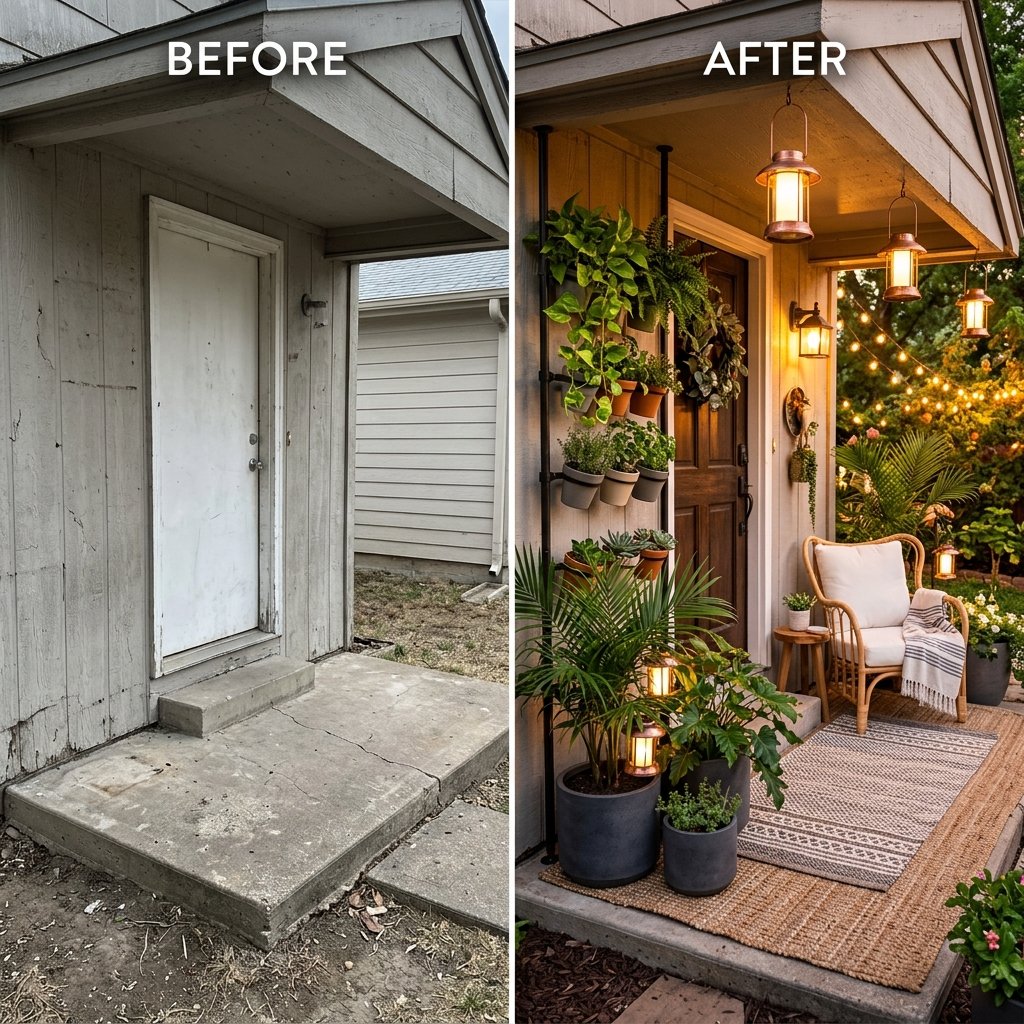

Welcome, frugal DIYers, handy upcyclers, and budget-savvy home stylists! If you are staring out your front window at a concrete slab no bigger than a postage stamp, you might think a luxurious outdoor oasis is entirely out of reach. But as crafty experts know, a small footprint is actually a massive advantage. Less square footage means you can completely overhaul the space for pennies on the dollar. You do not need a sprawling veranda to capture that five-star, high-end resort aesthetic; you just need a little resourcefulness, a few clever Dollar Tree hacks, and a weekend of rolling up your sleeves.
We are going to take that tiny, uninspired porch and turn it into a magnificent, welcoming retreat. By utilizing vertical space, upcycling cheap plastic into heavy faux-stone, and layering textures like a professional interior designer, we will trick the eye into seeing a grand entrance. Whether you are a handy parent looking to create a peaceful morning coffee spot, or a budget-conscious decorator wanting to boost your home’s curb appeal, these 7 foolproof styling tricks will deliver maximum impact for minimal cash.
Remember our frugal styling mantra: ‘Luxury is not about how much you spend; it is about how cleverly you disguise what you saved.’
Grab your work gloves, your favorite heavy-duty scissors, and a can of spray paint. It is time to build your zero-budget resort.
Trick 1: The Tension Rod Vertical Jungle
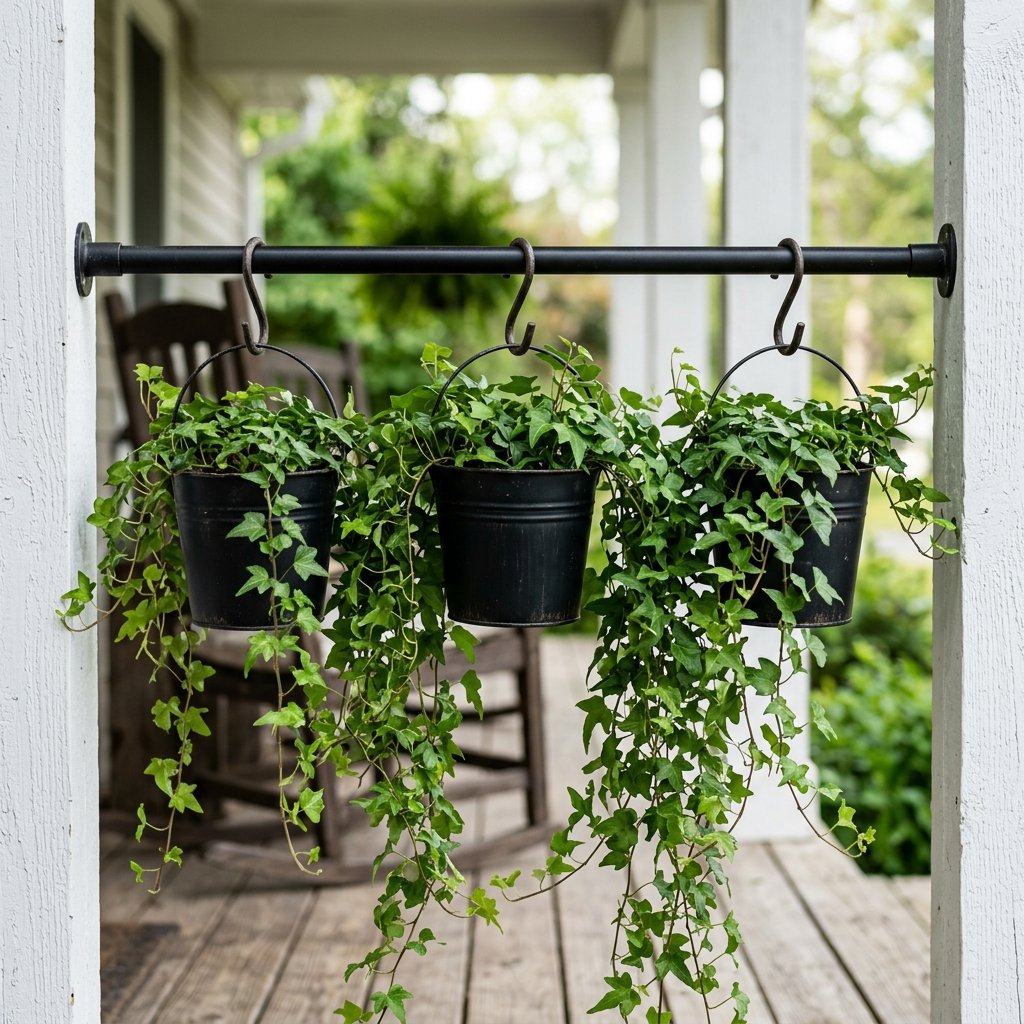
When you have zero floor space, you must look up. The biggest mistake people make with tiny porches is cluttering the ground with bulky plant stands. To get that lush, tropical resort feel without sacrificing your walking path, we are going to build a temporary, renter-friendly vertical garden using a simple household staple: the heavy-duty tension rod.
The Clever Mechanics
By wedging a sturdy shower tension rod between your porch pillars or the walls of your entryway alcove, you create an instant, floating hanging bar. From this bar, you can suspend trailing plants, lightweight Dollar Tree tin buckets, or macrame hangers. It draws the eye upward, making the porch feel twice as tall, and provides a gorgeous curtain of privacy greenery.
- Step 1: Measure the span between your porch walls or columns. Purchase a heavy-duty outdoor-rated tension rod (or a standard shower rod sprayed with rust-oleum clear coat).
- Step 2: Secure the rod tightly overhead. Give it a firm tug to ensure it can hold weight.
- Step 3: Take $1.25 plastic hanging planters or tin pails from the dollar store. If they look cheap, spray paint them matte black or oil-rubbed bronze.
- Step 4: Fill with lightweight potting mix and trailing plants like Pothos, Creeping Jenny, or budget-friendly faux ivy if you lack a green thumb.
- Step 5: Hang them using S-hooks or heavy-duty zip ties.
| Element | High-End Store Cost | Our Clever DIY Cost |
|---|---|---|
| Hanging Structure | $85.00 (Metal Trellis) | $12.00 (Tension Rod) |
| Planters (x3) | $45.00 (Ceramic) | $3.75 (Dollar Tree Tins) |
| Hanging Hardware | $15.00 (Chains) | $2.00 (S-Hooks/Zip Ties) |
| Total Investment | $145.00 | $17.75 |
Safety Note: Ensure your tension rod is rated for the weight of watered plants. If you live in a high-wind area, stick to lightweight faux greenery or secure the rod with small U-brackets for extra safety.
Trick 2: The Baking Soda Faux-Stone Planter Hack
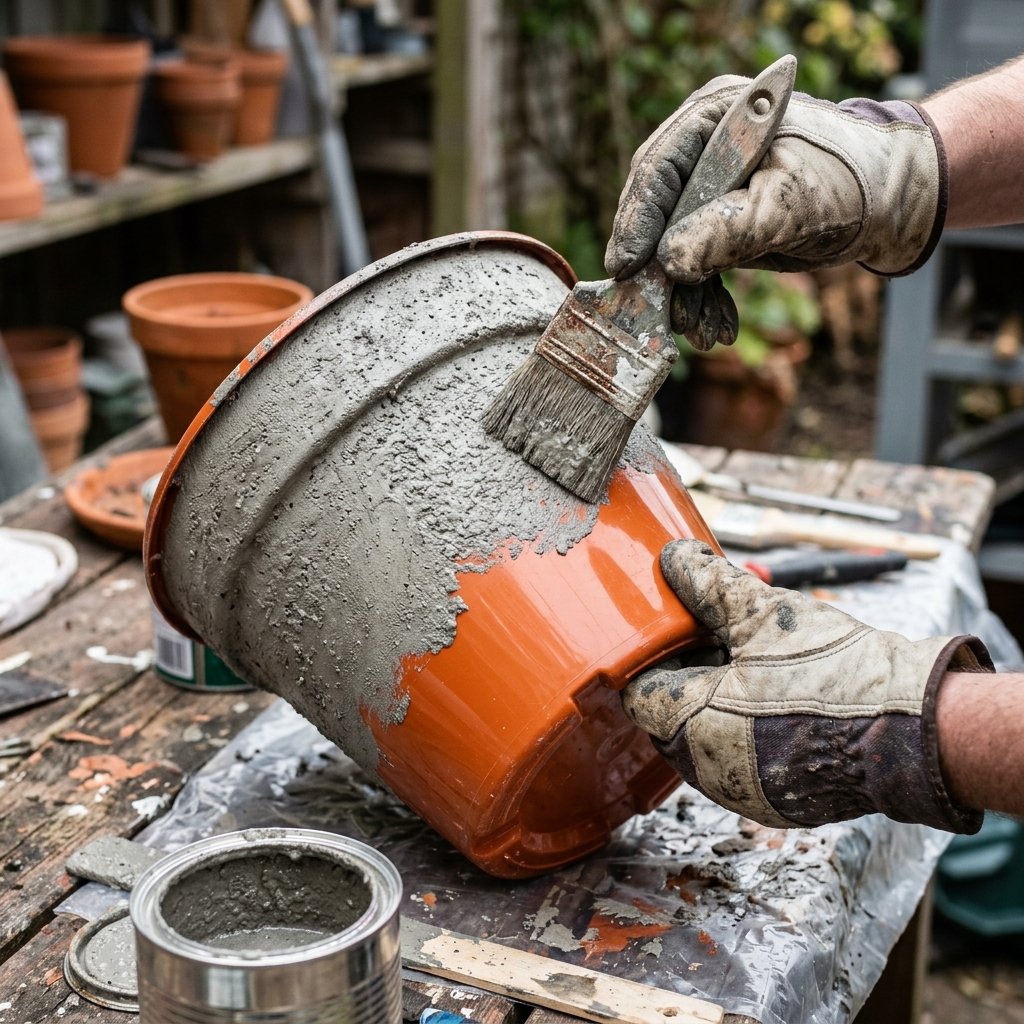
Nothing screams ‘luxury resort’ louder than massive, heavy concrete or stone planters flanking an entryway. However, real stone planters can cost upwards of $100 each and are a nightmare to move. As crafty upcyclers, we can perfectly replicate this rugged, masculine-elegant texture using cheap plastic pots and a box of baking soda from the kitchen pantry.
The Magic Texture Recipe
When you mix standard interior or exterior latex paint with baking soda, a chemical reaction occurs that thickens the paint into a gritty, cement-like paste. When applied with a stippling technique, it dries to look exactly like aged stone, terracotta, or concrete.
- Source the Blanks: Find large, cheap plastic planters. Dollar stores, thrift shops, or the clearance aisle at big box stores are perfect. The shape matters, not the color.
- Prep the Surface: Scuff the plastic with medium-grit sandpaper so the paint has something to grip. Wipe clean.
- Mix the Potion: In a disposable container, mix 1 cup of matte paint (gray, taupe, or terracotta) with 1/2 cup of baking soda. Stir until it reaches the consistency of thick frosting or pancake batter.
- Apply with Texture: Do not brush it on smoothly! Use a cheap chip brush to dab and stipple the mixture onto the planter. You want it to look rough, porous, and imperfect.
- Age the Stone (Optional): Once dry, take a slightly darker shade of paint, water it down heavily to create a ‘wash’, and brush it over the textured surface. Quickly wipe it back with a rag so the dark color only settles in the pits and grooves.
- Seal It: Spray with a matte exterior clear coat to protect your faux finish from the elements.
| Material | Measurement / Ratio | Purpose in Recipe |
|---|---|---|
| Matte Latex Paint | 2 Parts | Provides the base color and binding agent. |
| Baking Soda | 1 Part | Creates the gritty, porous, concrete texture. |
| Water (for wash) | 3 Parts Water : 1 Part Paint | Ages the piece, adding depth to the texture. |
This resourceful trick turns a flimsy $5 plastic pot into a piece that looks like it was excavated from an ancient Roman villa, instantly elevating your tiny porch’s pedigree.
Trick 3: The Anthropologie-Dupe Stenciled Coir Mat
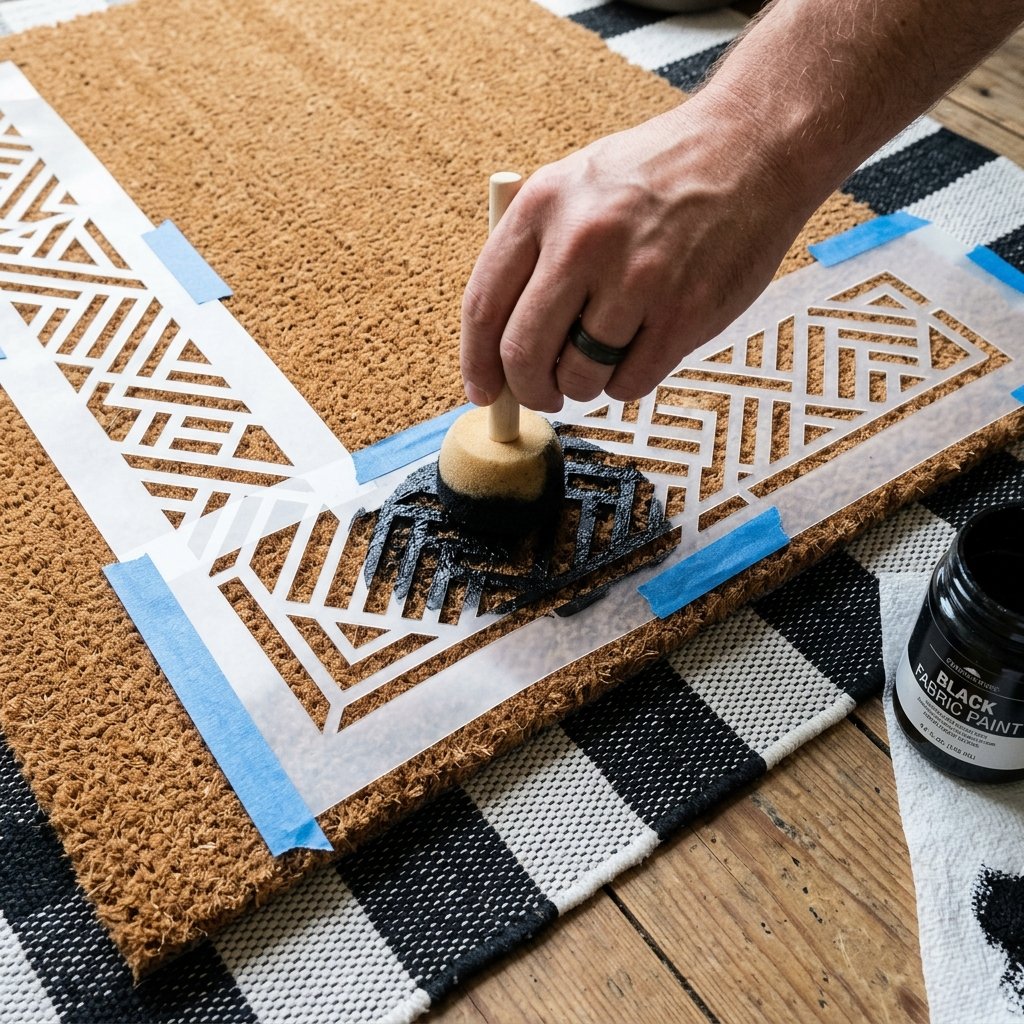
Your welcome mat is the literal threshold of your home’s first impression. Those witty, beautifully designed coir mats you see in high-end boutique catalogs are stunning, but dropping $40 to $60 on something you wipe your muddy boots on is the opposite of budget-savvy. Instead, we are going to craft a custom, high-end dupe using a blank mat and some clever stenciling.
Crafting the Custom Welcome
You can find plain, blank coir mats at big box hardware stores for around $10. With a little outdoor acrylic paint and a stencil, you can personalize it to look incredibly chic.
- Design Your Stencil: If you have a digital cutting machine (like a Cricut), cut your favorite welcoming phrase or a sophisticated geometric border out of freezer paper or vinyl. If you are going old-school, print your design on cardstock and carefully cut it out with a craft knife.
- Secure and Tape: Center your stencil on the blank mat. Use sewing pins or heavy-duty masking tape to hold it completely flat. Coir is highly textured, so ensuring the stencil is flush is critical to prevent paint bleeding.
- The Pouncing Technique: Do not use standard brush strokes! Dip a stiff stencil brush or a round sponge into outdoor black acrylic paint. Dab off the excess on a paper towel. Firmly ‘pounce’ (stamp straight up and down) over the stencil.
- Seal for Durability: Once the paint is completely dry (wait at least 24 hours), spray the entire mat with a UV-resistant clear acrylic sealer. This stops the sun from fading your hard work and keeps the bristles intact.
| Style Approach | Store-Bought Price | DIY Frugal Cost |
|---|---|---|
| Trendy Typography Mat | $45.00 | $12.00 |
| Geometric Border Mat | $55.00 | $13.00 |
| Custom Monogram Mat | $60.00 | $12.50 |
Pro Tip: To make the mat look even more expensive, layer it! Place your newly stenciled coir mat on top of a slightly larger, black-and-white striped woven cotton rug. This ‘layered look’ is a staple of luxury resort styling.
Trick 4: Resort-Style Ambient Solar Lanterns
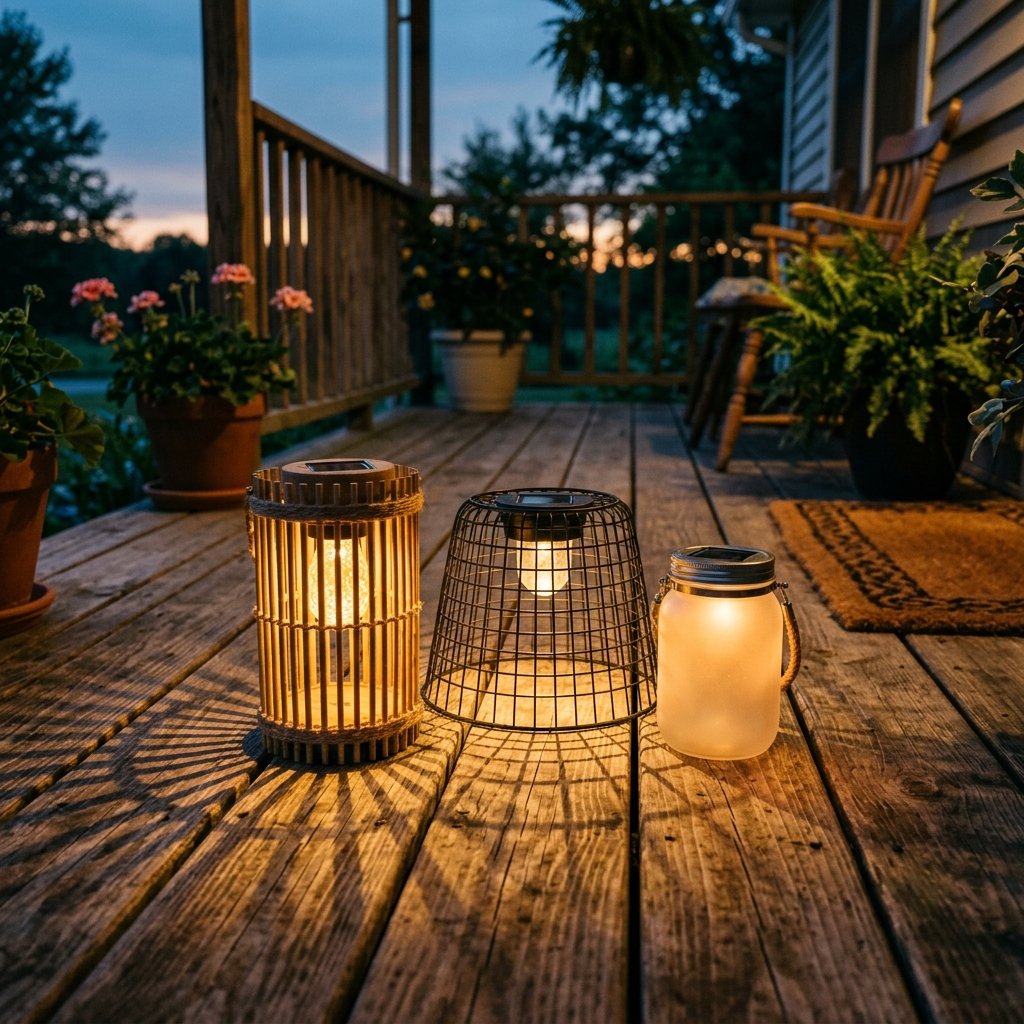
Harsh overhead porch lights kill the resort vibe instantly. Luxury spaces rely on warm, ambient, layered lighting. But if you don’t have outdoor outlets, you might feel stuck. The solution? Hacking cheap Dollar Tree solar path lights into gorgeous, high-end floor lanterns.
The Dollar Tree Lantern Hack
We are going to take the functional tops of cheap solar lights and mount them inside upcycled materials to cast beautiful, geometric shadows across your tiny porch at night.
- The Bamboo Skewer Lantern: Take two wooden embroidery hoops of the same size. Cut wooden bamboo skewers to your desired lantern height. Use wood glue and a hot glue gun to attach the skewers vertically between the two hoops, spacing them evenly. Spray paint the entire structure matte black or a rich wood stain. Pop the top off a $1.25 solar path light and glue it flush into the top hoop.
- The Wire Basket Hack: Go to the dollar store organization aisle and buy a matte black wire trash can or fruit basket. Flip it upside down. Weave a piece of twine or rugged leather cord around the base (now the top) for a masculine, rustic touch. Rest a solar light top securely in the center.
- The Frosted Glass Glow: Take a large glass jar (upcycled pickle jars work perfectly!). Spray the outside with frosted glass spray paint. Place a solar light top inside the lid ring and screw it on. It creates a soft, diffused, glowing orb.
| DIY Lantern Type | Materials Needed | Estimated Cost per Lantern |
|---|---|---|
| Bamboo Skewer | Embroidery hoops, skewers, solar light, glue | $4.50 |
| Wire Basket | Wire basket, leather cord, solar light | $3.00 |
| Frosted Orb | Upcycled jar, frosting spray, solar light | $2.50 |
Group these in clusters of three (varying heights) in the corner of your porch. When the sun goes down, they will automatically illuminate, casting expensive-looking, moody shadows without adding a single cent to your electric bill.
Trick 5: The Space-Saving Storage Ottoman (Milk Crate Upcycle)
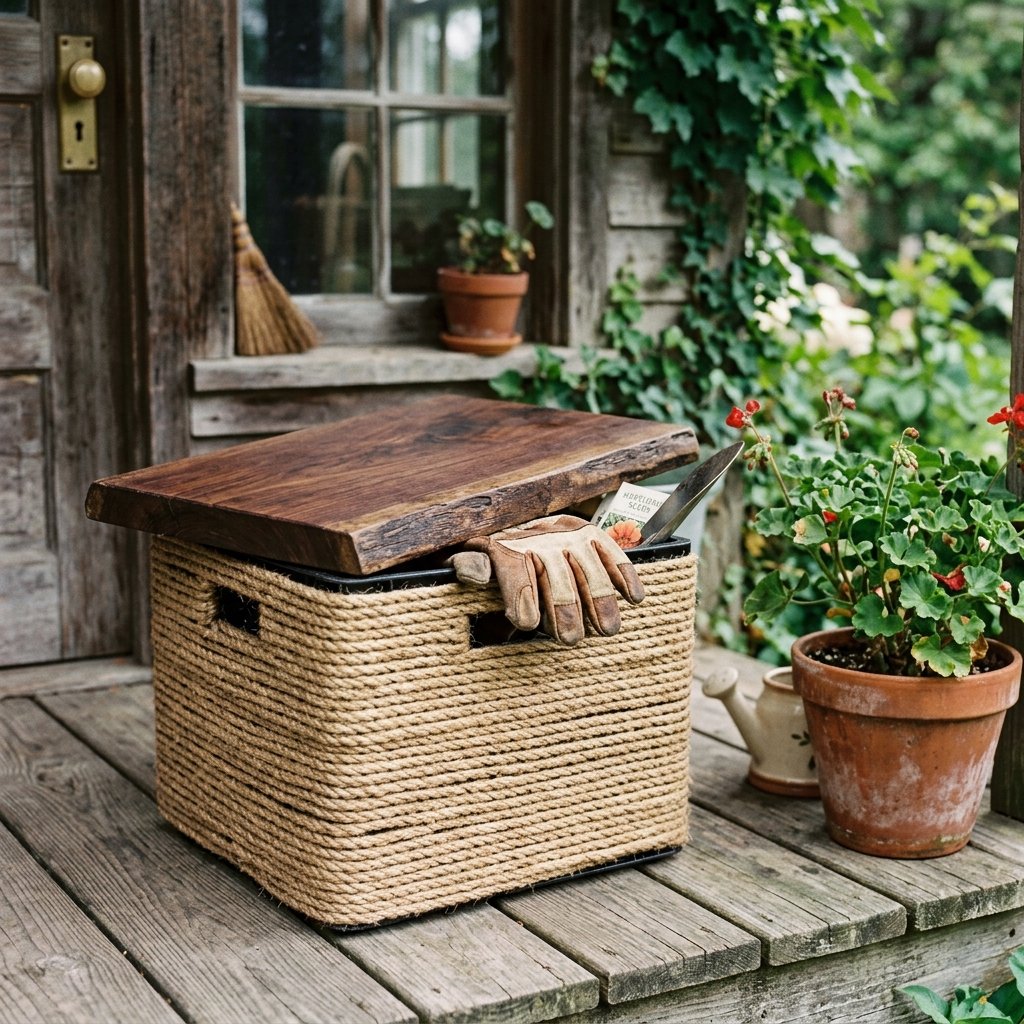
A luxury resort always offers a place to sit, take off your shoes, and sip a beverage. But on a tiny porch, a full-sized chair might block the door. We need seating that is compact, dual-purpose, and ruggedly stylish. Enter the upcycled milk crate storage ottoman.
Building Practical, Masculine-Elegant Seating
We are going to transform a standard, heavy-duty plastic milk crate (often found for free or thrifted for a few dollars) into a rustic, wood-topped seating cube that doubles as storage for your gardening gloves or outdoor cushions.
- Step 1: Wrap the Crate. To hide the plastic, wrap the exterior of the crate in thick jute rope or outdoor-rated faux leather strapping. Use a hot glue gun to secure the rope, wrapping tightly row by row from the bottom to the top edge. This gives it a nautical, high-end textured look.
- Step 2: Cut the Seat Board. Measure the top opening of your crate. Cut a piece of scrap 3/4-inch plywood to fit exactly over the top, with a slight overhang.
- Step 3: Upholster or Stain. You have two choices for the lid. For a rugged, masculine look, sand the wood smooth, apply a dark walnut stain, and seal it with polyurethane. For a plush look, staple a piece of high-density foam and outdoor canvas fabric over the board.
- Step 4: Add Cleats. To stop the lid from sliding off when you sit, screw two small strips of scrap wood (cleats) to the underside of the lid so they fit snugly inside the crate’s opening.
| Step | Material | Frugal Sourcing Tip |
|---|---|---|
| Base | Plastic Milk Crate | Ask local grocery stores or check thrift shops. |
| Wrapping | Jute Rope / Twine | Dollar Tree automotive or craft aisle. |
| Lid | Scrap Plywood | Hardware store off-cut bins (usually under $2). |
| Finish | Stain or Canvas | Leftover project supplies or drop cloth scraps. |
You now have a custom, textured ottoman that takes up a mere 13×13 inches of floor space, provides sturdy seating, and hides your porch clutter. Resourcefully creative, perfectly practical.
Trick 6: The Custom Painted Drop Cloth Rug
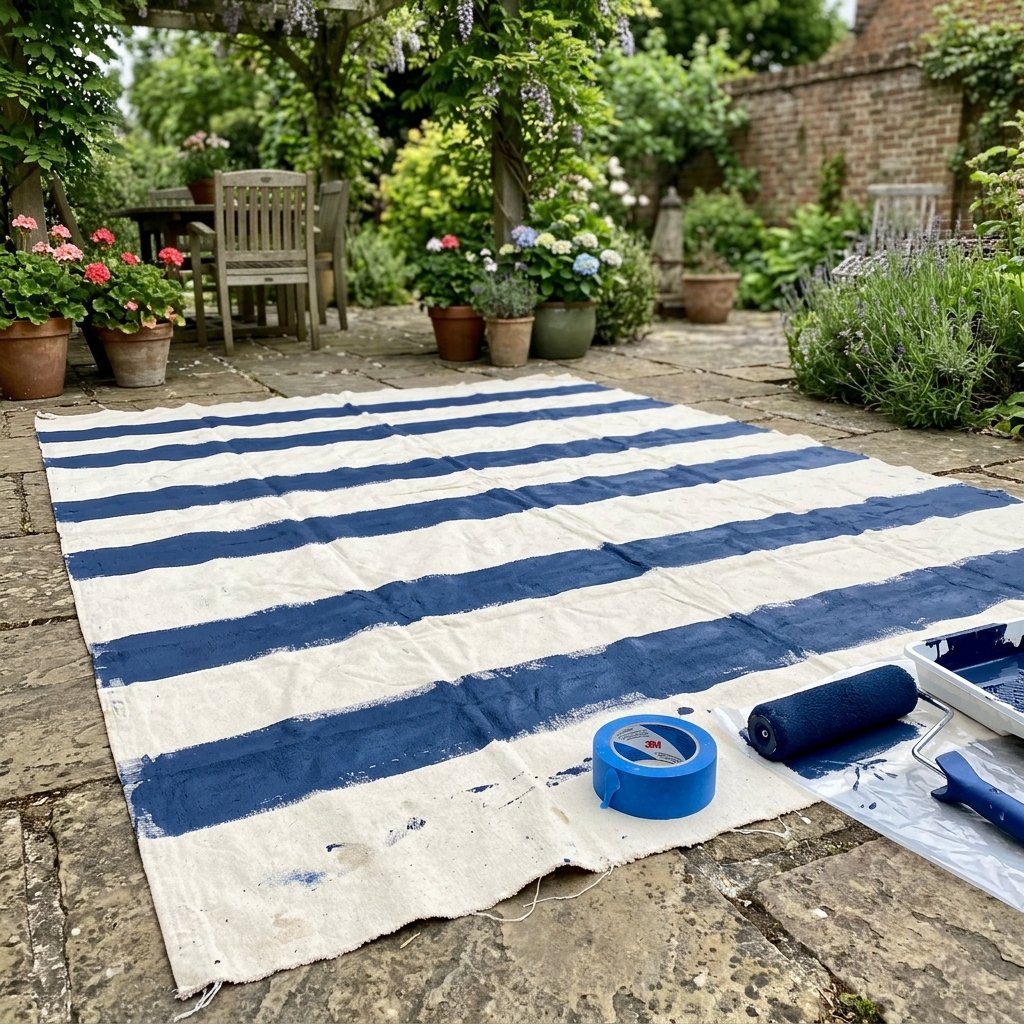
Outdoor rugs anchor a space, defining the ‘room’ and covering up ugly, stained concrete. However, large outdoor rugs are notoriously expensive. If you have a budget of zero, you can create a custom, heavy-duty outdoor rug using a canvas painter’s drop cloth and some leftover porch paint.
The Drop Cloth Transformation
Canvas drop cloths are woven tightly to stop paint drips, making them incredibly durable and perfect for outdoor foot traffic. They have a natural, oatmeal-linen color that looks exactly like high-end organic textiles.
- Prep the Canvas: Purchase a 4×5 or 6×9 canvas drop cloth (around $10-$15 at the hardware store). Wash it in hot water and dry it on high heat to pre-shrink the fibers and soften the fabric. Iron out any heavy wrinkles.
- Tape the Design: Lay the canvas flat on a driveway or garage floor. Use painter’s tape to map out a design. Wide stripes, a large buffalo check, or a simple crisp border all look incredibly chic and resort-like. Ensure the tape is pressed down firmly.
- Paint the Fibers: Use exterior porch and floor paint (or standard latex paint mixed with a fabric medium). Roll or brush the paint over your taped design. The canvas will soak up the paint, which is exactly what you want—it dyes the fibers rather than just sitting on top.
- Peel and Seal: Remove the tape while the paint is still slightly tacky to get crisp lines. Once completely dry (wait 48 hours), spray the entire rug generously with an outdoor fabric waterproofing spray like Scotchgard.
| Rug Type | Retail Price | Drop Cloth DIY Cost |
|---|---|---|
| Striped Outdoor Rug (5×7) | $120.00 | $18.00 |
| Geometric Patio Rug (5×7) | $150.00 | $20.00 |
Frugal Maintenance Tip: Because it is canvas, at the end of the season, you can literally throw this rug into your washing machine on a gentle cycle, re-apply waterproofing spray, and it is good as new for next year!
Trick 7: Modern Floating Address Plaque & Hardware Glow-Up
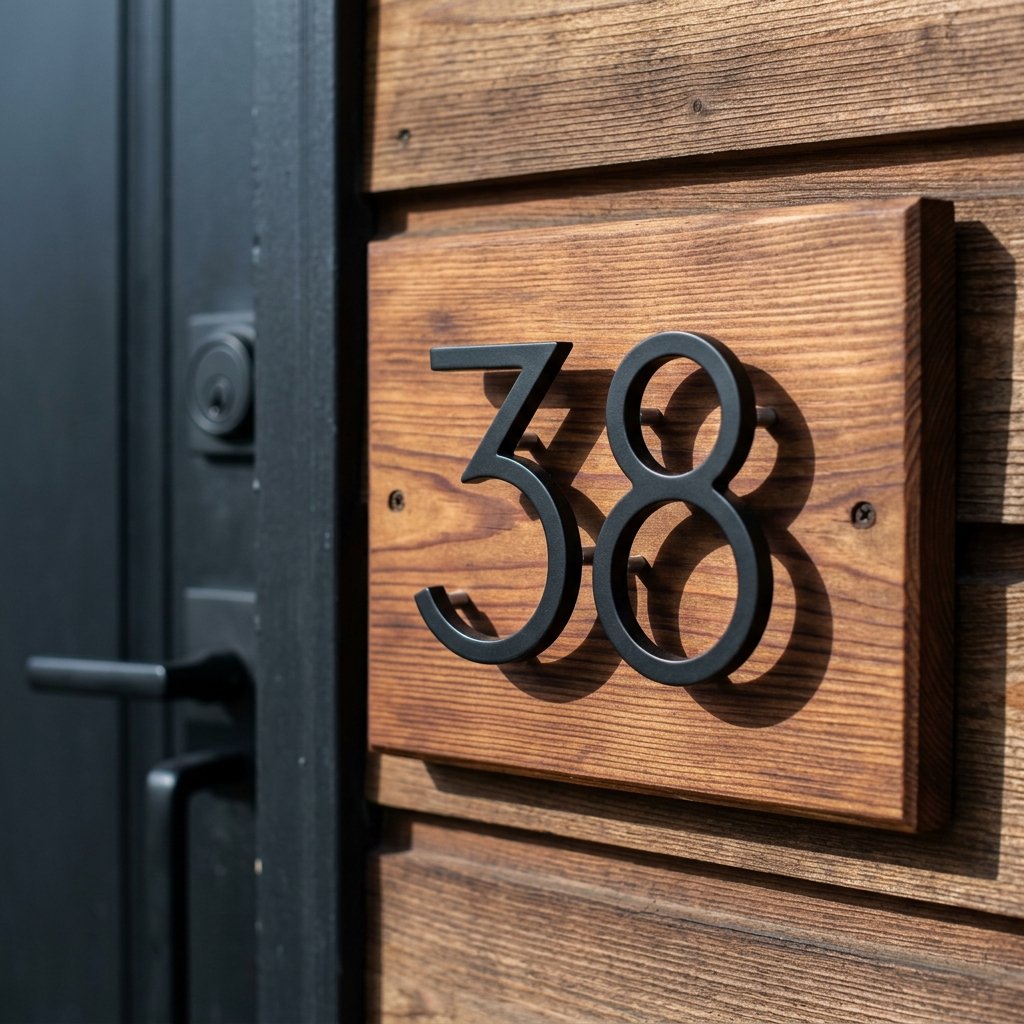
The final touch that separates a neglected porch from a luxury resort entrance is the hardware. Faded, brassy 1990s house numbers and a rusty door handle ruin the illusion of high-end styling. We are going to execute a rugged, modern hardware glow-up using scrap wood and a single can of matte black spray paint.
The Hardware Refresh
Instead of spending $150 on a new smart-handle and matching lighting fixtures, simply unscrew your current hardware. Lightly sand them, clean with degreaser, and hit them with two coats of Rust-Oleum Matte Black or Oil-Rubbed Bronze spray paint. This instantly modernizes the space.
The Floating Address Plaque
To give your house numbers that expensive, architectural look, we will build a custom wooden plaque with a ‘floating’ number effect.
- The Backing Board: Cut a piece of scrap wood (cedar fence pickets work beautifully and cost about $2 each). Sand the edges and apply a rich, warm weather-resistant stain to bring out the wood grain.
- The Floating Trick: Purchase inexpensive metal house numbers. Instead of screwing them flush against the wood, thread two small metal nuts or nylon spacers onto the back of each screw before you drill them into the wood.
- The Result: The spacers hold the numbers about half an inch away from the wood surface. When the sun hits them, they cast a sharp, 3D shadow against the wood, mimicking the custom signage you see at boutique hotels.
- Mounting: Attach a sawtooth hanger to the back and hang it proudly next to your freshly painted door hardware.
| Hardware Element | Replacement Cost | Spray Paint/DIY Cost |
|---|---|---|
| Door Handle & Lockset | $85.00 | $1.50 (Fraction of spray can) |
| Wall Sconce Light | $60.00 | $1.50 (Fraction of spray can) |
| Modern Address Plaque | $75.00 | $8.00 (Wood + Cheap Numbers) |
| Total Savings | $220.00 | $11.00 |
This final detail is the bow on the package. It tells guests (and yourself) that this home is cared for, intentionally styled, and rich in character.
Conclusion
Transforming a tiny, uninspiring front porch into a luxury resort oasis does not require a contractor, a massive budget, or a lot of square footage. As frugal DIYers and resourceful upcyclers, we know that the magic lies in the details. By utilizing vertical space with a tension rod, creating heavy-duty textures with baking soda, hacking dollar store solar lights, and giving old hardware a fresh coat of paint, you have completely rewritten the narrative of your entryway.
You have proven that with a little elbow grease, some crafty ingenuity, and a few budget-savvy tricks, you can create a high-end, welcoming retreat right outside your front door. So pour yourself a cup of coffee, sit down on your custom milk-crate ottoman, bask in the warm glow of your ambient solar lanterns, and enjoy the five-star view. You built this luxury resort with your own two hands, and that is the best upgrade of all.

Makenzie is the founder and lead writer at MoneyHackTips.com — a personal finance blog dedicated to delivering street-smart financial wisdom for real people on real budgets. With 300+ published articles covering everything from debt management to investing fundamentals, Makenzie’s mission is to make every dollar work harder. When not writing about money hacks, Makenzie is testing frugal living strategies, optimizing side hustles, and helping readers build financial freedom from scratch.