
The Art of High-End Upcycling on a Shoestring Budget
Let us set the scene: You are flipping through the latest Pottery Barn catalog, sipping your morning coffee, and admiring a stunning artisan-crafted stone vase, a perfectly weathered oak console table, and a chunky, textural linen armchair. It is a ruggedly elegant, perfectly curated dream. Then, you glance at the price tags. $299 for a vase? $1,200 for a console? $850 for an accent chair? Suddenly, that coffee tastes a little bitter. But what if I told you that you could recreate that exact high-end, catalog-perfect look for literal pennies using items rescued from the dusty shelves of your local thrift store?
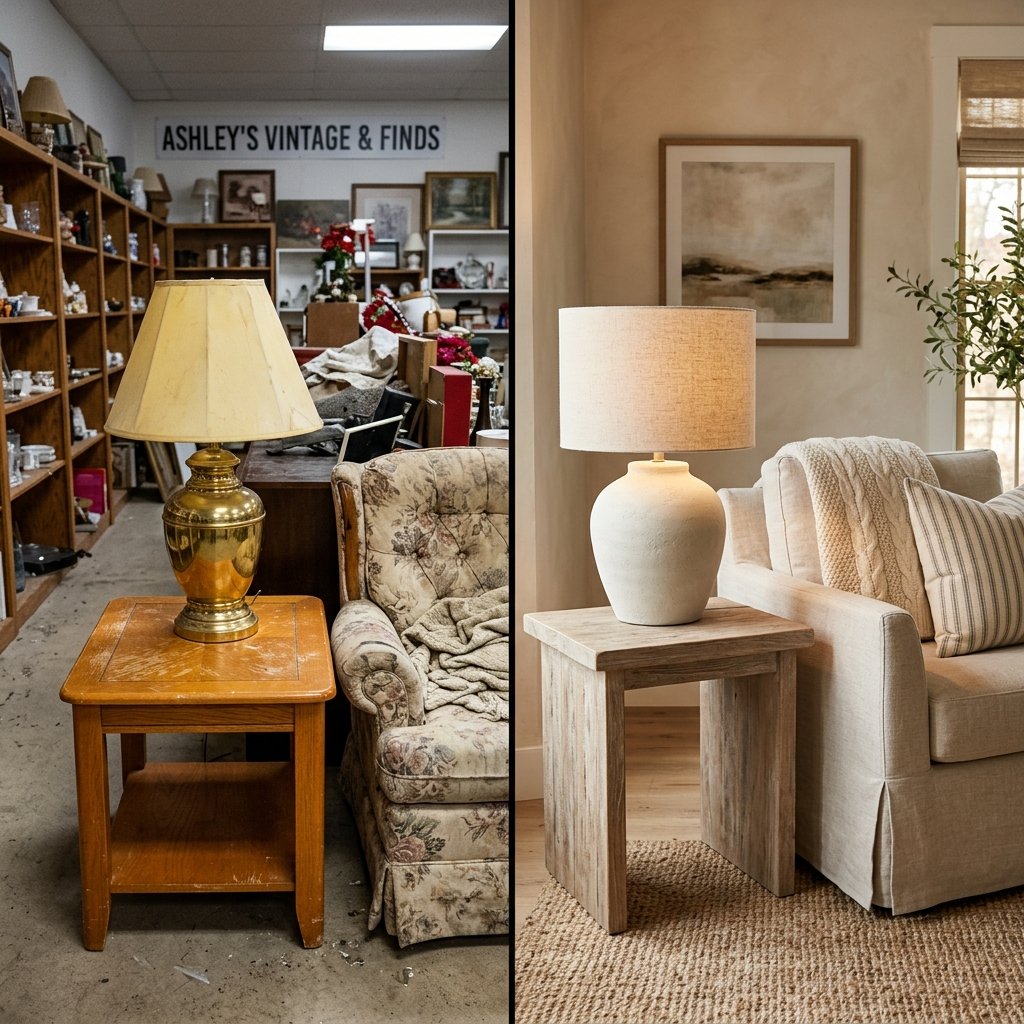
Welcome to the ultimate frugal DIYer’s masterclass in high-end upcycling. We are not just slapping a coat of cheap craft paint on a mason jar and calling it a day. We are talking about transformational, jaw-dropping, texture-rich makeovers that will fool your most discerning, label-conscious guests. As resourceful crafters, handy upcyclers, and budget-savvy home decorators, we possess a superpower: the ability to look past the ugly, outdated, 1990s floral patterns and shiny brass finishes to see the structural potential beneath.
In this comprehensive guide, we are diving deep into 10 shocking thrift store makeovers. We will utilize clever techniques like the legendary baking soda paint trick, canvas drop-cloth upholstery, joint compound plastering, and chemical wood bleaching. You will learn how to mimic the look of aged brass, artisan ceramics, and weathered reclaimed wood using materials that cost less than a fast-food lunch. Roll up your sleeves, grab your sandpaper, and prepare to turn trash into absolute treasure.
“The difference between a thrift store reject and a high-end luxury piece isn’t the price tag—it’s the vision, the texture, and about $4 worth of supplies.”
The Master Sourcing Strategy: How to Thrift Like a Pro Designer
Seeing Past the Ugly
Before we dive into the specific makeovers, we must establish the ground rules of high-end thrifting. When you walk into a Goodwill, Salvation Army, or local charity shop, you are going to be bombarded with visual noise. Your brain will naturally want to reject the scuffed laminate, the terrifying floral fabrics, and the sheer volume of 1980s shiny plastic. To curate a Pottery Barn aesthetic on a zero-based budget, you must train your eye to look exclusively at shape, silhouette, and structural integrity.
When hunting for your blank canvases, ignore the color completely. Ignore the hideous shade of mustard yellow on that ceramic lamp. Instead, ask yourself: Does this lamp have a substantial, heavy base? Is the silhouette classic? If the answer is yes, you can fix the finish for $2. When looking at furniture, check for solid wood construction, dovetail joints, and sturdy legs. A wobbly, particle-board side table is not worth your time, but an ugly, scratched-up solid oak piece from 1995 is an absolute goldmine.
The Frugal Upcycler’s Toolkit
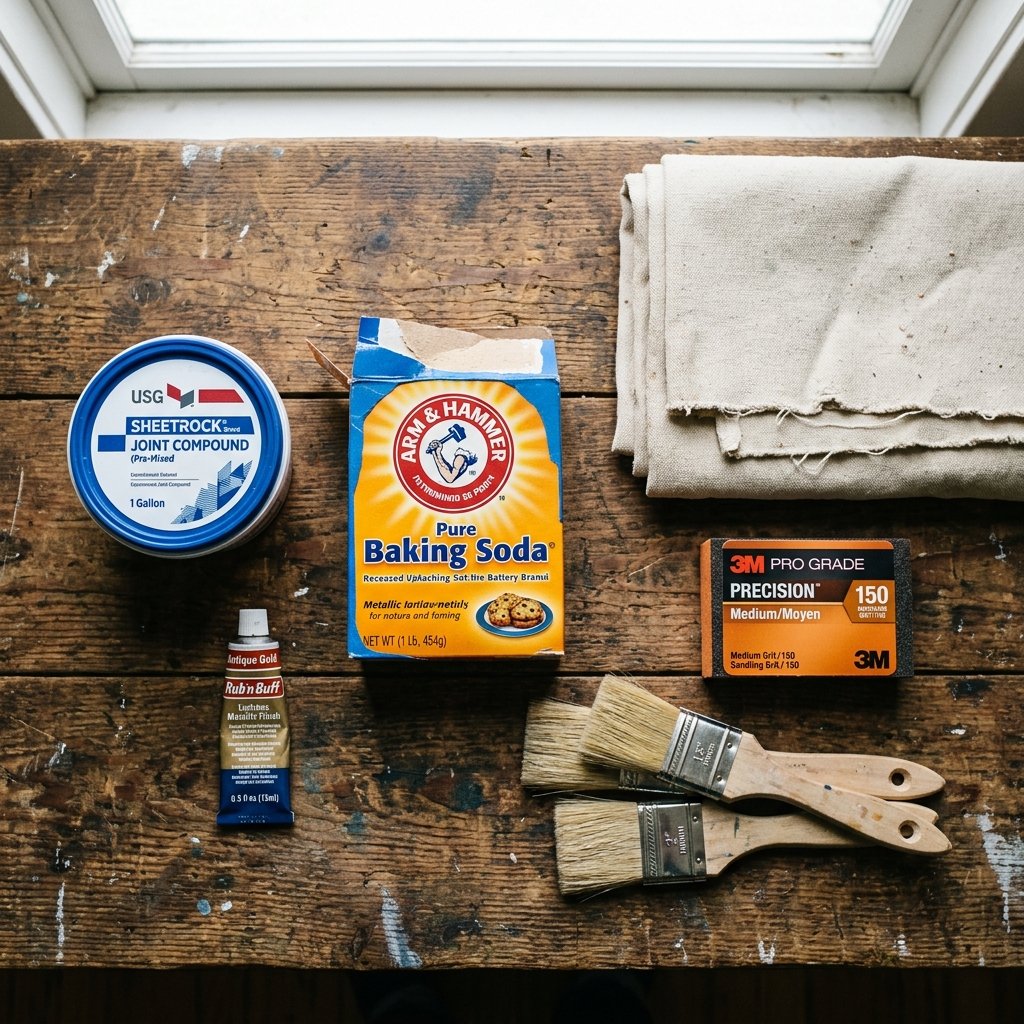
To execute these makeovers, you will need a small arsenal of budget-friendly supplies. Keep these on hand, and you will be ready to tackle any project that comes your way:
- Baking Soda: The ultimate texturizing agent for paint.
- Joint Compound (Spackle): For creating faux plaster and stone finishes.
- Matte Mod Podge: For sealing and decoupaging.
- Rub ‘n Buff: A wax-based metallic finish that turns plastic into aged brass.
- Canvas Drop Cloths: The cheapest, most durable faux linen available.
- A Good Sanding Sponge: Specifically in 120-grit and 220-grit.
| Essential Supply | Thrift / Hardware Cost | Potential Savings vs. Store-Bought Decor |
|---|---|---|
| Box of Baking Soda | $1.00 | Saves $150+ on artisan vases |
| Canvas Drop Cloth (9×12) | $14.00 | Saves $800+ on linen upholstery |
| Rub ‘n Buff (Antique Gold) | $6.00 | Saves $200+ on vintage mirrors |
| Tub of Joint Compound | $8.00 | Saves $300+ on plaster lamps |
Makeover 1: The Faux Terracotta Artisan Stone Vase
From Dollar-Bin Glass to Hand-Thrown Ceramic
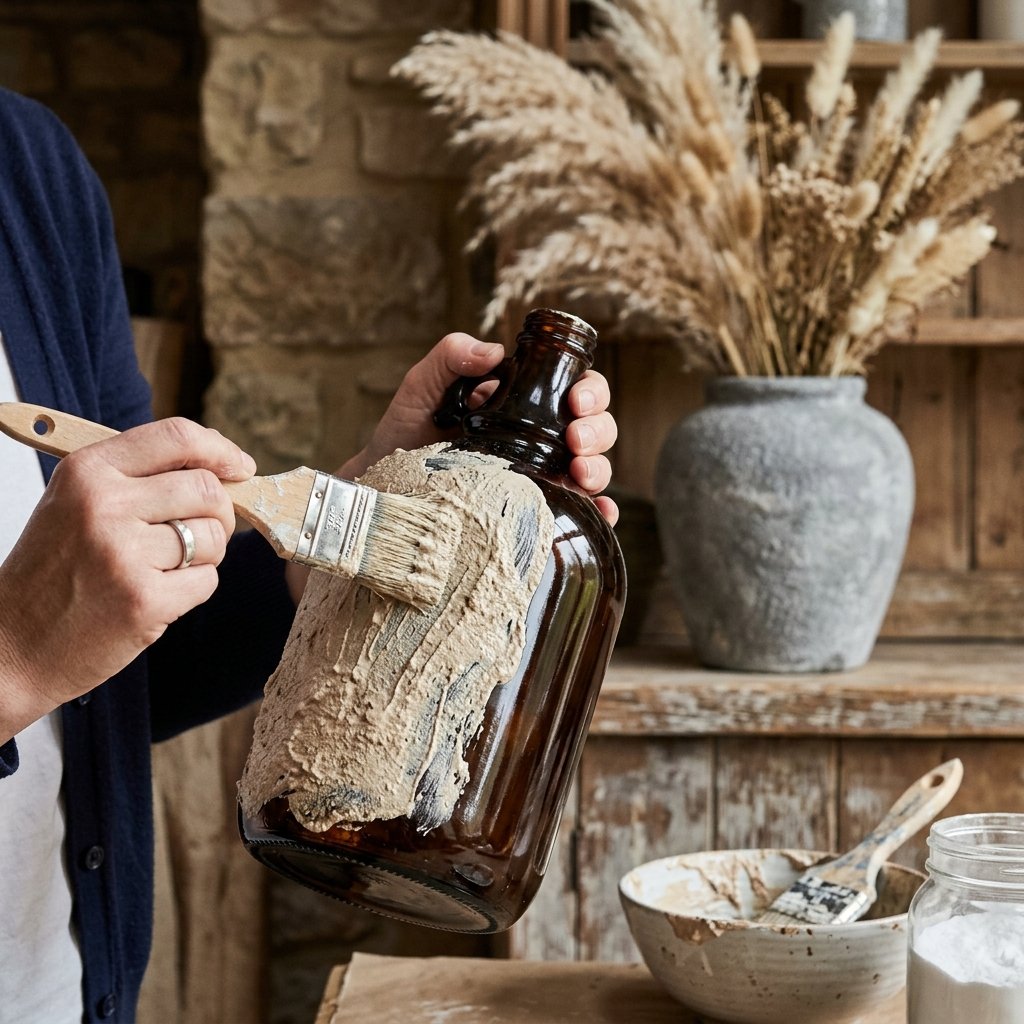
Pottery Barn is famous for its massive, heavy, artisan-crafted stone and terracotta vases. They look like they were excavated from an ancient Roman villa and carry a price tag to match, often retailing for upwards of $150 to $300. Our version? We are going to achieve this exact look for about $4 using the legendary baking soda paint trick.
First, head to the thrift store and find the largest, most obnoxiously shaped glass or cheap glazed ceramic vase you can find. Look for jugs with handles, large urns, or wide-mouthed cylinders. The uglier the painted motif on the outside, the better—because it usually means it’s priced at $1.99.
The Baking Soda Paint Formula
The secret to turning sleek, shiny glass into porous, ancient stone is adding texture to your paint. You will need a base color (a warm beige, muted terracotta, or charcoal gray acrylic or latex paint) and standard baking soda.
- Clean the Vase: Wipe down your thrifted vase with rubbing alcohol to remove decades of grease and thrift-store grime. This ensures maximum paint adhesion.
- Mix the Magic Potion: In a disposable cup, mix your paint and baking soda. The ideal ratio is roughly 1 cup of paint to 1/4 cup of baking soda. Stir vigorously until the mixture fluffs up into a thick, mousse-like consistency.
- Apply the First Coat: Using a cheap, stiff-bristled brush, apply the paint to the vase. Do not use smooth strokes! Instead, use a stippling (dabbing) motion to build up a chunky, uneven texture. Let this dry completely for 1 hour.
- Apply the Second Coat: Add another layer using the same stippling technique. If you want an even more aged look, mix a slightly darker shade of paint for the second coat to create depth.
- The Mud Rub (Optional but highly recommended): Once completely dry, take a damp paper towel, dip it in a tiny bit of dark brown wax or heavily diluted brown paint, and rub it into the crevices of your textured vase. This mimics centuries of accumulated dirt and ages the piece beautifully.
“Safety Note: When sanding or dusting off dried baking soda paint, wear a basic dust mask. You don’t want to inhale fine particulate dust, even if it’s just baking soda and acrylic!”
| Item | Pottery Barn Artisan Vase | Our Thrifted DIY Vase |
|---|---|---|
| Base Vessel | Included | $2.50 (Thrifted) |
| Textured Finish | Hand-thrown clay | $1.50 (Paint + Baking Soda) |
| Total Cost | $199.00 | $4.00 |
| Savings | – | $195.00 (98% Savings) |
Makeover 2: The Weathered Wood Console Table

Banishing the 1990s Orange Oak
Nothing screams “dated thrift store furniture” quite like the glossy, orange-tinted oak finish that dominated the 1990s. However, beneath that terrible polyurethane shell lies beautiful, solid, raw wood just begging to be released. High-end retailers sell “reclaimed weathered oak” console tables for $800 to $1,500. We are going to achieve that rugged, coastal-farmhouse look by chemically stripping and bleaching a thrifted piece.
Find a solid wood console, end table, or coffee table. Crucial tip: Ensure it is actually solid wood and not wood veneer over particle board. If you sand too hard on veneer, you will burn right through it to the manufactured sawdust underneath.
The Bleaching and Whitewashing Process
This process is highly rewarding but requires some elbow grease and patience. The goal is to strip the old finish, remove the orange tannins from the wood, and apply a subtle whitewash to settle into the wood grain.
- Strip the Finish: Apply a heavy-duty chemical stripper (like CitriStrip) generously over the entire piece using a cheap chip brush. Let it sit for 30 to 45 minutes until the old finish bubbles up. Scrape it off with a plastic putty knife.
- Sand it Bare: Once the bulk of the finish is gone, use an orbital sander with 80-grit sandpaper to remove the remaining stain. Follow up with 120-grit, and finish with 220-grit for a buttery smooth surface.
- Bleach the Wood: This is the secret weapon. If the raw wood still looks too orange or red, brush on household bleach (or a two-part wood bleach for stubborn stains). Let it sit in the sun for 4 hours. The UV rays combined with the bleach will pull the orange tones out, leaving a beautiful, pale, driftwood color. Neutralize the bleach by wiping the piece down with a 50/50 mix of white vinegar and water.
- Apply a Whitewash: Mix 1 part white water-based paint with 3 parts water. Brush this thin wash over the raw wood, working in small sections, and immediately wipe it off with a clean rag. The white pigment will catch in the deep grain of the oak, giving it that signature Pottery Barn cerused look.
- Seal with Matte Polycrylic: Protect your hard work with three thin coats of a water-based, matte finish polycrylic. Do not use oil-based polyurethane, as it will amber and turn your piece yellow over time!
“Safety Note: Chemical strippers and wood bleach emit strong fumes. Always work in a well-ventilated area, preferably outdoors, and wear heavy-duty chemical-resistant gloves and safety goggles.”
| Step | Time Required | Tool / Material Used |
|---|---|---|
| Chemical Stripping | 1 Hour | CitriStrip, Plastic Scraper, Gloves |
| Orbital Sanding | 1.5 Hours | 80, 120, and 220 Grit Sandpaper |
| Wood Bleaching | 4 Hours (Drying) | Household Bleach, Sun Exposure |
| Whitewash & Seal | 2 Hours | Diluted White Paint, Matte Polycrylic |
Makeover 3: The Wabi-Sabi Plaster Table Lamp

Turning 1980s Brass into Modern Masterpieces
If you have ever browsed a thrift store, you have seen them: the shiny, lacquered brass lamps from the 1980s and 90s. They are heavy, they have great structural curves, but the finish is incredibly dated. High-end home stores are currently obsessed with textured, matte plaster lamps that look like they were sculpted by hand in a Mediterranean villa. These retail for $250 to $400 each. We are going to transform that $5 brass atrocity using a tub of standard drywall joint compound.
The Plaster Application Technique
This is perhaps the most fun, tactile, and creatively liberating project on this list. You do not need to be neat; in fact, the messier and more organic your application, the better the final result will look.
- Prep the Surface: Remove the old lampshade and harp. Tape off the socket and cord with painter’s tape. Sand the shiny brass surface lightly with 120-grit sandpaper to give it some “tooth,” then wipe it clean.
- Apply a Primer: Spray the entire lamp base with a high-adhesion bonding primer (like Kilz or Zinsser). This step is non-negotiable; joint compound will slide right off slick, unprimed brass. Let it dry for 1 hour.
- Slather on the Plaster: Open your tub of pre-mixed joint compound. Using your hands (wear latex gloves!) or a plastic putty knife, smear the compound all over the lamp base. Slap it on, swirl it around, and leave thick, intentional ridges. You want it to look like imperfect, hand-molded clay.
- Let it Cure: This is the hardest part. You must let the joint compound dry completely. Depending on how thick you applied it, this can take anywhere from 24 to 48 hours. It will turn from a wet gray to a stark, chalky white when fully dry.
- Sand and Refine: Once dry, take a sanding sponge and lightly knock down any incredibly sharp peaks or completely unnatural-looking globs. You want a smooth, undulating texture.
- Paint and Seal: Paint the lamp with a matte ceramic-look paint or a simple flat white or beige latex paint. Finally, seal it with a spray-on matte clear coat so the plaster doesn’t chip if bumped.
“Pro Tip: To upgrade the look even further, throw away the cheap, pleated thrift store lampshade and replace it with a crisp, linen drum shade. The contrast between the rough plaster base and the tailored linen shade screams luxury.”
| Material | Purpose | Estimated Cost |
|---|---|---|
| Thrifted Brass Lamp | The heavy, structural base | $5.00 |
| Bonding Primer Spray | Ensures plaster adhesion | $6.00 |
| Pre-Mixed Joint Compound | Creates the faux-plaster texture | $7.00 |
| Matte Sealer Spray | Protects against chipping | $5.00 |
| Total DIY Cost | – | $23.00 (vs $300 Retail) |
Makeover 4: The Rustic Linen Slipcovered Armchair
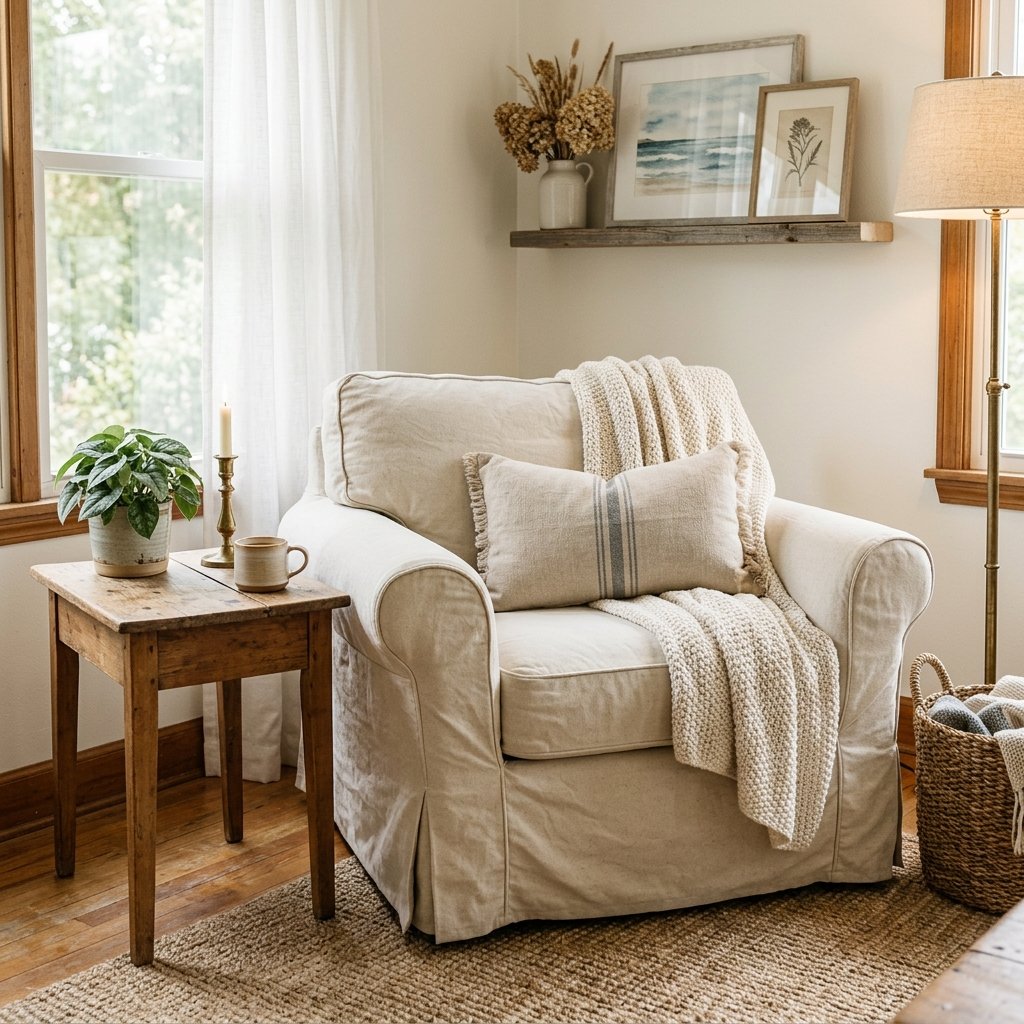
Upholstery on a Dime: The Drop Cloth Secret
Let’s talk about the holy grail of thrift store finds: the sturdy, comfortable, but hideously upholstered armchair. Reupholstering a chair professionally can cost upwards of $500 in labor alone, not including the fabric. High-end linen slipcovered chairs retail for $1,000+. But what if you could create a custom, tailored, washable linen slipcover for about $20? Enter the ultimate frugal upcycler’s secret weapon: the canvas drop cloth.
Hardware store canvas drop cloths are made of 100% cotton, feature a beautiful, rugged weave that looks exactly like heavy Belgian linen, and cost a fraction of the price of fabric-store yardage.
Bleaching and Sewing the Faux Linen
Before you even think about cutting the fabric, you must prep the drop cloth to soften it and remove the stiff, industrial sizing.
- The Bleach Bath: Place your 9×12 drop cloth in the washing machine. Add 4 cups of liquid bleach and run it on the hottest, longest cycle available. This strips the gray/yellow industrial tint and turns the canvas into a beautiful, creamy oatmeal color.
- The Softening Wash: Run the drop cloth through the wash a second time using regular detergent and a massive dose of fabric softener. Dry it on high heat. It will emerge incredibly soft, pliable, and perfectly shrunk (so your final slipcover won’t shrink later).
- Draping and Pinning: Drape the large piece of canvas over your thrifted chair inside out. Tuck the fabric deeply into the seat crevices. Using heavy-duty upholstery pins, begin pinning the fabric together along the natural seams of the chair (the arms, the backrest, the skirt). You are essentially creating a tailored mold of the chair.
- Cutting the Pattern: Once pinned tightly, take fabric scissors and cut away the excess fabric, leaving a 1-inch seam allowance outside your pin lines.
- Sewing the Cover: Carefully remove the pinned “shell” from the chair. Take it to your sewing machine and sew straight stitches along all your pinned lines. Use a heavy-duty denim needle (size 100/16) because the canvas is thick.
- The Reveal: Turn the slipcover right-side out, wrestle it onto your chair, and smooth it down. If you want a truly relaxed, coastal look, leave the bottom hem slightly frayed or sew a simple, clean skirt that hovers just above the floor.
“Handy Upcycler Mantra: Measure twice, pin tightly, and remember that drop cloth fabric is forgiving. If you make a mistake, you’re only out $14, not $100 in designer linen!”
| Fabric Sourcing | Cost per Yard | Total Cost for an Armchair (Approx 6 Yards) |
|---|---|---|
| Designer Belgian Linen | $45.00/yd | $270.00 |
| Mid-Tier Upholstery Cotton | $18.00/yd | $108.00 |
| Hardware Store Drop Cloth | $2.30/yd | $14.00 |
Makeover 5: The Aged Brass Antique Mirror
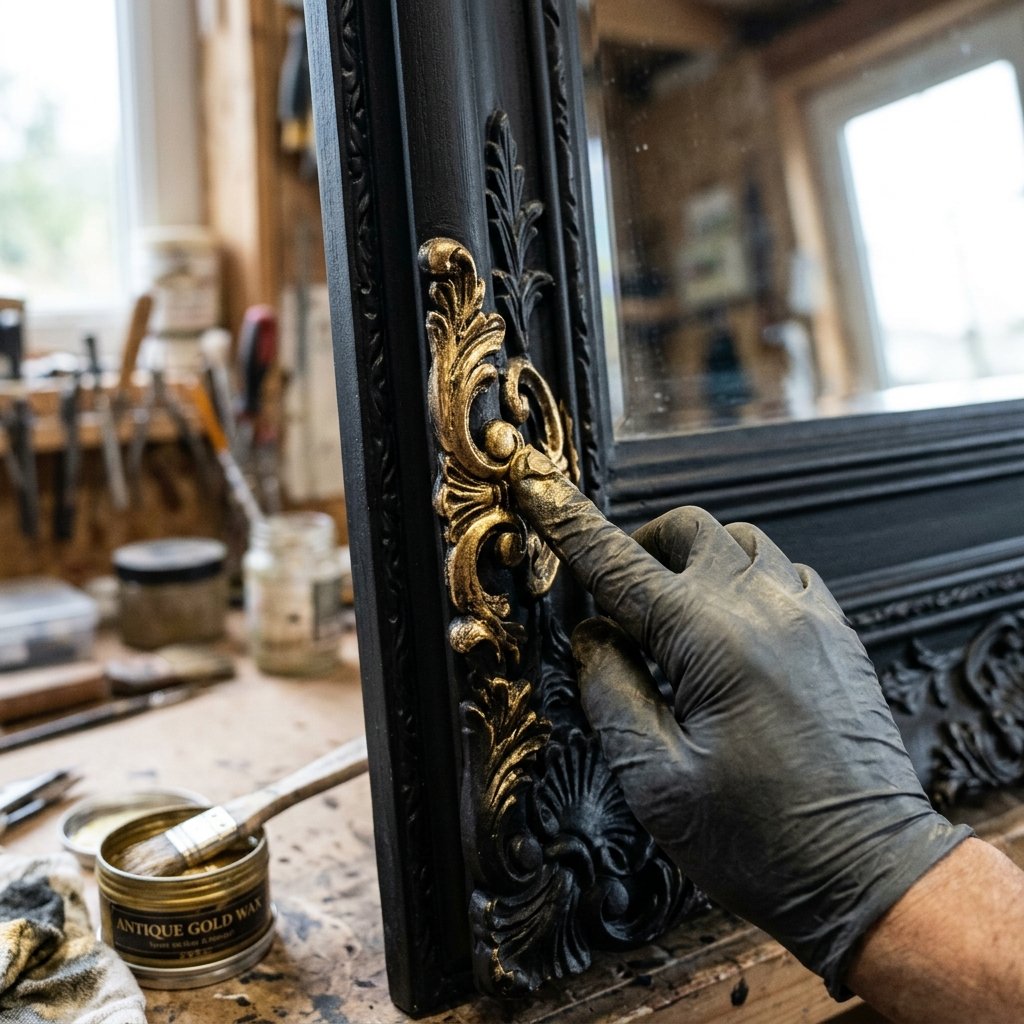
The Magic of Rub ‘n Buff
Ornate, vintage-inspired gold and brass mirrors are a staple of high-end interior design. Retailers sell resin and plastic mirrors painted to look like antique metal for $150 to $500. Thrift stores are absolutely overflowing with cheap, ugly plastic mirrors from the 80s and 90s, often painted in garish colors or fake, shiny gold. We are going to rescue one of these lightweight plastic mirrors and give it the heavy, aged patina of solid antique brass using a tiny tube of magic called Rub ‘n Buff.
The Patina Process
Rub ‘n Buff is a wax-based metallic finish formulated with carnauba wax, fine metallic powders, and select pigments. It is the absolute best way to fake expensive metal.
- Clean and Mask: Thoroughly clean the mirror frame. Use painter’s tape and old newspaper to completely cover the mirror glass. You do not want metallic wax smudged all over the reflective surface.
- Apply a Dark Base Coat (The Secret Step): If the frame is currently white, bright plastic, or shiny gold, spray paint the entire frame with a matte black or dark brown primer. This dark base coat will act as the “shadow” and “aging” in the deep crevices of the ornate details once the gold is applied. Let it dry for 2 hours.
- Apply the Rub ‘n Buff: Squeeze a pea-sized amount of Rub ‘n Buff (the shade “Antique Gold” or “European Gold” works best for the Pottery Barn look) onto your index finger. Wearing a disposable glove is recommended.
- Gilding the Frame: Lightly rub your finger over the raised details of the mirror frame. Do not press hard, and do not try to cover every square inch. You want the metallic wax to hit the high points, leaving the dark matte black base coat visible in the deep recesses. This contrast creates the illusion of decades of natural tarnish and patina.
- Buff to a Shine: Once the wax has dried for about 5 minutes, take a soft, clean microfiber cloth and gently buff the raised areas. The friction activates the carnauba wax, turning the dull metallic paste into a brilliant, hard, realistic metal shine.
“Designer Tip: Less is more with Rub ‘n Buff. Start with a tiny amount on your finger. You can always add more, but it is very difficult to remove once it has adhered to the porous matte base coat.”
| Mirror Type | Finish Quality | Weight | Estimated Cost |
|---|---|---|---|
| Pottery Barn Ornate Mirror | Real metal or high-quality resin, hand-finished | Heavy (15+ lbs) | $399.00 |
| Thrifted Plastic Mirror (Before) | Shiny, fake, garish plastic | Light (3 lbs) | $8.00 |
| Thrifted DIY Mirror (After) | Deep, aged antique brass patina | Light (3 lbs) | $14.00 (Mirror + Wax) |
Makeover 6: The Chunky Woven Rope Basket
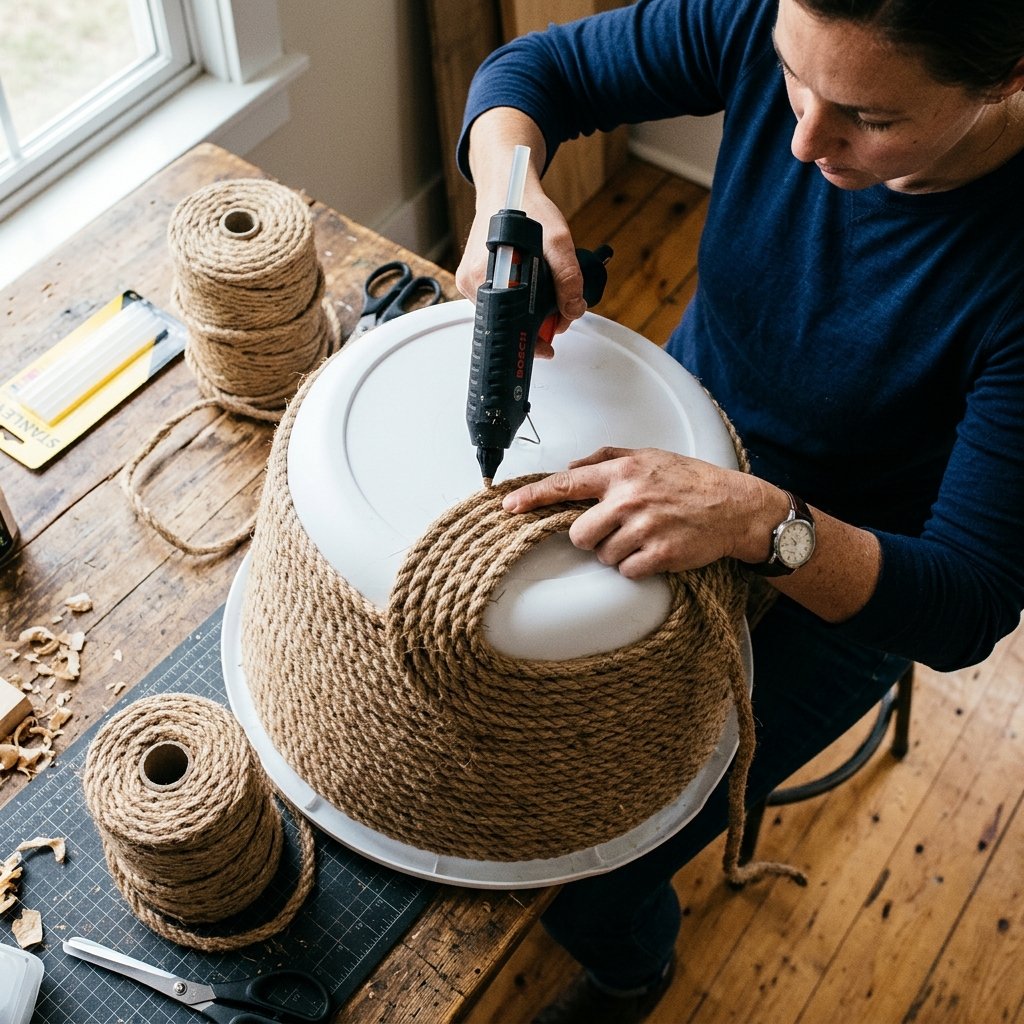
Elevating the Cheap Plastic Laundry Bin
Large, chunky woven baskets made of natural fibers like jute, seagrass, or water hyacinth are essential for that cozy, textured, catalog-ready home. They are perfect for holding throw blankets, firewood, or fiddle leaf fig trees. However, a large, high-quality woven basket can easily cost $80 to $150. Meanwhile, thrift stores have stacks of cracked, ugly plastic laundry baskets and cheap dollar-store bins for $1.00. We are going to wrap one of these cheap bins in thick jute rope to create a heavy, luxurious, rustic basket.
The Hot Glue and Jute Masterclass
This project requires patience, a lot of hot glue, and a thick, high-quality rope. The thicker the rope, the more expensive the final product will look.
- Sourcing the Rope: Head to the hardware store and buy a coil of twisted sisal or jute rope. You want a thickness of at least 3/8 inch or 1/2 inch. Thin twine will look cheap and take hours to wrap; thick rope looks substantial and architectural.
- Prep the Bin: If your thrifted plastic basket has a flared lip or handles that stick out awkwardly, use heavy-duty shears or a utility knife to carefully cut them off so you have a relatively straight, smooth cylinder or square to work with.
- The Bottom Coil: Start at the very bottom edge of the basket. Apply a thick 3-inch line of hot glue directly to the plastic and press the end of your rope into it. Hold it for 10 seconds until secure.
- Wrap and Glue: Continue wrapping the rope tightly around the basket, applying a line of hot glue every few inches. Make sure each new row of rope sits flush and tight against the row below it so no plastic shows through.
- Creating Handles (Optional): When you reach the top few inches, you can create faux handles by leaving a loop of rope unglued from the basket on two opposite sides, then continuing to glue the rows tightly above and below the loops.
- Finishing the Edge: When you reach the top rim, cut the rope at an angle so it tapers off nicely. Glue the end down securely. For a polished look, you can line the inside of the basket with a piece of scrap canvas drop cloth to hide the plastic interior completely.
“Safety Note: You will be using a lot of hot glue for this project. Use a high-temp glue gun for better adhesion, but consider wearing silicone finger protectors to prevent severe burns when pressing the rope into the hot glue!”
| Rope Thickness | Visual Impact | Time to Wrap Large Basket |
|---|---|---|
| 1/8 inch (Twine) | Looks cheap, crafty, and flimsy | 3+ Hours |
| 1/4 inch | Decent, but lacks structural heft | 1.5 Hours |
| 1/2 inch (Thick Jute) | Rugged, masculine, high-end catalog look | 45 Minutes |
Makeover 7: The Faux Marble Pedestal Side Table
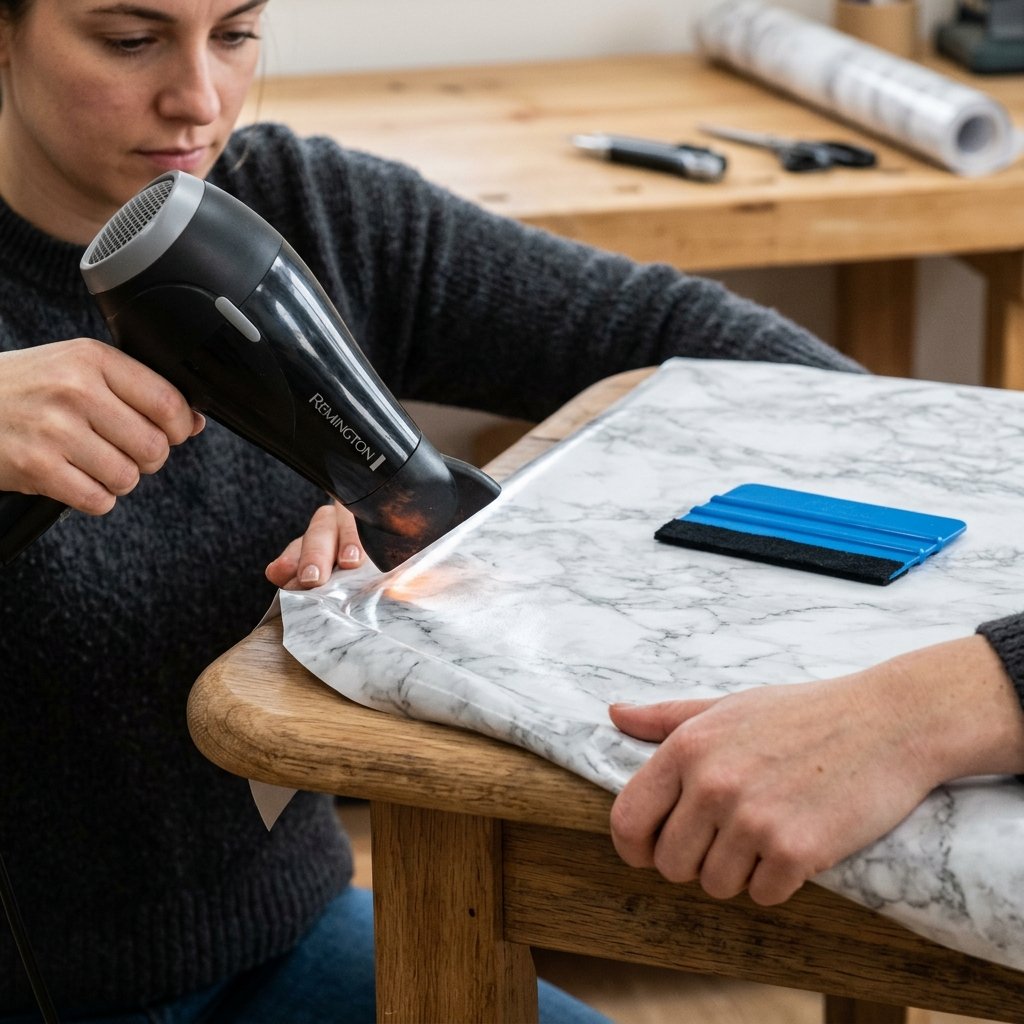
Faking Expensive Stone with Contact Paper
Marble pedestal tables are a staple of elegant, masculine, and sophisticated interiors. A real marble side table will easily set you back $300 to $600, and it will weigh a ton. Thrift stores frequently carry small, wobbly, laminate-topped plant stands or side tables from the early 2000s for about $10. Using high-quality architectural vinyl (contact paper) and some matte black spray paint, we can create a stunning dupe that looks identical to real stone until you physically tap on it.
The Vinyl Wrapping Technique
The secret to making contact paper look like real marble is in the wrapping technique. You cannot simply stick it on the top and cut the edges; you must wrap it like a professional car detailer to create the illusion of a solid slab.
- Paint the Base: First, detach the top of the table from the base. Take the base outside, sand it lightly, and spray paint it with a matte black or oil-rubbed bronze finish. This gives it a heavy, iron-like appearance. Let it dry for 2 hours.
- Prep the Top: Clean the laminate tabletop thoroughly with glass cleaner to remove any dust or grease. Any tiny speck of dirt will show up as a bump under the vinyl.
- Cut the Vinyl: Unroll your faux marble contact paper. Cut a piece that is at least 3 inches wider than your tabletop on all sides. You need this excess to wrap around the edges.
- Apply and Squeegee: Peel back just the first two inches of the paper backing. Stick the exposed vinyl to one edge of the table. Using a plastic smoothing tool (or a credit card wrapped in a soft cloth), slowly push the vinyl forward while pulling the backing paper away from underneath. Smooth out any air bubbles immediately.
- The Heat Gun Trick (Crucial Step): To make the vinyl stretch tightly around the curved edges or corners of the table without wrinkling, use a hair dryer or heat gun on a low setting. Warm the vinyl slightly until it becomes soft and pliable, then pull it tightly under the lip of the table and stick it to the underside. This creates a seamless, “solid slab” edge.
- Reassemble: Trim any excess vinyl from the underside with a utility knife, then screw the faux-marble top back onto your freshly painted matte black base.
“Resourceful Mantra: High-quality contact paper has evolved. Look for ‘architectural vinyl’ online. It is thicker, has a matte finish, and features incredibly realistic, non-repeating stone veining that blows the old shiny 1990s shelf liner out of the water.”
| Component | DIY Faux Marble Method | Real Stone Counterpart |
|---|---|---|
| Table Base | Matte Black Spray Paint ($6) | Cast Iron / Welded Steel |
| Table Top | Architectural Vinyl Wrap ($12) | Solid Carrara Marble |
| Total Weight | 8 lbs (Easy to move) | 45+ lbs (Heavy) |
| Total Cost | $28.00 (Including thrifted table) | $450.00+ |
Makeover 8: The Matte Black Apothecary Cabinet
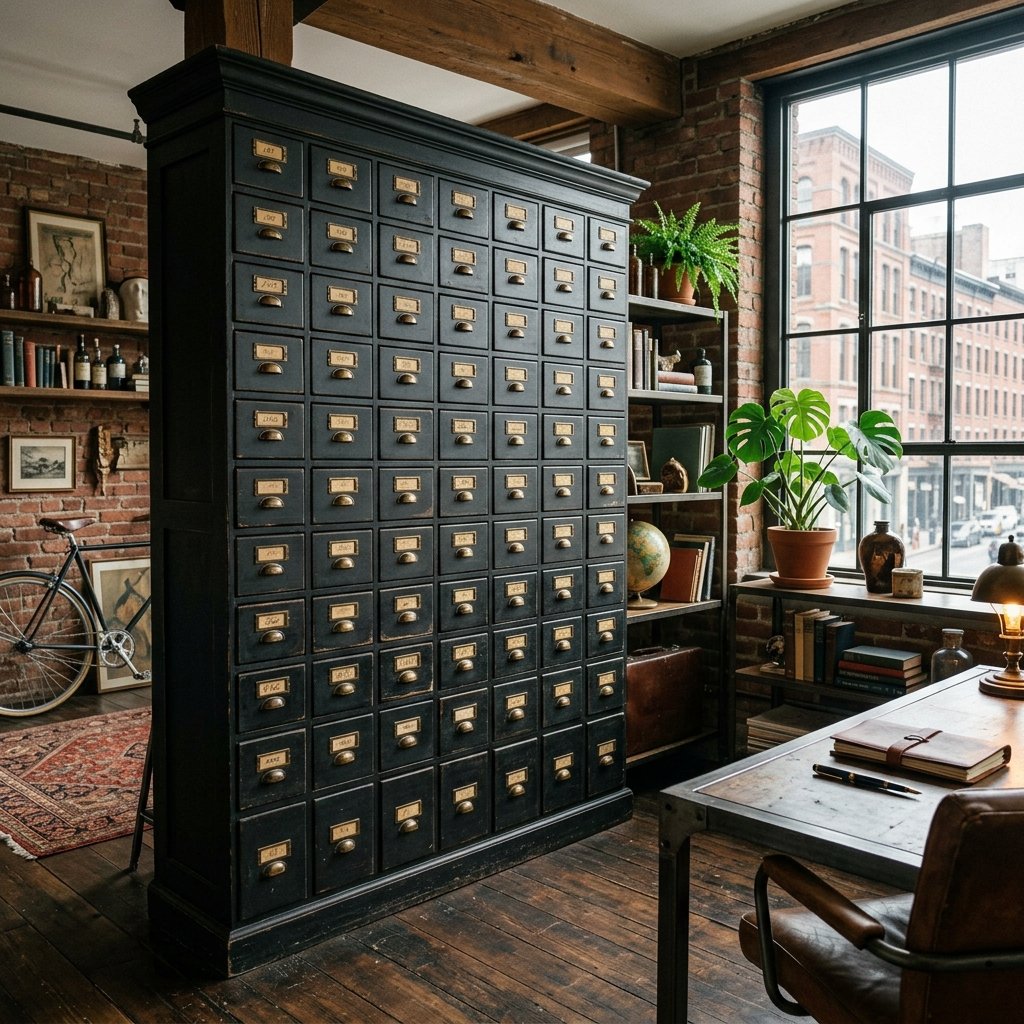
From Cheap CD Tower to Vintage Card Catalog
Vintage apothecary cabinets and wooden card catalogs are highly sought after by decorators for their rugged, industrial charm and incredible storage capacity. Genuine antiques can sell for $1,000 to $3,000. However, thrift stores are currently burdened with thousands of obsolete wooden CD towers, cassette tape racks, and cheap laminate drawer units from the 1990s. We are going to flip one of these useless media towers into a stunning, matte black apothecary cabinet using paint and clever hardware.
The Faux-Drawer Illusion
If your thrifted unit has a few large drawers instead of many small ones, we can use a router or a simple saw trick to create the illusion of multiple small apothecary drawers.
- Create the Illusion (Optional): If your unit has large drawer fronts, take a hand saw or a Dremel tool and score shallow, straight lines vertically and horizontally across the drawer face. This creates a grid that makes one large drawer look like four or six small, individual drawers.
- Sand and Prime: Lightly sand the entire unit to rough up the laminate or cheap varnish. Apply a coat of heavy-duty bonding primer (like BIN Shellac-based primer) to ensure your paint will stick to the slick surface.
- Paint it Matte Black: Paint the entire cabinet with a high-quality matte black or deep charcoal chalk paint. Chalk paint is excellent for this because it dries to a dead-flat, velvety finish that mimics the look of aged, industrial painted wood. Apply two coats, waiting 2 hours between coats.
- Seal with Dark Wax: To give the black paint depth and protect it from fingerprints, rub the entire piece down with a clear or dark furniture wax. Buff it to a subtle, leathery sheen.
- The Hardware Magic: This is where the transformation truly happens. Purchase a bulk pack of “antique brass label pull” hardware online (you can get a pack of 50 for about $15). Screw one of these label pulls onto the center of every “faux drawer” square you created.
- Add Custom Labels: Cut small pieces of aged paper and write numbers, botanical names, or organizational labels on them. Slide them into the brass label pulls for the ultimate vintage apothecary aesthetic.
“Budget Savvy Tip: Hardware is the jewelry of furniture. You can take the cheapest, most poorly constructed laminate box, paint it matte black, and add heavy, expensive-looking brass hardware, and it will instantly look like a $500 designer piece.”
| Item / Step | Material Used | Cost Breakdown |
|---|---|---|
| Base Unit | Thrifted CD Tower / Drawer Unit | $15.00 |
| Paint Finish | Matte Black Chalk Paint & Wax | $12.00 |
| Hardware | Bulk Pack of Brass Label Pulls (x20) | $15.00 |
| Total Investment | – | $42.00 |
Makeover 9: The Botanical Framed Canvas Art
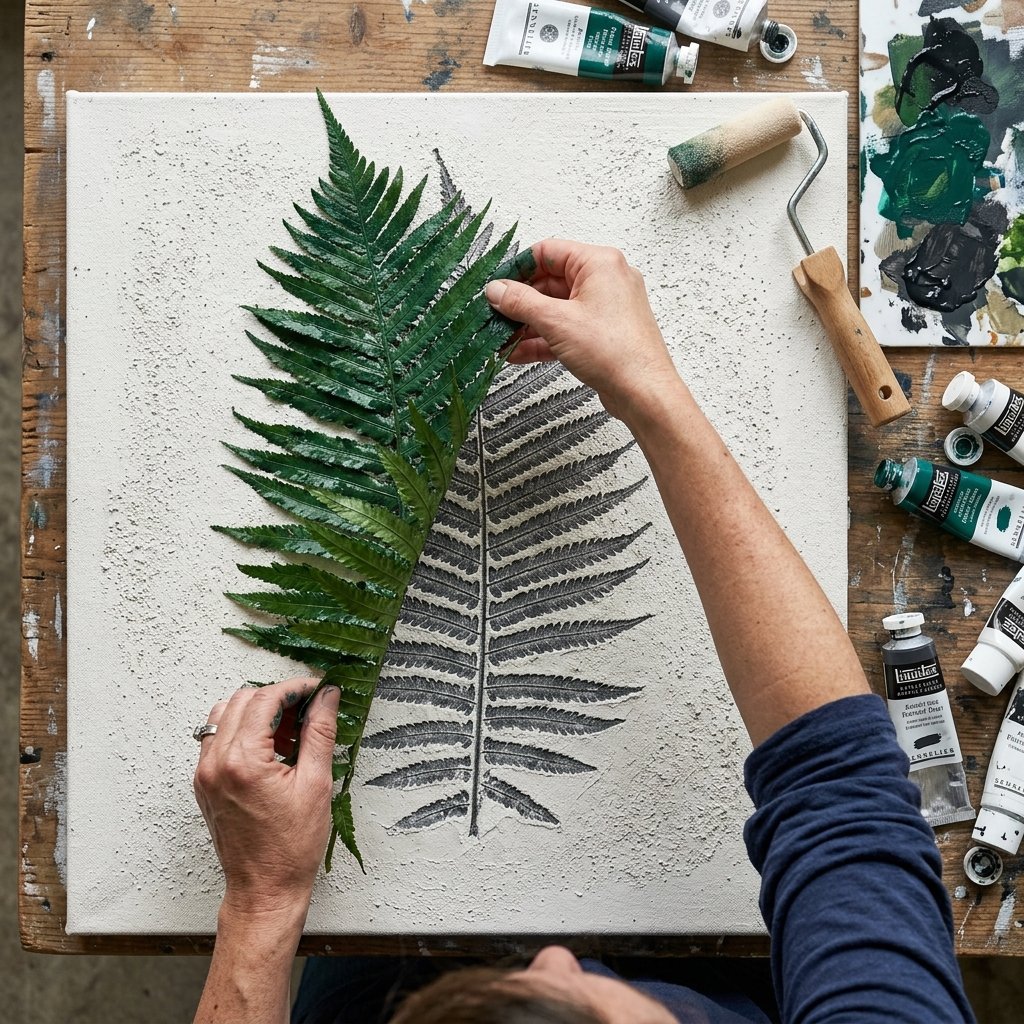
Painting Over Cheap Motel Art
Large-scale, framed canvas art is incredibly expensive to ship and purchase new, often running between $200 and $600 at high-end retailers like Pottery Barn. Meanwhile, thrift stores have entire aisles dedicated to massive, ugly, mass-produced canvas prints from the 2000s (think generic Tuscan wine bottles or cheesy inspirational quotes). We are going to buy these massive canvases purely for their size and wooden frames, and paint completely over them to create high-end, textured botanical art.
The Joint Compound Canvas Trick
We are bringing back our trusty tub of joint compound to completely obliterate the old artwork and create a thick, gallery-worthy texture.
- Sourcing the Canvas: Find the largest canvas you can for under $15. If it comes in a floating frame, carefully unscrew the canvas from the back of the frame and set the frame aside.
- Erase the Past: Take a large putty knife and spread a thin, even layer of joint compound over the entire surface of the ugly canvas. You do not need to be perfectly smooth; leave some trowel marks for a rustic, linen-like texture. This completely hides the old image and gives you a fresh, white, highly textured blank slate. Let it dry overnight.
- Paint the Base: Once the plaster is dry, paint the entire canvas with a warm, creamy off-white acrylic or wall paint.
- Create the Botanical Imprint: Go to your backyard or a local park and forage for a large, structurally interesting branch, fern frond, or monstera leaf.
- The Stamping Technique: Lay your foraged leaf flat on some newspaper. Using a foam roller, roll a thin layer of dark green, charcoal, or muted brown acrylic paint onto the back side of the leaf (the side with the raised veins).
- Press and Peel: Carefully lift the painted leaf, place it paint-side-down onto your textured white canvas, and press firmly all over the back of the leaf. Place a piece of paper towel over it and rub gently to ensure all the veins make contact. Carefully peel the leaf away to reveal a stunning, highly detailed, organic botanical print.
- Reframe: If your canvas came with a frame, sand the frame down to raw wood or paint it matte black, then reattach the canvas. The result is a massive, bespoke piece of art that looks like it belongs in a luxury catalog.
“Creative Encouragement: Do not be intimidated by ‘making art.’ The leaf does all the complex drawing for you. The natural imperfections, the missing spots of paint, and the heavy plaster texture are exactly what make it look like an expensive, original artisan piece rather than a cheap print.”
| Art Size | Store-Bought Print Cost | Our DIY Foraged Canvas Cost |
|---|---|---|
| Small (8×10) | $45.00 | $3.00 |
| Medium (16×20) | $120.00 | $8.00 |
| Massive (24×36) | $350.00+ | $15.00 (Thrifted Canvas) |
Makeover 10: The Rustic Carved Wood Dough Bowl
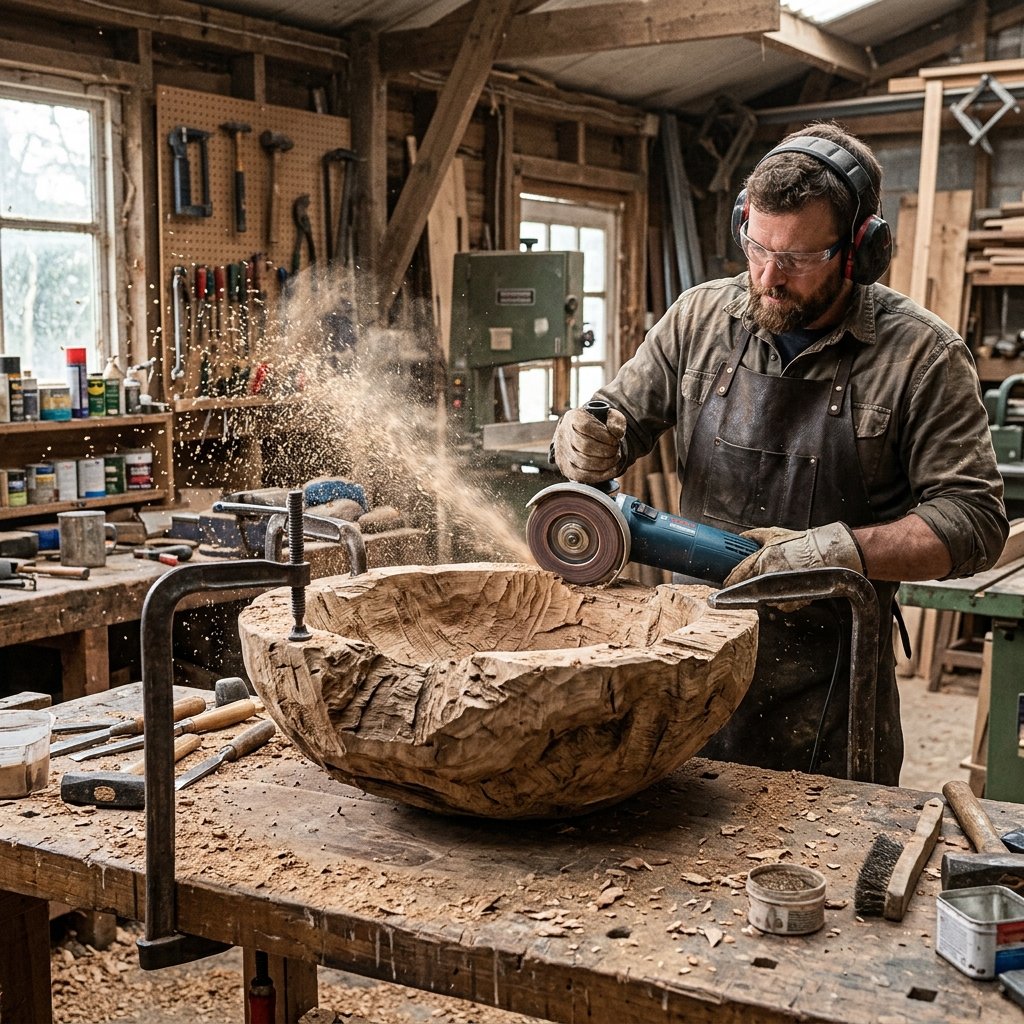
Transforming a Basic Salad Bowl into a Centerpiece
Long, hand-carved wooden dough bowls are the ultimate rustic centerpiece for a long dining table or kitchen island. Filled with moss, decorative spheres, or seasonal pinecones, they scream “rugged elegance.” Authentic antique dough bowls are hand-hewn from single logs and can cost anywhere from $100 to $250. We are going to create an incredibly convincing dupe using a cheap, shallow wooden salad bowl or tray from the thrift store and some aggressive power tool carving.
The Power Carving and Aging Process
To make a perfectly round, machine-turned wooden bowl look like a hand-carved antique, we have to destroy its perfection.
- Find the Base: Look for a thick, solid wood bowl or an oblong wooden tray. The thicker the wood, the better, as we will be carving into it. Avoid bamboo, as it splinters terribly.
- Strip the Finish: Use an orbital sander with 60-grit sandpaper to aggressively strip away the shiny, food-safe varnish from the inside and outside of the bowl. Get it down to raw, dull wood.
- The Angle Grinder Carving (The Fun Part): Put on safety goggles and heavy gloves. Equip an angle grinder with a flap disc (a sanding disc made of overlapping flaps of sandpaper). Gently touch the spinning disc to the inside and outside edges of the bowl. Gouge out shallow, irregular divots. You are trying to mimic the deep, uneven cuts of an antique hand adze or carving chisel. Destroy the perfect symmetry of the rim by grinding it down unevenly.
- Smooth the Gouges: Switch back to your orbital sander with 120-grit paper and smooth out the harsh edges of the divots you just created so they look worn and soft, not freshly cut.
- Age the Wood (The Vinegar Trick): To make the fresh wood look 100 years old, use the steel wool and vinegar trick. Place a pad of fine steel wool into a jar, fill it with white vinegar, and let it sit for 24 hours. The vinegar dissolves the steel, creating an iron acetate solution.
- Apply the Stain: Brush this clear liquid onto your raw, carved bowl. Within minutes, a chemical reaction with the tannins in the wood will turn the bowl a deep, weathered, grayish-brown. It looks exactly like naturally aged, oxidized barn wood.
- Seal it: Finish the bowl by rubbing it down with a dark furniture wax or a food-safe mineral oil to deepen the color and give it a subtle, rich sheen.
“Safety Note: Using an angle grinder to carve wood is highly effective but requires absolute focus. Keep both hands on the tool, clamp your bowl securely to a workbench, and never wear loose clothing that could get caught in the spinning disc.”
| Step | Tool / Material | Purpose |
|---|---|---|
| Aggressive Sanding | Orbital Sander (60-grit) | Removes the shiny, modern factory finish |
| Faux Hand-Carving | Angle Grinder with Flap Disc | Creates deep, rustic, hand-hewn divots and texture |
| Chemical Aging | Steel Wool + White Vinegar | Oxidizes the wood to a natural, 100-year-old gray/brown |
| Conditioning | Dark Wax or Mineral Oil | Seals the wood and adds a rich, subtle sheen |
Conclusion
Your Home, Curated by You (and Your Budget)
Creating a beautiful, high-end, Pottery Barn-inspired home does not require a six-figure salary or a limitless credit card limit. It requires vision, a little bit of elbow grease, and the courage to look at a hideous, shiny brass lamp or a terrifyingly floral armchair and say, “I can fix that.” By utilizing these ten shocking thrift store makeovers, you have unlocked the ultimate frugal superpower.
You now know how to manipulate texture with baking soda and joint compound, how to chemically age wood with bleach and vinegar, how to fake expensive metal with wax, and how to tailor canvas drop cloths into luxurious linen. You are no longer at the mercy of retail markups. The next time you find yourself drooling over a $300 artisan vase in a catalog, you can smile, close the magazine, and head straight to your local thrift store with $4 in your pocket.
Remember, the most beautiful homes are not the ones where everything was bought off a showroom floor in one day. The most beautiful homes are layered, textured, and filled with pieces that have a story. And there is no better story than, “I made this myself for literal pennies.” Happy thrifting, happy upcycling, and stay ruggedly creative!

Makenzie is the founder and lead writer at MoneyHackTips.com — a personal finance blog dedicated to delivering street-smart financial wisdom for real people on real budgets. With 300+ published articles covering everything from debt management to investing fundamentals, Makenzie’s mission is to make every dollar work harder. When not writing about money hacks, Makenzie is testing frugal living strategies, optimizing side hustles, and helping readers build financial freedom from scratch.