The Art of the Masculine Desk: Why Handmade Matters
In a world of mass-produced plastic, there is something deeply satisfying about a desk accessory that carries weight, history, and the mark of a craftsman. If you have ever browsed high-end boutiques or artisan marketplaces, you have likely seen those stunning wood and epoxy resin phone docks retailing for anywhere from $85 to $150. Today, we are going to channel our inner resourceful guru and build one for a fraction of that cost—likely under $20 if you are clever with your scrap pile. This project is the ultimate ‘Trash-to-Treasure’ win, combining the rugged, organic beauty of raw wood with the sleek, modern finish of resin. Whether you are crafting a Father’s Day surprise, a graduation gift, or simply upgrading a home office, this guide provides the precision and budget-savvy secrets to ensure a ’boutique’ result without the boutique price tag.
“True luxury isn’t about what you spend; it’s about the resourcefulness of the maker and the story within the materials.”
Scavenging for Success: Sourcing Your Materials on a Budget

The secret to a high-end look on a low-end budget is in the ‘scavenge.’ You don’t need to buy a massive slab of exotic hardwood. In fact, for a phone dock, we only need a piece about 6 to 8 inches long. Check your local cabinet shops for ‘offcuts’ or visit a local sawmill where they often have a ‘burn bin’ full of character-rich scraps like live-edge walnut, oak, or cedar for free or just a few dollars.
Essential Material Checklist
| Material | Source Tip | Estimated Cost |
|---|---|---|
| Scrap Live-Edge Wood | Cabinet shop offcuts or firewood pile | $0 – $5 |
| Epoxy Resin (Small Kit) | Craft store with 40% off coupon | $12 – $15 |
| Mica Powder or Liquid Pigment | Sample packs or leftover acrylic paint | $1 |
| Sandpaper (Various Grits) | Bulk packs from discount hardware stores | $2 |
| Wood Finish/Oil | Food-grade mineral oil or beeswax | $1 |
By sourcing these items strategically, you are already saving over 80% compared to buying a pre-made kit. Look for wood with interesting knots or cracks; these are usually discarded by others but are exactly what we need to create that stunning ‘resin river’ effect.
The Blueprint: Prepping the Form and the Wood

Before we pour the resin, we must prepare the ‘mold.’ Since we are being budget-savvy, we won’t buy a professional silicone mold. Instead, we will use melamine scraps or even a plastic food container lined with tuck tape (sheathing tape). Resin does not stick to the shiny surface of tuck tape, making it the perfect low-cost release agent.
Preparation Steps
- Cut your wood: Slice your scrap piece down the middle to create two halves with the ‘live edge’ or rough edge facing inward toward each other.
- Clean the edges: Use a wire brush to remove any loose bark or dirt. Resin needs a clean surface to bond to the wood fibers.
- Build the box: Create a small rectangular frame slightly larger than your phone dock dimensions. Line the bottom and sides with tuck tape.
- Seal the wood: Lightly brush a thin coat of resin on the inner edges of the wood. This prevents ‘off-gassing’ (bubbles) during the main pour.
“Measure twice, pour once. A tight mold is the difference between a masterpiece and a sticky mess on your workbench.”
The Pour: Mastering the Epoxy River
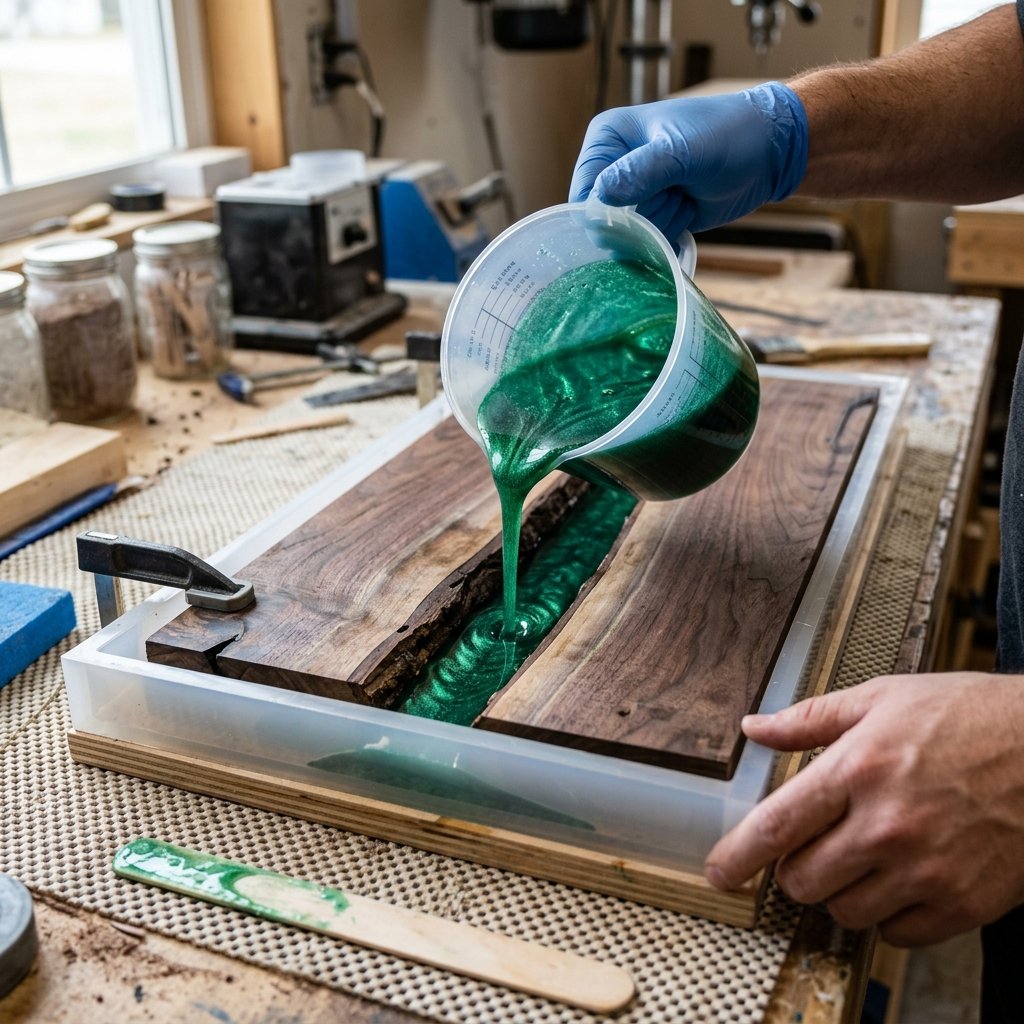
This is where the magic happens. Mixing resin is a science, but achieving the aesthetic is an art. For a masculine, elegant look, I recommend deep ‘Midnight Blue,’ ‘Forest Green,’ or even a ‘Smoky Black’ pigment. If you want to keep costs at zero for coloring, a tiny drop of oil-based paint can work, but specialized mica powders provide that shimmering depth.
The Mixing Ratio
Most hobbyist resins are a 1:1 ratio. Use clear plastic cups and mark them with a permanent marker to ensure 100% accuracy. Stir slowly for at least 3 minutes, scraping the sides and bottom constantly. If you stir too fast, you’ll introduce micro-bubbles that are hard to remove.
The Pouring Process
- Level your mold: Use a bubble level to ensure the resin doesn’t lean to one side.
- The Slow Stream: Pour the resin into the center of the wood gap in a thin, steady stream. This helps bubbles pop as they fall.
- Heat it up: Use a simple BBQ lighter or a hair dryer on low heat to gently pass over the surface. The heat will cause any trapped bubbles to rise and burst instantly.
The Rough to the Refined: Sanding and Shaping

Once the resin has cured (usually 24 to 48 hours), it’s time to reveal the treasure. Removing the piece from the mold might require a bit of prying. Don’t worry if it looks dull and scratched at first; the sanding process is what brings the ‘glass’ finish to life.
The Sanding Progression Table
| Grit Level | Purpose | Time Investment |
|---|---|---|
| 80 – 120 Grit | Leveling the resin and wood flush | 15 Minutes |
| 220 – 400 Grit | Removing scratches from the previous grit | 10 Minutes |
| 600 – 1000 Grit | Starting the polishing phase | 10 Minutes |
| 2000+ Grit (Wet) | Achieving a high-gloss, transparent finish | 5 Minutes |
After sanding, you’ll need to cut the phone groove. Using a table saw or a simple hand saw and chisel, cut a slot at a 15-degree angle. This angle is the ‘sweet spot’ for viewing notifications while the phone sits on the desk. Ensure the slot is wide enough (usually 1/2 inch to 5/8 inch) to accommodate a phone with a case.
The Finishing Touch: Masculine Elegance in a Bottle

To protect the wood and make the resin pop, you don’t need expensive polyurethane. A simple, rugged finish like Linseed Oil, Walnut Oil, or even a homemade Beeswax Polish (melted beeswax and olive oil) will do the trick. These finishes are easy to apply, smell great, and are completely non-toxic.
Applying the Finish
- Wipe away all sanding dust with a tack cloth or a microfiber rag.
- Apply a generous amount of oil to a clean rag and rub it into the wood in circular motions.
- Watch as the grain ‘pops’ and the resin transforms from cloudy to crystal clear.
- Let it soak for 20 minutes, then buff away the excess with a dry cloth.
“The finish isn’t just about looks; it’s about the feel. A well-oiled dock feels warm and substantial in the hand, a true mark of quality.”
Conclusion
A Bespoke Gift for the Modern Man
Congratulations! You have successfully turned a piece of ‘trash’ wood and a bit of chemistry into a high-end desk accessory. This DIY wood and epoxy resin phone dock isn’t just a place to rest a phone; it’s a conversation piece that showcases your craftsmanship and budget-savvy creativity. By following these plans, you’ve avoided the $100 price tag of retail versions and created something far more valuable: a handmade heirloom. Whether it’s sitting on a mahogany executive desk or a reclaimed pine workbench, this dock is a rugged, practical, and elegant reminder that with a little grit and some clever upcycling, you can create the perfect gift for anyone—yourself included. Now, go ahead and buff that resin one last time; you’ve earned it!

Makenzie is the founder and lead writer at MoneyHackTips.com — a personal finance blog dedicated to delivering street-smart financial wisdom for real people on real budgets. With 300+ published articles covering everything from debt management to investing fundamentals, Makenzie’s mission is to make every dollar work harder. When not writing about money hacks, Makenzie is testing frugal living strategies, optimizing side hustles, and helping readers build financial freedom from scratch.