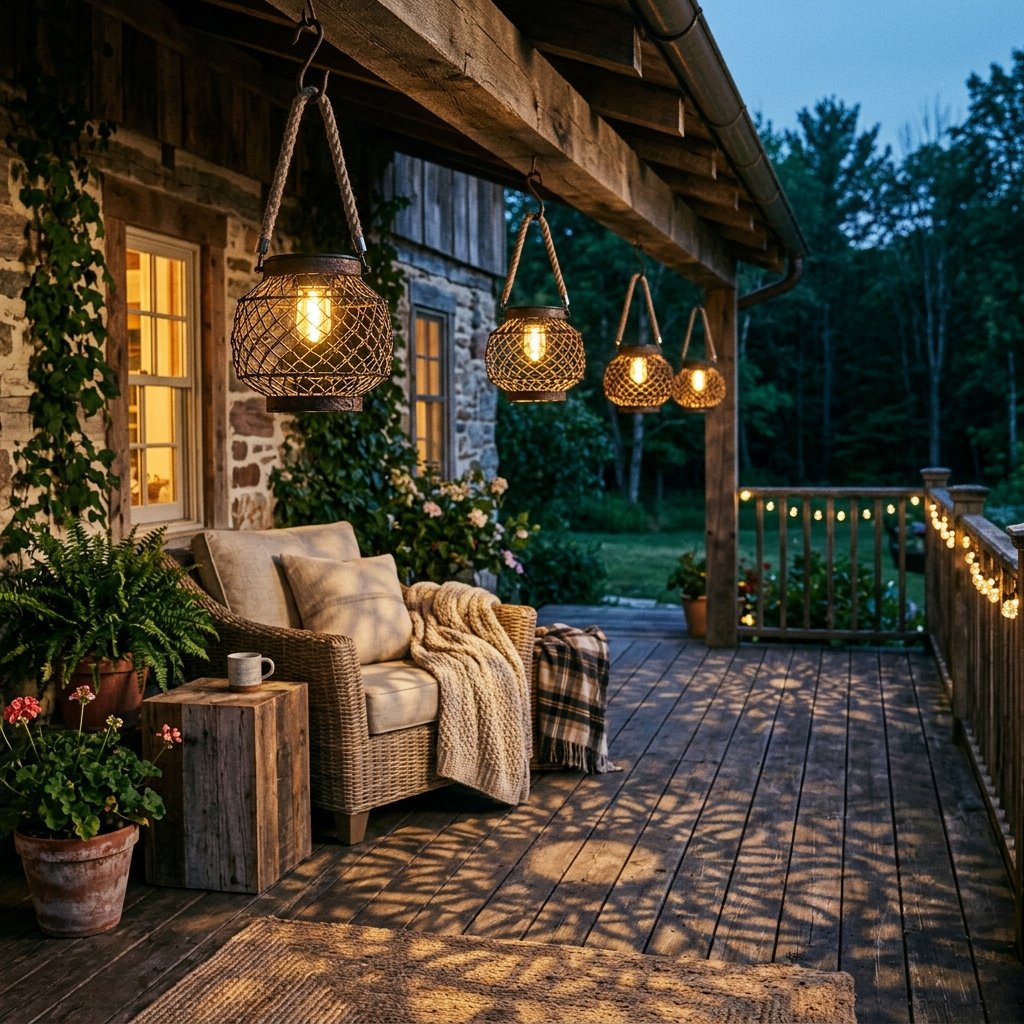

There is an undeniable, rugged magic to a well-lit porch at twilight. It is the transition space between the wild outdoors and the comfort of home—a place for evening whiskey, quiet conversations, and watching the fireflies. But if you have ever browsed high-end home decor catalogs for outdoor lighting, you have likely experienced the immediate sticker shock. Retailers routinely charge upwards of $100 to $250 for a single rustic hanging lantern. For the frugal DIYer, the crafty parent, or the budget-savvy homeowner, dropping half a mortgage payment on patio ambiance is simply not an option.
Welcome to the ultimate trash-to-treasure alchemy. We are going to take the humble, easily overlooked $1.25 Dollar Tree solar path light and marry it to a cheap wire basket, transforming them into heavy-duty, masculine-elegant hanging lanterns that look like they were forged in a blacksmith’s shop. This project is the epitome of resourceful crafting. It requires no electrical wiring, no expensive power tools, and absolutely no stress. In just under 30 minutes of active crafting time, you will create a custom lighting solution that will completely revolutionize your outdoor space tonight.
“True craftsmanship isn’t about how much money you spend on raw materials; it is about the vision to see the potential in the mundane, and the cleverness to elevate it.”
Whether you are prepping for a budget-friendly backyard wedding, looking to impress your neighbors, or simply wanting to reclaim your evening patio time with a touch of rugged sophistication, this guide is your blueprint. Roll up your sleeves, grab your spray paint, and let us turn pocket change into pure patio magic.
The Blueprint: Gathering Your Dollar Tree Arsenal
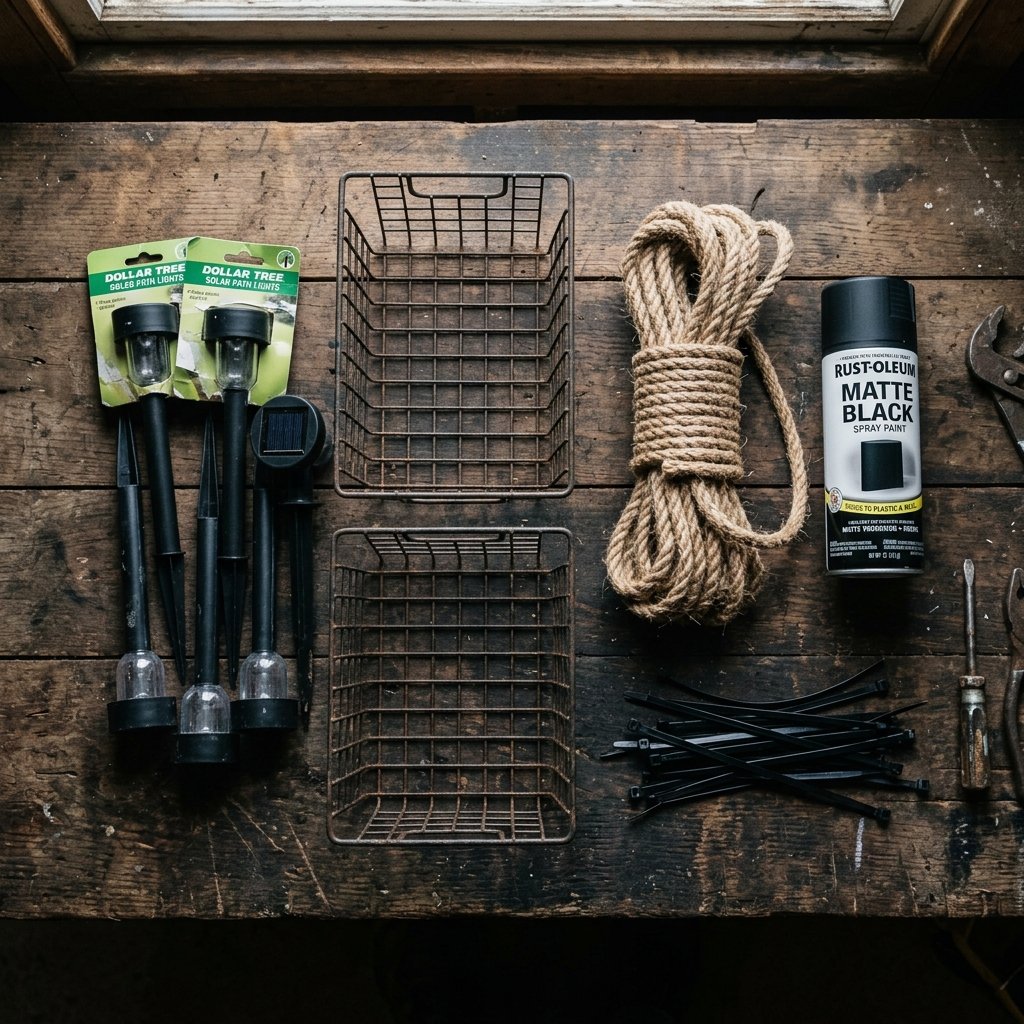
The foundation of any great upcycling project lies in the hunt. Your local dollar store is a goldmine of raw materials waiting to be reimagined. For this project, we are ignoring the intended purpose of these items and looking purely at their structural potential. You are not buying a cheap path light; you are acquiring a self-contained, weather-proof solar LED module. You are not buying a flimsy wire trash bin or fruit basket; you are sourcing an industrial-style lantern cage.
Material Checklist & Sourcing
- Dollar Tree Solar Path Lights: You need one for every lantern you plan to make. Look for the ones with a removable top puck. Cost: $1.25 each.
- Wire Baskets: Dollar Tree often sells wire wastebaskets, locker bins, or decorative metal fruit bowls. Choose a shape that appeals to your masculine-elegant aesthetic. Cost: $1.25 each.
- Nautical Rope or Thick Twine: For the hanging mechanism. Thick, rugged jute rope adds that high-end, nautical-industrial flair. Cost: $1.25 per roll.
- Matte Black or Oil-Rubbed Bronze Spray Paint: The great equalizer. This is where the magic happens. A good rust-preventative paint is crucial. Estimated Cost: $6.00 per can (Hardware store).
- Zip Ties or Heavy-Duty Wire: For securing the solar module to the basket. Cost: $1.25.
- E6000 Glue or Hot Glue (Optional): For extra security against high winds.
Let us look at the sheer financial power of this clever DIY. Below is a breakdown of what you would pay for a similar aesthetic at a high-end retailer versus our crafty, budget-savvy approach.
| Decor Element | High-End Retailer Cost | Our DIY Dollar Tree Cost | Total Frugal Savings |
|---|---|---|---|
| Hanging Wire Lantern | $89.00 | $2.50 (Basket + Light) | $86.50 |
| Faux Forged Finish | $25.00 (Premium finish fee) | $1.50 (Prorated spray paint) | $23.50 |
| Nautical Hanging Rope | $15.00 | $0.25 (Prorated rope) | $14.75 |
| Total Per Lantern | $129.00 | $4.25 | $124.75 Saved! |
When you realize you can build six of these for less than the tax on a store-bought version, the project becomes not just a craft, but a massive victory for your wallet.
Deconstruction: Harvesting the Solar Core
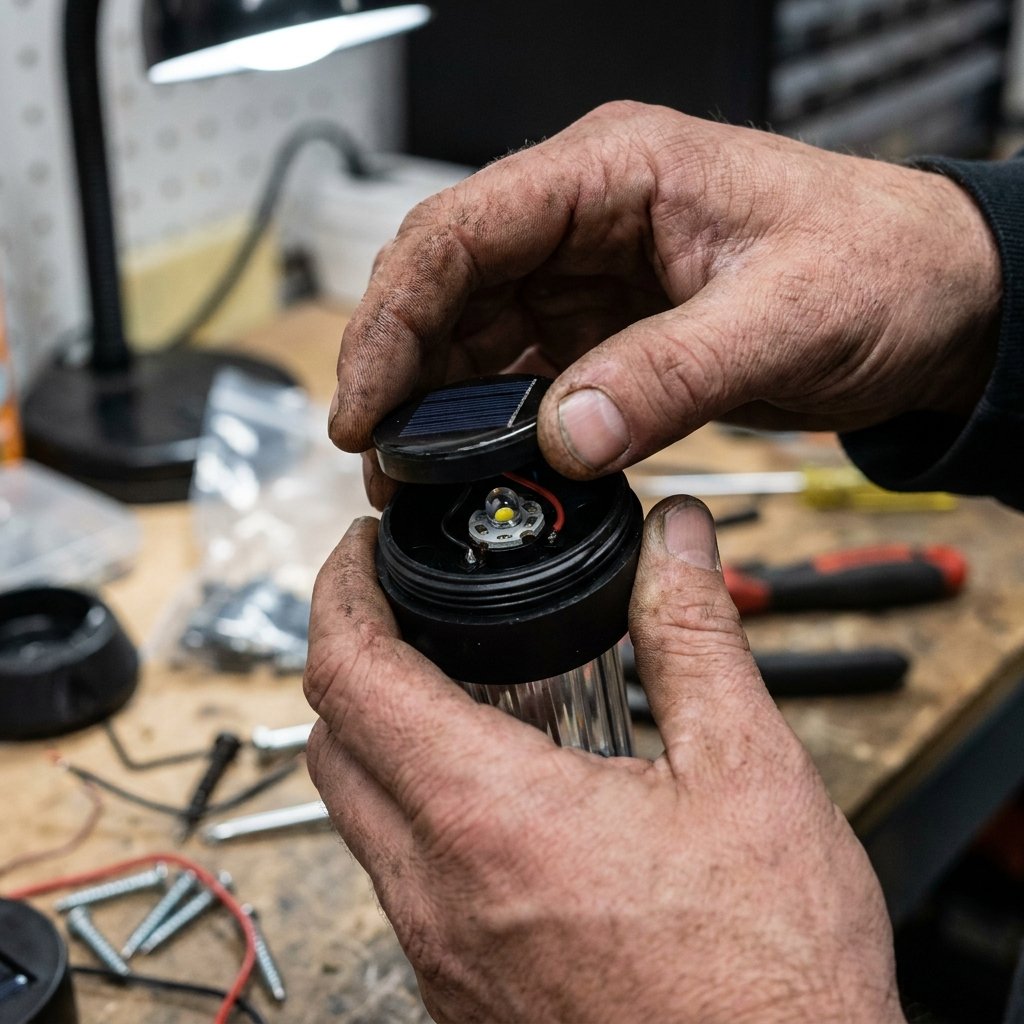
Now that you have your materials, it is time to channel your inner engineer. The cheap plastic stakes that come with these solar lights are completely useless for our high-end vision. We need to extract the “brain” of the light—the solar panel and LED housing—without damaging the delicate wiring inside.
Step-by-Step Harvesting Process
- Remove the Stake: Firmly grasp the clear plastic housing of the solar light in one hand and the black plastic ground stake in the other. Twist gently and pull. The stake should pop right off. Discard it or save it for a future garden project.
- Isolate the Solar Puck: Most dollar store solar lights have a top cap (the puck) that houses the mini solar panel, the battery, and the LED bulb, which twists off from the clear plastic lens. Carefully twist the top puck counter-clockwise.
- Inspect the Battery: Before proceeding, pull the little paper tab to activate the battery. Cover the solar panel with your hand to simulate darkness; the LED should instantly glow. If it doesn’t, you may need to open the battery compartment and reseat the tiny rechargeable AAA battery. Pro-Tip: Upgrading these cheap batteries to higher-quality rechargeable NiMH batteries can double your illumination time from 4 hours to 8 hours.
- Clean the Housing: Wipe down the plastic edges of the puck with rubbing alcohol. This removes any manufacturing oils and ensures our paint and adhesives will bond perfectly.
“Do not throw away the clear plastic lenses! They make excellent cloches for starting tiny seedlings in your spring garden. A resourceful crafter wastes nothing.”
Once you have harvested your solar pucks, set them aside in a safe, dry place. You now have the technological heart of your new rustic lanterns ready for integration.
The Alchemy of Paint: Faking Heavy Forged Iron
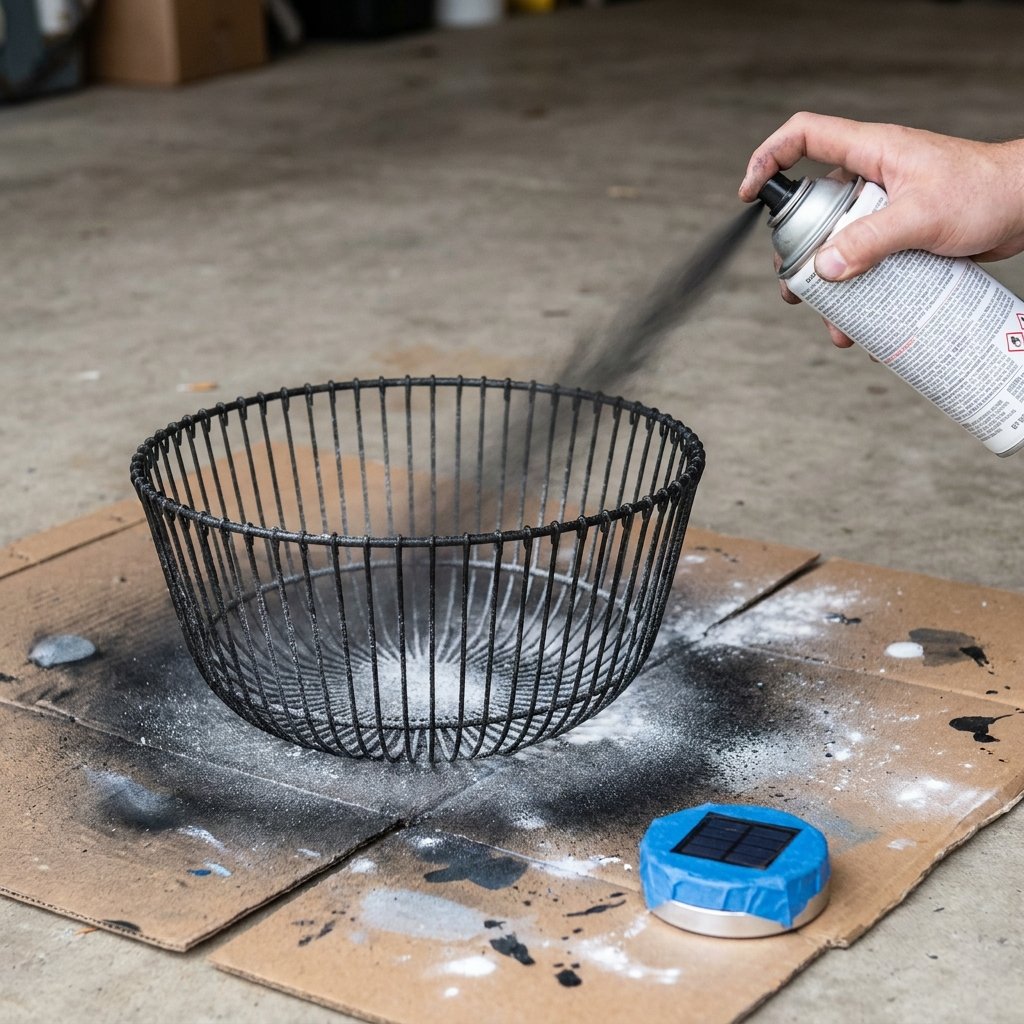
This is the most critical step in the entire process. The difference between a project that looks like a “dollar store craft” and one that looks like a “Pottery Barn exclusive” comes down entirely to texture and finish. We are going to use a clever painting technique to make flimsy wire and cheap plastic look like aged, heavy forged iron.
The Baking Soda Texture Trick
If you want to take your finish to the next level, you need texture. Spray paint alone is too smooth and reveals the cheap nature of the plastic pucks. Here is how we fake the grit of cast iron:
- Prep the Area: Lay down a heavy canvas drop cloth or flattened cardboard boxes in a well-ventilated outdoor space.
- Mask the Solar Panel: This is a crucial safety and functionality step. Use blue painter’s tape to completely cover the square solar panel on the top of the puck, and the small LED bulb on the bottom. If you paint over the panel, the lantern will never charge. Use a utility knife to trim the tape perfectly to the edges.
- Apply the Base Coat: Lay your wire baskets and the masked solar pucks on the cardboard. Spray a light, sweeping coat of matte black or oil-rubbed bronze paint. Keep the can 10 to 12 inches away to prevent drips.
- Add the Iron Grit: While the first coat of paint is still wet and tacky, take a handful of ordinary baking soda and lightly dust it over the wire baskets and the plastic puck housing. The baking soda will stick to the wet paint, creating a micro-texture that perfectly mimics the pitting of forged iron.
- Seal the Deal: Once the baking soda layer has dried for about 10 minutes, hit the items with a second, heavier coat of spray paint. This seals the baking soda in and gives it a uniform, dark, metallic finish.
Allow the pieces to cure completely for at least 2 hours in the sun. When you peel off the painter’s tape, you will be left with a rugged, industrial-looking housing that perfectly contrasts with the clean, high-tech solar panel.
The Marriage of Wire and Light: Assembly Mechanics
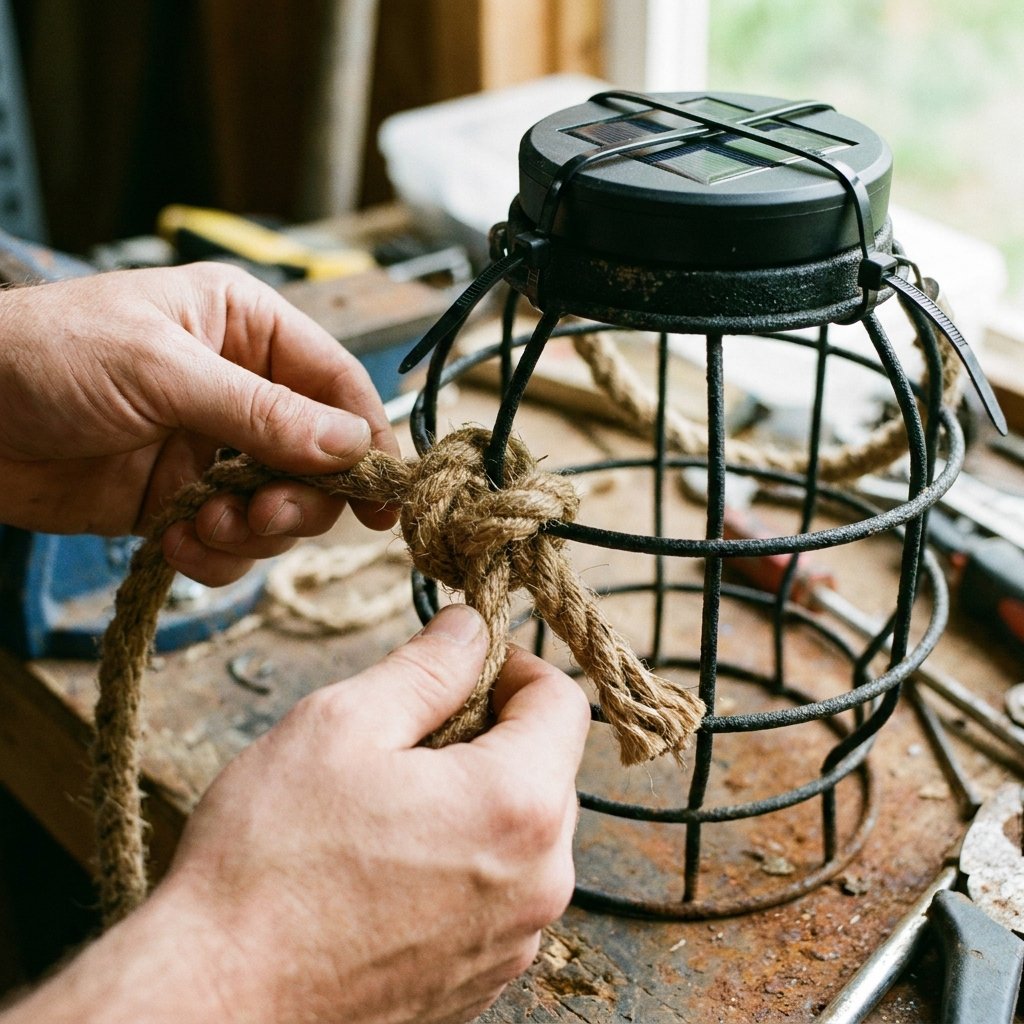
With our components painted and cured, it is time for the assembly—the MacGyver moment where disparate parts become a unified, functional piece of decor. The goal here is to suspend the solar puck at the top of the inverted wire basket, allowing the LED to shine down through the wire cage, casting brilliant, geometric shadows on your porch floor.
Securing the Solar Engine
Depending on the style of wire basket you chose, the bottom (which is now the top of our lantern) might have a tight grid or a wide opening. We need to secure the solar puck so it sits flush against the top, with the panel facing the sky and the bulb pointing down into the cage.
- The Zip-Tie Method: If your basket has a tight wire mesh, simply rest the solar puck on top. Thread two small, black zip ties through the wire mesh and over the plastic lip of the solar puck, locking it down tight. Snip the tails of the zip ties flush with a pair of diagonal cutters. Because everything is painted matte black, the zip ties will be completely invisible.
- The E6000 Method: If the basket has a solid metal ring at the base, apply a generous bead of E6000 industrial adhesive around the lip of the solar puck and press it firmly against the metal ring. Clamp it or place a heavy book on top and let it cure for 24 hours. E6000 is weatherproof and will withstand summer heat and winter freezes.
Rigging the Nautical Rope Handle
A lantern needs a handle, and nothing says “rugged elegance” quite like thick nautical jute rope. Cut a length of rope to approximately 24 inches.
- Locate two opposite sides of the wire basket near the top (formerly the bottom).
- Thread one end of the rope through the wire grid.
- Tie a secure, masculine knot. A simple overhand knot works, but if you want to show off your scouting skills, tie a Bowline knot or a Hangman’s loop for a highly decorative, industrial look.
- Repeat on the other side.
- To prevent the ends of the rope from fraying in the wind, dab a tiny amount of hot glue or clear nail polish on the freshly cut tips.
“The juxtaposition of the harsh, dark metal wire and the warm, organic texture of the jute rope is what tricks the eye into believing this is a $150 designer piece rather than a $4 weekend hack.”
Styling the Night: Hanging and Porch Integration
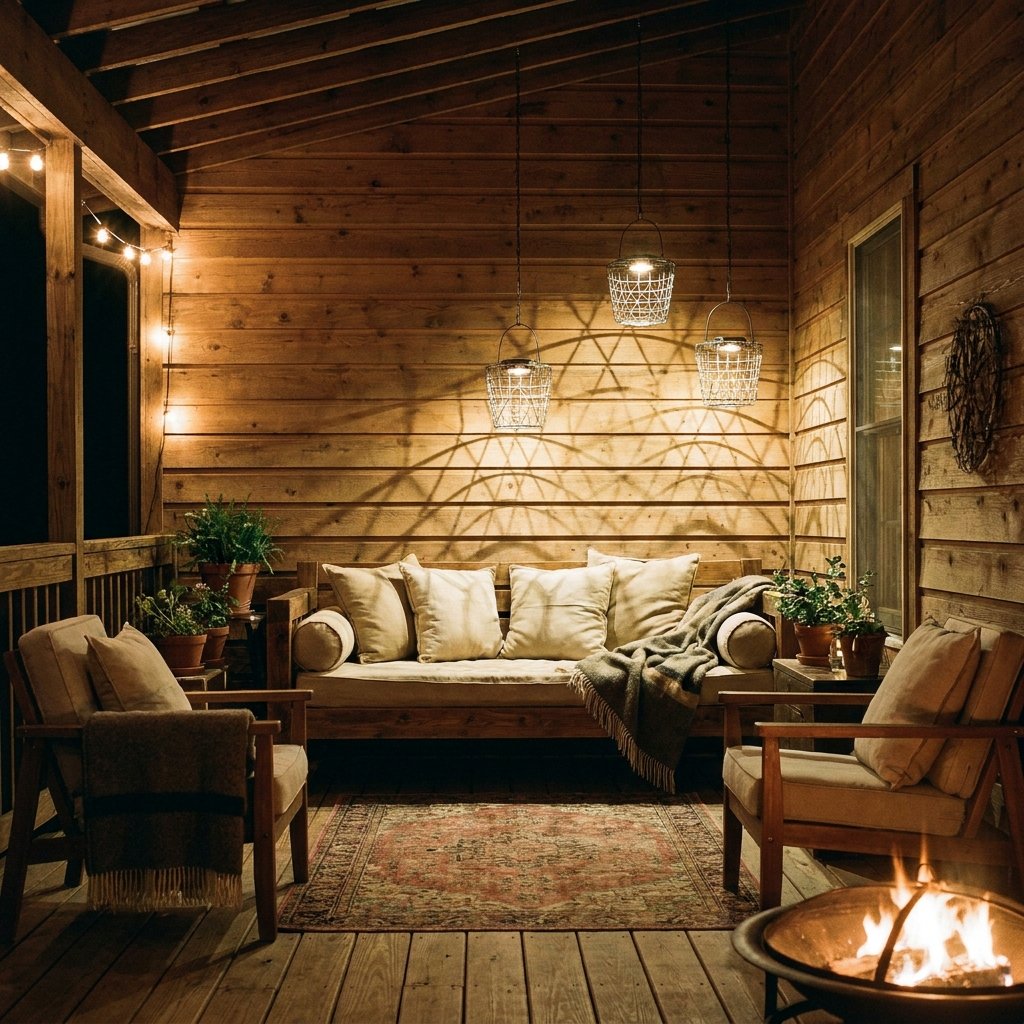
The construction is complete. Now comes the reward: installing your masterwork and styling your porch to maximize the magical ambiance. Because these lanterns are 100% solar-powered and completely wireless, your hanging options are virtually limitless. You are no longer chained to the location of your outdoor electrical outlets.
Strategic Hanging Strategies
To get the most visual impact from your new lanterns, consider the following styling tips:
- The Staggered Cluster: Hang three lanterns at varying heights in the corner of your porch using simple black screw-in cup hooks. The staggered heights create depth and a professional, curated look.
- The Shepherd’s Hook Pathway: If you have a walkway leading up to your porch, purchase a few heavy-duty wrought iron shepherd’s hooks. Hang your DIY lanterns on these to guide guests to your door with a warm, inviting glow.
- The Pergola Canopy: If you have a wooden pergola or trellis, string a piece of heavy-gauge wire across the beams and use S-hooks to suspend a line of lanterns directly over your outdoor dining table. It mimics the look of expensive cafe lighting without any of the electrical hazard.
Maximizing the Shadow Play
The true magic of these wire basket lanterns isn’t just the light they emit; it is the shadows they cast. When the LED bulb shines through the wire grid, it projects intricate, geometric patterns onto your walls, ceiling, and deck boards. To maximize this effect, hang the lanterns relatively close to a solid surface (about 12 to 18 inches away from a wall). The closer the lantern is to the wall, the sharper and more dramatic the shadow lines will be.
Pair your new lighting with other budget-friendly porch upgrades. A freshly stenciled Dollar Tree coir mat, some upcycled faux stone planters, and a couple of rugged canvas throw pillows will complete the high-end, masculine-elegant aesthetic. Your outdoor space will instantly feel like a boutique hotel patio, and only you will know the resourceful, frugal secrets behind its creation.
Conclusion
Transforming your home and creating a welcoming, magical atmosphere does not require a bottomless bank account; it requires a shift in perspective. By looking past the cheap plastic exterior of a Dollar Tree solar light and seeing the potential of a simple wire basket, you have engineered a high-end decor piece that punches far above its weight class. You have saved yourself well over $100 per lantern, bypassed the headaches of electrical wiring, and crafted something truly unique with your own two hands.
These DIY solar hanging lanterns are a testament to the power of frugal ingenuity. They prove that with a little bit of spray paint, some rugged rope, and a resourceful mindset, you can elevate your outdoor living space from ordinary to extraordinary in a single afternoon. So pour yourself a drink, step out onto your newly illuminated porch, and bask in the warm, patterned glow of a job incredibly well done. The night is yours, and you built it on a budget.

Makenzie is the founder and lead writer at MoneyHackTips.com — a personal finance blog dedicated to delivering street-smart financial wisdom for real people on real budgets. With 300+ published articles covering everything from debt management to investing fundamentals, Makenzie’s mission is to make every dollar work harder. When not writing about money hacks, Makenzie is testing frugal living strategies, optimizing side hustles, and helping readers build financial freedom from scratch.