
Welcome, fellow frugal DIYers, resourceful parents, and cardboard architects. If there is one universal truth of parenting, it is this: you can spend $150 on a flashing, singing, battery-draining plastic mega-toy, and your toddler will inevitably spend the next three weeks playing exclusively with the cardboard box it came in. So, why not skip the middleman, save your hard-earned cash, and transform that very box into a masterpiece of imaginative play? Today, we are rolling up our sleeves to build the ultimate zero-budget toy: a DIY Cardboard Box Play Scanner.
Pretend play is the cornerstone of early childhood development. When toddlers mimic our daily routines—like scanning groceries at the checkout—they are building crucial cognitive, linguistic, and fine motor skills. But you do not need to clutter your living room with expensive, noisy plastic to facilitate this. With a little crafty ingenuity, a rugged utility knife, and a stash of Amazon boxes, you can engineer an interactive, durable play scanner that features pushable buttons, a ‘glass’ scanning bed, and even a satisfying mechanical ‘beep’—all for absolutely $0.
This guide is designed for the handy moms and dads who love a good trash-to-treasure project. We will walk through the structural engineering of cardboard folding, the clever upcycling of household scraps for interactive elements, and the rugged reinforcement techniques needed to ensure your creation survives the enthusiastic hands of a toddler. Grab your hot glue gun, channel your inner maker, and let’s turn weekend recycling into hours of free fun!
The Magic of Cardboard Upcycling: Why DIY Beats Store-Bought
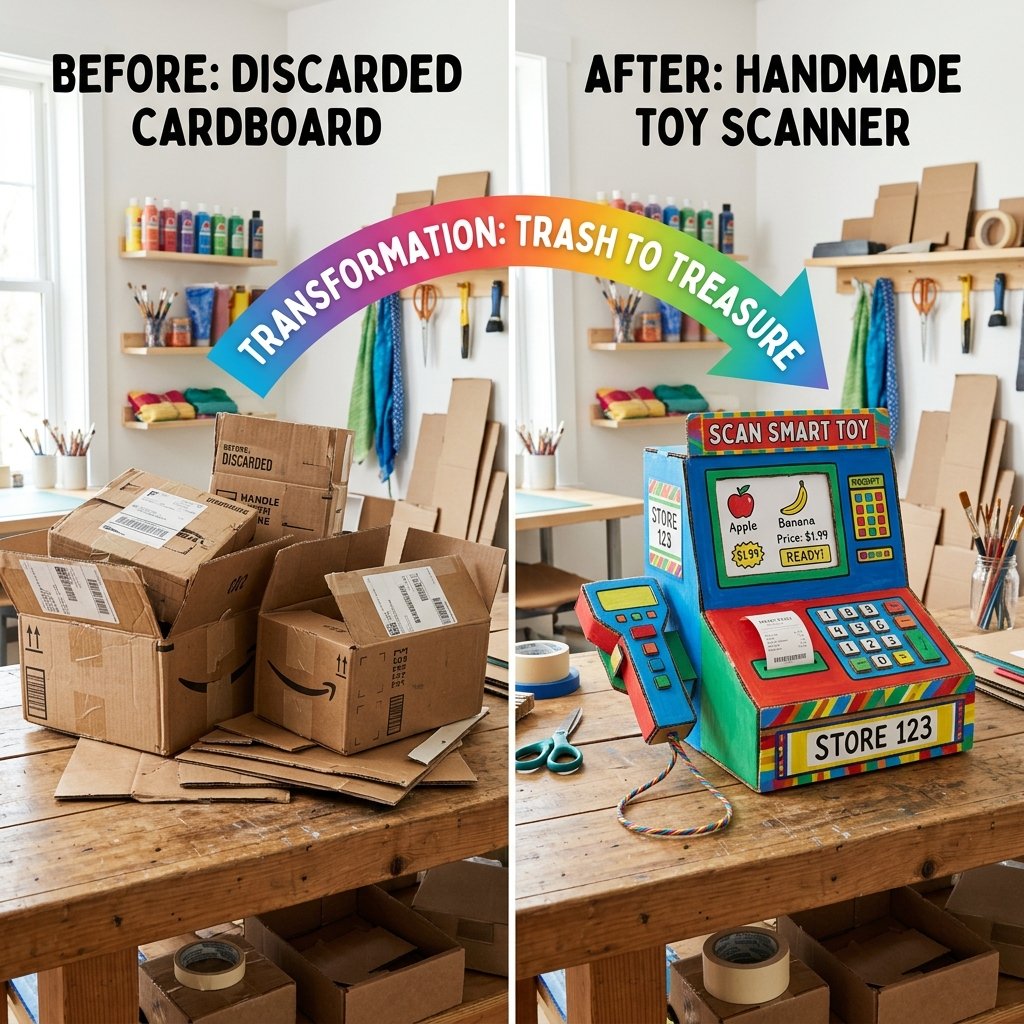
Before we make our first cut, let us talk about why cardboard is the undisputed king of DIY crafting materials. It is abundant, easily manipulated, structurally sound when folded correctly, and completely forgiving. If you make a mistake, you simply grab another flap from the recycling bin. Building a DIY cardboard play scanner is not just about saving money; it is about modeling resourcefulness for your children and creating something customized entirely to their height and play style.
Store-bought pretend play stations are often bulky, made of brittle plastic that cracks under pressure, and require a constant supply of AA batteries. Our rugged DIY version relies on mechanical ingenuity and your child’s imagination. Plus, when they eventually outgrow it, you can toss the whole thing into the recycling bin guilt-free. Let us look at a quick breakdown of why going the frugal, crafty route is the superior choice.
| Feature | Store-Bought Plastic Scanner | Zero-Budget DIY Cardboard Scanner |
|---|---|---|
| Initial Cost | $35 – $150 | $0 (Using household scraps) |
| Durability | Prone to cracking, unrepairable | Easily reinforced, infinitely repairable with tape |
| Customization | None (Standard factory colors) | Limitless (Paint, custom decals, sizing) |
| Environmental Impact | High (Non-biodegradable plastics) | Zero-waste (100% Recyclable/Upcycled) |
| Power Source | Expensive batteries | 100% Imagination-powered |
By choosing the DIY route, you are stepping into the role of a resourceful upcycler. You are taking everyday household waste and elevating it into a functional, joy-inducing tool for your child. It is practical, it is masculine-elegant in its raw engineering, and it is incredibly satisfying to build.
Scavenging Your Stash: Materials & Tools for the Ultimate Play Scanner
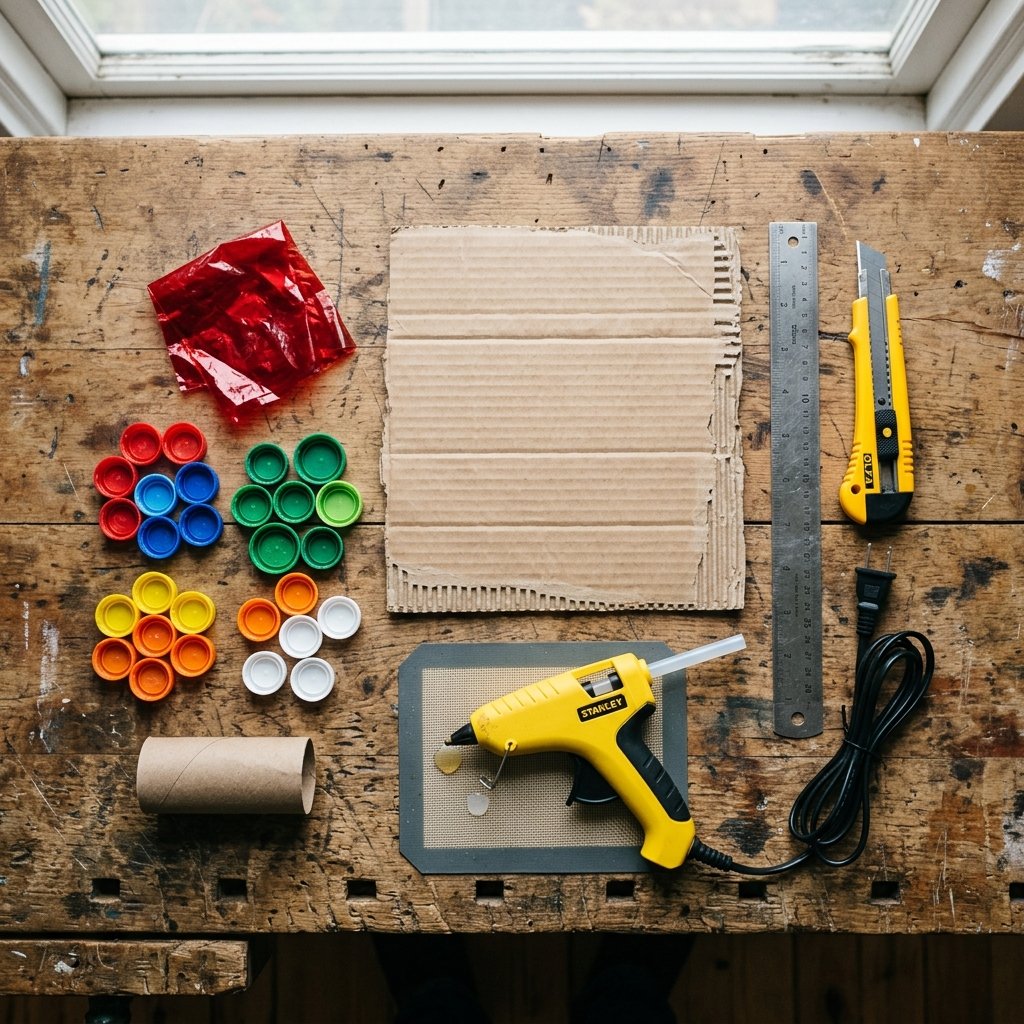
Every great craftsman knows that a project is only as good as its materials. Luckily, our materials list reads like a scavenger hunt through your own home. We are looking for sturdy, double-walled corrugated cardboard for the main chassis, and clever little bits of trash for the interactive components. Here is what you need to gather before we begin construction.
The Master Supply List
- The Main Chassis: One medium-sized shipping box (roughly 12x10x8 inches is perfect for a toddler’s reach).
- The Scanner Glass: A piece of clear plastic packaging (the kind that comes on toy boxes or berry containers) and a scrap of red tissue paper or cellophane for the ‘laser’.
- The Buttons: Bottle caps, pieces of dense packing foam, or extra cardboard scraps.
- The Receipt Roll: An empty toilet paper tube and some scrap printer paper.
- The Adhesives: A heavy-duty hot glue gun (your best friend for this project), masking tape, and a glue stick.
- The Tools: A sharp utility knife (box cutter), a metal ruler for straight cuts, a cutting mat, and a pencil.
| Material Item | Household Scavenge Source | Estimated DIY Cost |
|---|---|---|
| Corrugated Cardboard | Old shipping boxes, diaper boxes | $0.00 |
| Clear Plastic Window | Takeout containers, toy packaging | $0.00 |
| Red ‘Laser’ Light | Leftover gift wrap tissue, cellophane | $0.00 |
| Faux Buttons & Knobs | Milk jug caps, juice bottle lids | $0.00 |
| Hot Glue & Tape | Existing craft stash | $0.00 |
Safety First: This project requires heavy use of a sharp utility knife to cut through thick corrugated cardboard. Always cut away from your body, use a metal straight-edge to guide your blade, and ensure your toddler is safely occupied elsewhere during the cutting phase. A dull blade is more dangerous than a sharp one, so swap out your box cutter blade before starting!
Blueprinting and Cutting: Shaping the Main Register and Scanner Bed
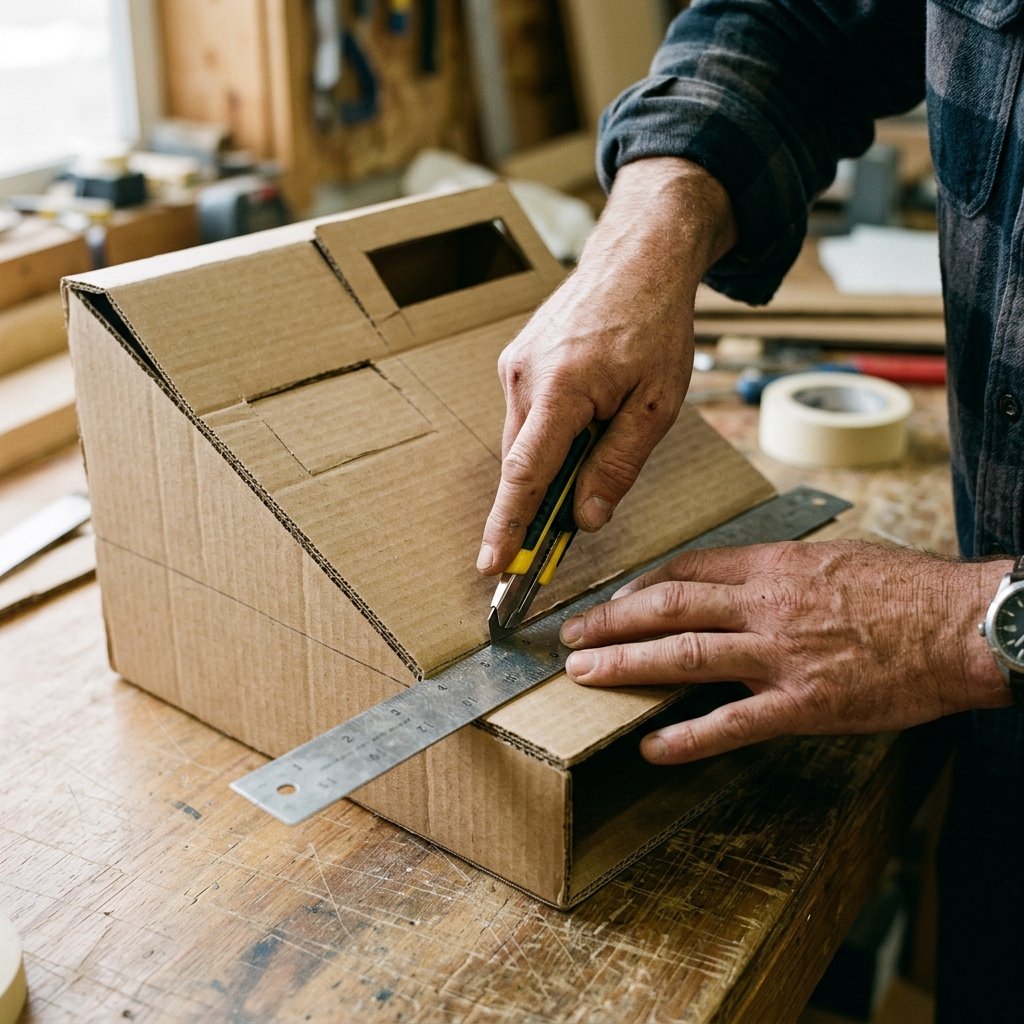
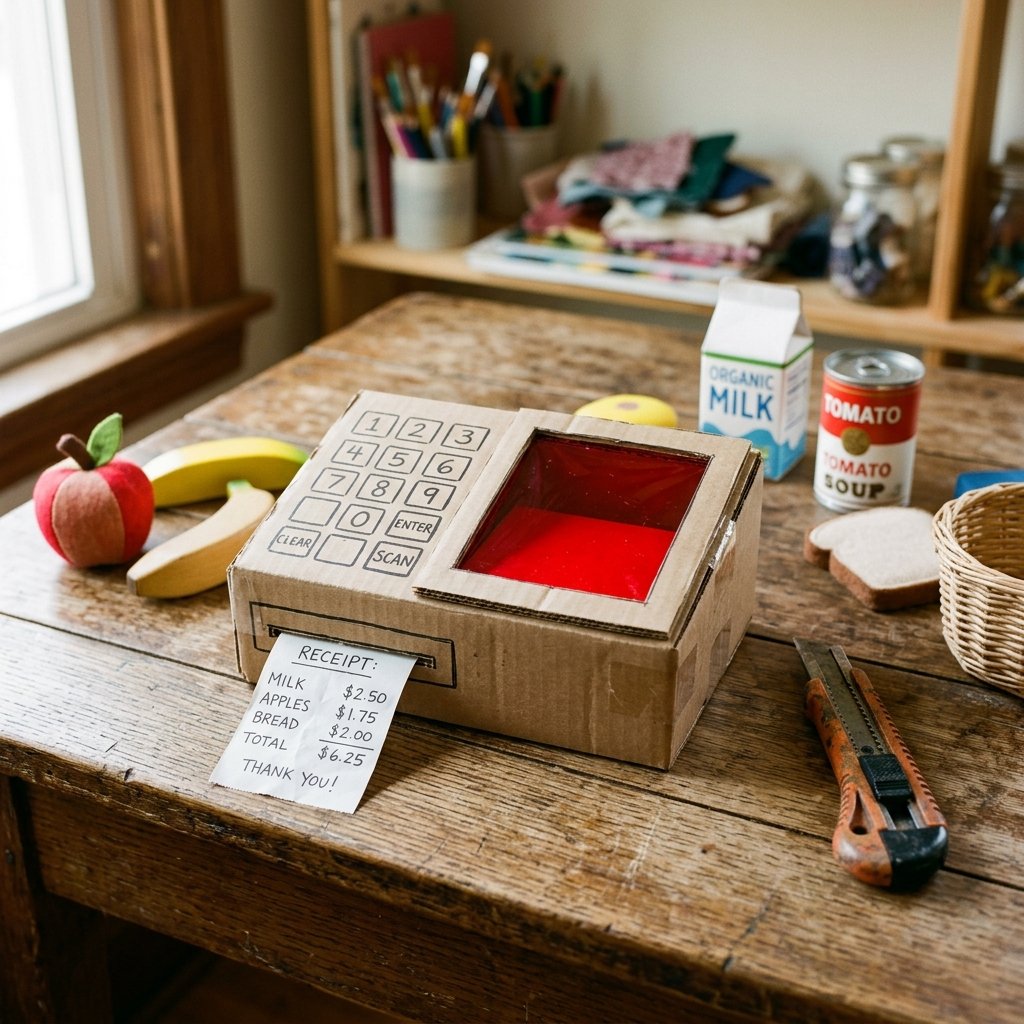
Now comes the architectural phase. We are going to transform a standard, boring cubic box into a sleek, angled checkout register with a flat scanning bed. This requires a bit of clever measuring and scoring. The goal is to create a two-tiered structure: a flat lower section where the ‘groceries’ are dragged across the scanner, and an angled upper section that houses the keypad and receipt slot.
Step 1: Establishing the Profile
Take your medium-sized box and tape the bottom flaps shut securely. Stand the box up. On the left and right sides of the box, draw the profile of your register. You want a flat horizontal line extending from the front (about 4 inches deep) for the scanner bed, then a diagonal line sloping upward toward the back for the keypad face. Use your metal ruler and a sharp pencil to ensure both sides are perfectly symmetrical.
Step 2: The Big Cut
Using your utility knife, carefully cut along the profile lines you just drew on the side panels. Once the sides are cut, score (do not cut all the way through) the front panel horizontally so it can fold back to form the flat scanner bed. Score the remaining top flap so it can angle down to meet the scanner bed, forming the keypad face. Hot glue everything into its new, angled position. Hold the joints firmly for at least 30 seconds while the glue sets.
Step 3: Creating the Scanner Window
On the flat, horizontal section of your new register, trace a rectangle (about 3×4 inches). Cut this rectangle out completely. Take your clear plastic packaging scrap and cut it slightly larger than the hole. Cut a piece of red tissue paper or cellophane to the exact same size. Glue the red layer to the plastic layer, then glue the entire assembly to the underside of the hole. When you flip it back over, you will have a glossy, red ‘laser’ scanning bed that looks incredibly authentic.
Crafter’s Pro-Tip: When working with corrugated cardboard, ‘scoring’ is your secret weapon. By cutting only through the top layer of paper and the wavy inner corrugation, but leaving the bottom layer of paper intact, you create a perfect, clean hinge. This technique is essential for building strong, angled structures without needing extra tape.
Engineering the ‘Beep’: Adding Interactive Buttons and Sounds

A play scanner is nothing without the satisfying tactile feedback of buttons and the magical ‘beep’ of a scanned item. This is where we elevate our project from a simple cardboard box to an interactive, high-end DIY toy. We are going to use resourceful upcycling to engineer mechanical movement and sound without a single wire or battery.
The Tactile Keypad
For the keypad on the angled face of the register, you have a few frugal options. The easiest method is to hot-glue colorful milk jug or juice bottle caps in a grid. For a more interactive, pushable button, cut small squares of dense packing foam (or layered cardboard) and glue them down. You can top them with paper squares and draw numbers on them. Because the foam is squishy, the buttons will actually depress when your toddler pushes them, providing excellent fine motor practice.
The Secret Squeaker Mechanism
Now, for the piece de resistance: the scanner ‘beep’. How do we achieve this on a zero budget? We scavenge! If you have an old, torn dog toy or a cheap dollar-store plushie that has seen better days, extract the plastic squeaker from inside it. If you don’t have a squeaker, the metal pop-top of a juice bottle (the kind that clicks when you press the center) works brilliantly as a mechanical clicker.
- Positioning: Find a spot right next to the red scanner window on the flat bed.
- Housing: Cut a small hole just large enough for the top of the squeaker or clicker to poke through.
- Mounting: From the underside of the cardboard, hot glue the squeaker firmly into place. Ensure it is backed by a scrap piece of stiff cardboard so that when the child pushes down on it from the top, it resists and makes the noise rather than just falling into the box.
- Camouflage: Cover the top of the squeaker with a small, flexible piece of craft foam or a large flat button. Now, every time they slide a toy apple across the red scanner and press the button, they get an audible, satisfying ‘BEEP!’.
This kind of clever, mechanical problem-solving is what makes DIY so rewarding. You are creating sensory feedback using pure, rugged ingenuity.
Rugged Assembly & Kid-Proof Reinforcement
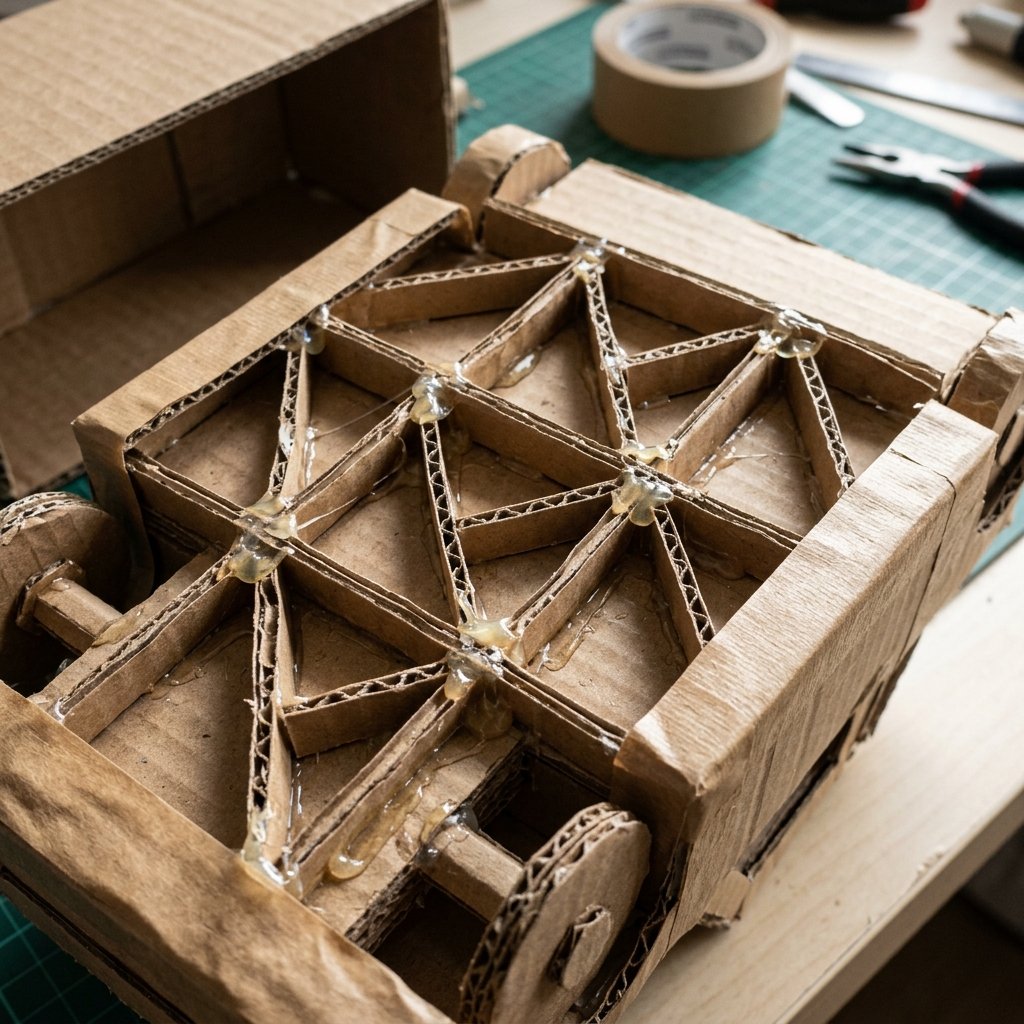
Toddlers are wonderful, imaginative creatures. They are also tiny, destructive forces of nature. A standard cardboard box held together with a few strips of scotch tape will not survive a week of intense grocery store roleplay. To make this DIY cardboard play scanner last for months, we need to apply some practical, heavy-duty reinforcement techniques.
Cross-Bracing for Structural Integrity
Cardboard is incredibly strong when force is applied parallel to its corrugations, but it crushes easily when force is applied perpendicularly. To prevent the angled keypad face or the scanner bed from caving in when your child leans on it, we must add internal struts. Cut two or three long, narrow rectangles of scrap cardboard. Fold them into triangular tubes (triangles are the strongest structural shape) and hot glue them inside the chassis, directly underneath the scanner bed and the keypad. These invisible pillars will make the toy rugged enough to withstand a toddler’s body weight.
Edge Binding with Tape
The raw edges of cut corrugated cardboard are vulnerable to peeling, fraying, and moisture (toddler drool). To seal the edges and give the scanner a polished, manufactured look, we will use the ‘edge binding’ technique. Take a roll of heavy-duty paper masking tape or duct tape. Run a strip along every exposed cut edge, folding half of the tape over the front and half over the back. This not only reinforces the seams but provides a smooth surface for painting later.
The Upcycler’s Mantra: “If it wobbles, add a triangle. If it bends, add a brace. If you want it to last, seal the edges.” Taking an extra 10 minutes to reinforce your cardboard builds will exponentially increase the lifespan of your DIY toys.
The Aesthetic Finish: Painting, Decals, and Bringing the Checkout to Life
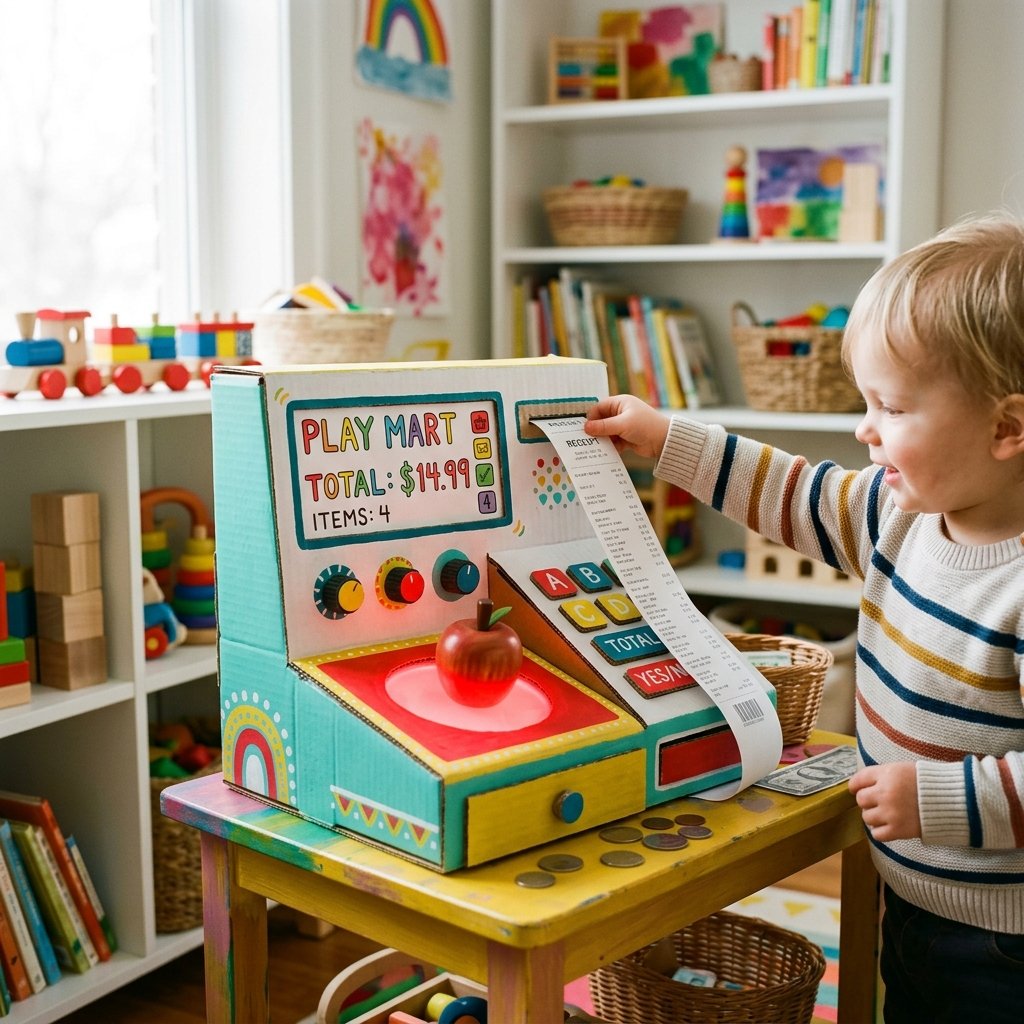
We have built a structurally sound, interactive piece of machinery. Now, it is time to make it look amazing. This is where you can let your creativity shine and customize the scanner to match your child’s playroom or mimic your local grocery store.
Painting Without Warping
Cardboard and wet paint are natural enemies. If you apply a heavy coat of water-based acrylic or tempera paint directly to the box, the paper will absorb the moisture, warp, and ruin your perfectly straight lines. To avoid this, you have two budget-savvy options:
- The Primer Method: Coat the entire box in a thin layer of cheap spray paint or oil-based primer first. Once dry, it seals the paper, allowing you to brush on any craft paint you like without warping.
- The Wrapping Method: Skip the paint entirely! Use leftover wrapping paper, contact paper from the Dollar Tree, or even brown kraft paper to wrap the chassis like a complex gift. It is fast, clean, and looks incredibly sharp.
Adding the Receipt Roll
No checkout is complete without a receipt. Take an empty toilet paper tube and cut a slit in the top of your register, just wide enough for paper to pass through. Cut a long strip of scrap printer paper, roll it around a pencil, and drop it into the box so the end pokes out of the slit. You can even draw little barcodes and prices on it. Your toddler will spend hours just pulling the receipt paper out!
The Finishing Touches
To really sell the illusion, use a black sharpie to draw a digital display screen above the keypad. Write out “TOTAL: $0.00” to keep with our zero-budget theme. You can also print out small, fake barcodes and tape them to your child’s existing play food or wooden blocks. Suddenly, every toy in the house becomes scannable inventory.
By combining thoughtful engineering with a few aesthetic flourishes, you have created a high-end, personalized toy. You saved money, you upcycled waste, and you built something with your own two hands that will provide literal hours of free fun.
Conclusion
There you have it—a masterclass in frugal, resourceful parenting. By looking at a pile of discarded shipping boxes not as trash, but as raw building materials, you have engineered a fully functional, highly interactive DIY cardboard play scanner. You bypassed the exorbitant costs of store-bought plastic, avoided the headache of dead batteries, and built a rugged, custom toy tailored specifically to your toddler’s imagination.
Projects like this remind us that the best toys are not always the ones that cost the most money; they are the ones that invite the most creativity. When your child stands at their new checkout counter, scanning wooden blocks and handing you a hand-drawn paper receipt, you will know that the $0 budget and the hour of crafting were worth every single second. So keep your utility knife sharp, save those good, sturdy boxes, and never underestimate the endless possibilities of a little hot glue and a lot of imagination. Happy crafting, and enjoy the hours of free fun!

Makenzie is the founder and lead writer at MoneyHackTips.com — a personal finance blog dedicated to delivering street-smart financial wisdom for real people on real budgets. With 300+ published articles covering everything from debt management to investing fundamentals, Makenzie’s mission is to make every dollar work harder. When not writing about money hacks, Makenzie is testing frugal living strategies, optimizing side hustles, and helping readers build financial freedom from scratch.