

The Art of the Elevated Cash Gift
Let’s be honest: giving cash can sometimes feel a bit like a last-minute surrender. We’ve all been there—scribbling a name on a generic envelope at the eleventh hour. But what if I told you that with a little resourceful creativity and about five minutes of your time, you could transform a standard bill into a structural masterpiece? This isn’t just about the money; it’s about the tactile experience of a handmade gesture. As a frugal DIYer, you know that the best gifts don’t require a massive budget—they require clever execution. Today, we are diving deep into the world of money origami, specifically the 3D Christmas Tree. This project is rugged enough for a masculine-elegant aesthetic yet charming enough to be the ‘cutest’ thing under the tree. Whether you are a handy parent looking to surprise the kids or a budget-savvy friend wanting to stand out, this tutorial is your masterclass in trash-to-treasure gifting (where the ‘trash’ is just the boring packaging we’re throwing away!).
“A gift of cash is a resource; a gift of origami is a memory. Combine them, and you have the perfect holiday gesture.”
Strategic Preparation: The Bill Selection Matrix
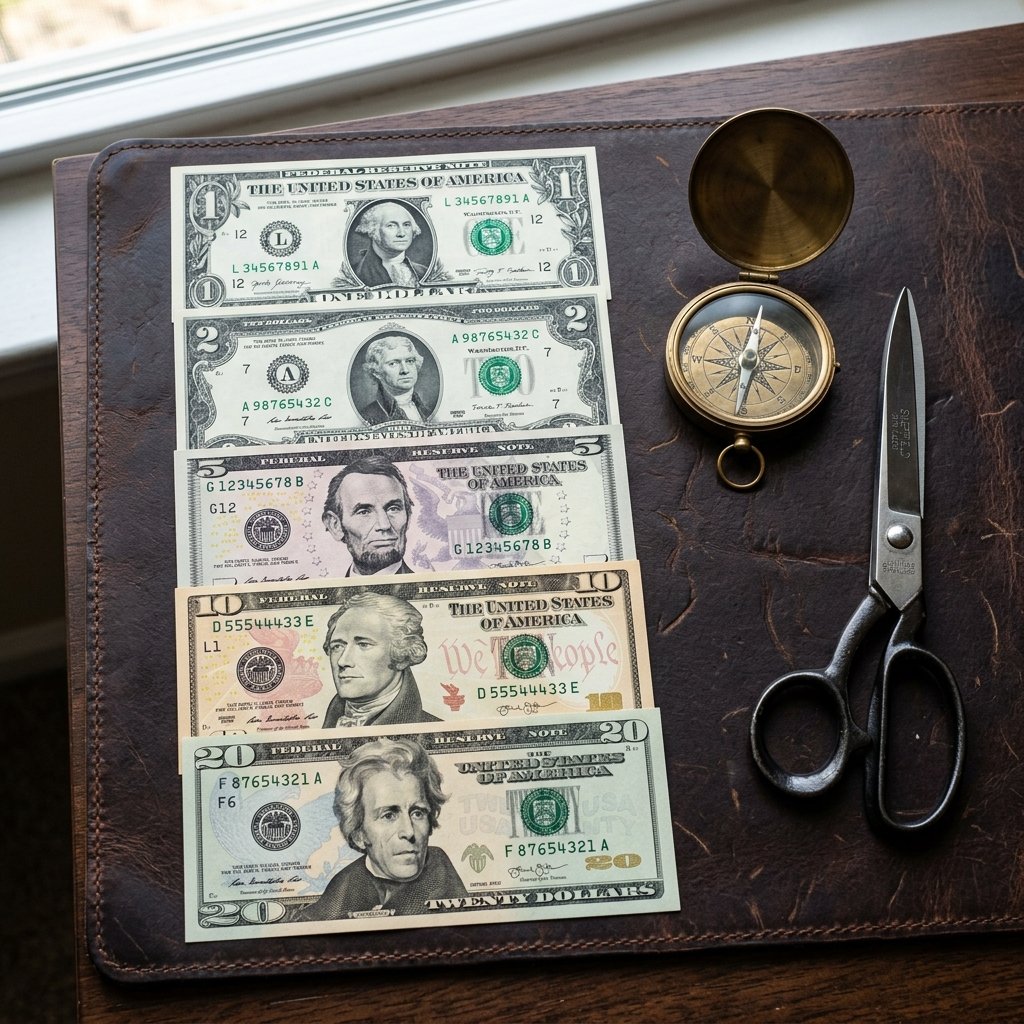
Before we start folding, we need to talk strategy. Not all bills are created equal when it comes to origami. For a crisp, professional finish, the physical condition of the currency is paramount. You want bills that feel like fresh stationery, not the limp, wrinkled ones you find at the bottom of a vending machine. If your cash is looking a bit tired, a pro-tip from the world of master menders: a very quick pass with a low-heat iron (no steam!) can revive a bill’s structural integrity.
| Bill Denomination | Visual Impact | Best Recipient |
|---|---|---|
| $1 Bill | High (Great for practice) | Kids & Stocking Stuffers |
| $2 Bill | Elite (Rare & Unique) | Collectors & Grandkids |
| $5 – $10 Bill | Substantial | Teenagers & Friends |
| $20 – $100 Bill | Premium Luxury | Significant Others & Graduates |
The $1 bill is excellent for creating a ‘Money Forest’ because you can fold ten of them for the price of one ten-dollar gift, creating a much larger visual footprint on the gift table. However, the $20 bill remains the gold standard for a standalone tree due to its deep green hues which naturally mimic evergreen foliage.
The Tool Kit: Minimalist Engineering

One of the beauties of money origami is that it requires almost zero overhead. As a budget-savvy crafter, you likely already have everything you need in your junk drawer or wallet. While your fingers are your primary tools, a few ‘rugged’ additions can help you achieve those razor-sharp creases that define high-end origami.
- Crisp Currency: The newer, the better.
- A ‘Bone Folder’ (or Credit Card): Use the edge of a plastic card to score your folds.
- A Small Paperclip: To secure the base if you’re using older, softer bills.
- Wooden Skewer or Toothpick: For the ‘trunk’ (optional).
“Precision is the hallmark of the craftsman. In origami, your crease is your signature.”
If you are making these in bulk for a holiday party, set up an assembly line. Scoring all your bills at once saves 30% more time than folding each one individually from start to finish.
Step-by-Step: Folding the 3D Christmas Tree
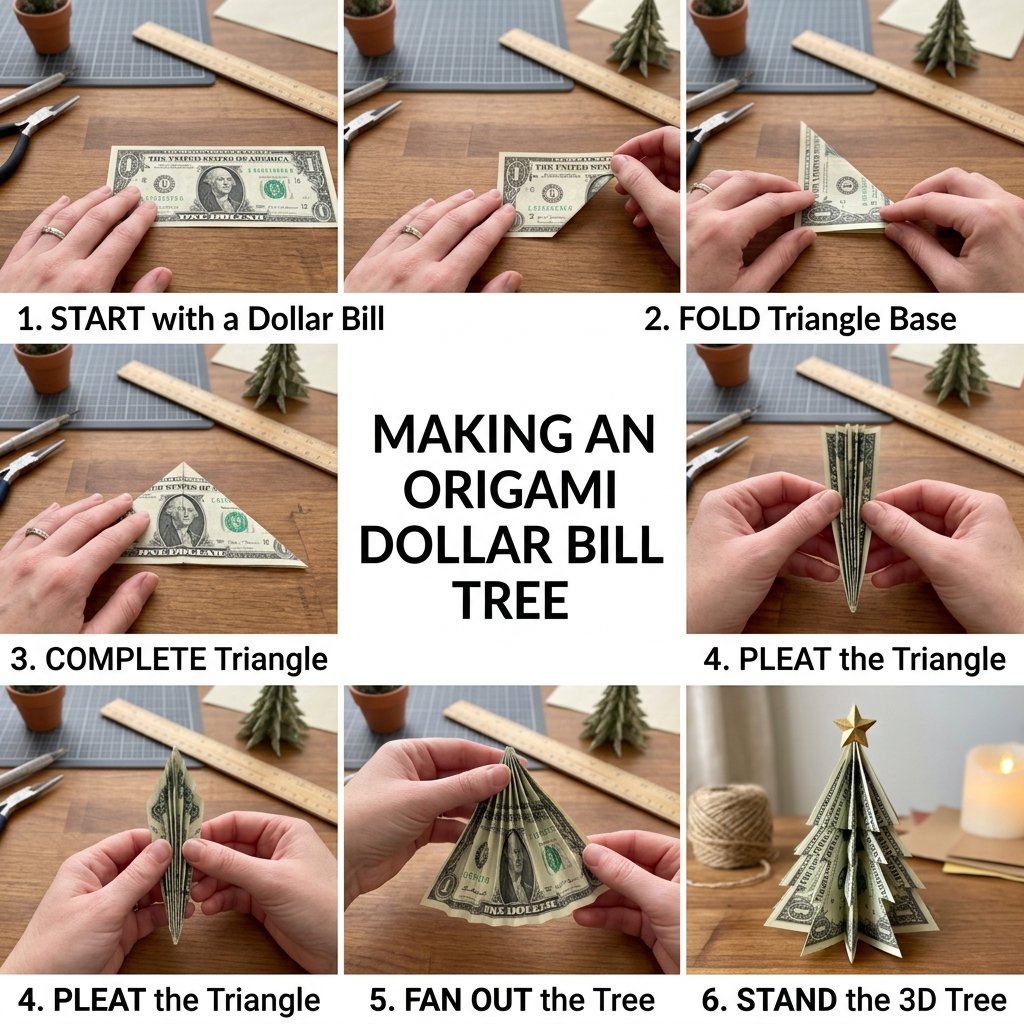
Follow these instructions carefully. If you get stuck, remember: origami is a game of patience. We are going to create a tiered, standing tree that looks like it belongs in a boutique window.
Phase 1: The Foundation Folds
- Vertical Half: Lay the bill flat. Fold it in half lengthwise (hot dog style). Crease it firmly and unfold.
- The Center Point: Fold the bill in half widthwise (hamburger style) just to mark the center, then unfold.
- The Roof Fold: Take the top two corners and fold them down to meet the center vertical crease, forming a triangle shape at the top.
Phase 2: Creating the Tiers
- The Bottom Flip: Fold the rectangular bottom portion of the bill upward, so it overlaps the bottom of your triangle.
- The Squash Fold: This is the ‘crafty expert’ move. Open the bottom flap slightly and tuck the corners inward to create a clean, flat base.
- The Pleating: To create the ‘branches,’ make a series of small 1/4 inch accordion folds (zig-zags) starting from the bottom and moving upward.
Phase 3: The 3D Transformation
- The Final Lock: Gently pull the sides of the bill outward. The pleats will expand like an accordion.
- The Stand: Tuck the very bottom edges into each other to form a circular base. If the bill is too springy, a tiny piece of clear tape or a paperclip on the inside will hold its shape forever.
“Don’t rush the squash fold. It’s the structural anchor of the entire tree.”
Elevating the Presentation: Rugged & Masculine-Elegant Ideas

Now that you have your tree, don’t just hand it over. As an event stylist on a dime, you know that packaging is 50% of the gift’s perceived value. Here is how to present your money origami tree so it looks like a $50 gift even if it’s only a single dollar.
| Presentation Method | Materials Needed | Vibe |
|---|---|---|
| The Mason Jar Forest | Empty jar, Epsom salt (snow) | Rustic/Cozy |
| The Wood Slice Display | Small branch slice, hot glue | Rugged/Handmade |
| The Shadow Box | $1.25 Dollar Tree frame | High-End Decor |
| The Ornament Hook | Wire, ribbon | Traditional |
For a masculine-elegant touch, place the tree on a small disc of natural cedar or pine. The scent of the wood combined with the crispness of the bill creates a sensory experience that an envelope simply cannot match. If you’re feeling extra crafty, use a gold-painted paperclip as a star at the top of the tree.
Troubleshooting & Pro-Tips for Perfectionists

Even the most handy DIYers run into snags. If your tree is leaning or won’t stay upright, check your structural integrity. Here are a few quick fixes:
- Problem: The tree keeps unfolding. Solution: Your creases aren’t sharp enough. Re-score every fold with a hard edge.
- Problem: The bill is too soft. Solution: Lightly mist the bill with a tiny bit of hairspray (from a distance!) to stiffen the fibers before folding.
- Problem: The base is uneven. Solution: Trim a small piece of cardboard from a cereal box and glue the tree to it for a weighted ‘pedestal.’
“Safety Note: When using an iron to crisp up bills, never leave it unattended and use the lowest setting. US currency is a blend of linen and cotton, but it can still scorch!”
Conclusion
The Gift That Keeps on Giving
You’ve done it. You’ve taken a simple piece of legal tender and transformed it into a work of art. This Money Origami Tree is more than just a Christmas gift; it’s a testament to your resourceful spirit and your willingness to put in the effort for the people you love. By following this guide, you’ve saved money on expensive cards and gift wrap while providing a memorable, ‘cute,’ and sophisticated surprise. Whether it’s sitting on a mantle, hanging from a branch, or tucked into a stocking, your handmade tree is sure to be the talk of the holiday. So go ahead—grab those crisp bills and start folding. Happy crafting, and Merry Christmas!

Makenzie is the founder and lead writer at MoneyHackTips.com — a personal finance blog dedicated to delivering street-smart financial wisdom for real people on real budgets. With 300+ published articles covering everything from debt management to investing fundamentals, Makenzie’s mission is to make every dollar work harder. When not writing about money hacks, Makenzie is testing frugal living strategies, optimizing side hustles, and helping readers build financial freedom from scratch.