The Art of the Save: Why We Mend
There is a specific kind of heartbreak that occurs when you pull on your favorite pair of thick, cozy wool socks only to feel your big toe poke through a fresh hole. In our modern ‘throwaway’ culture, the instinct is to toss them in the bin and head to the store for a cheap 6-pack. But a true frugal guru knows better. Those socks aren’t trash; they are an opportunity to practice a rugged, practical skill that has been passed down through generations of savvy makers. Whether you are a handy parent looking to save on the kids’ sports socks or a crafty gift-giver who wants to preserve a hand-knit treasure, mastering the invisible stitch is a game-changer. This isn’t just about saving $15 on a new pair; it is about the satisfaction of self-reliance and the masculine elegance of maintaining your gear. In the next few minutes, we are going to transform you from a consumer into a mender, using nothing more than a needle, some thread, and a bit of clever resourcefulness.
The Mender’s Arsenal: Supplies for a Professional Finish
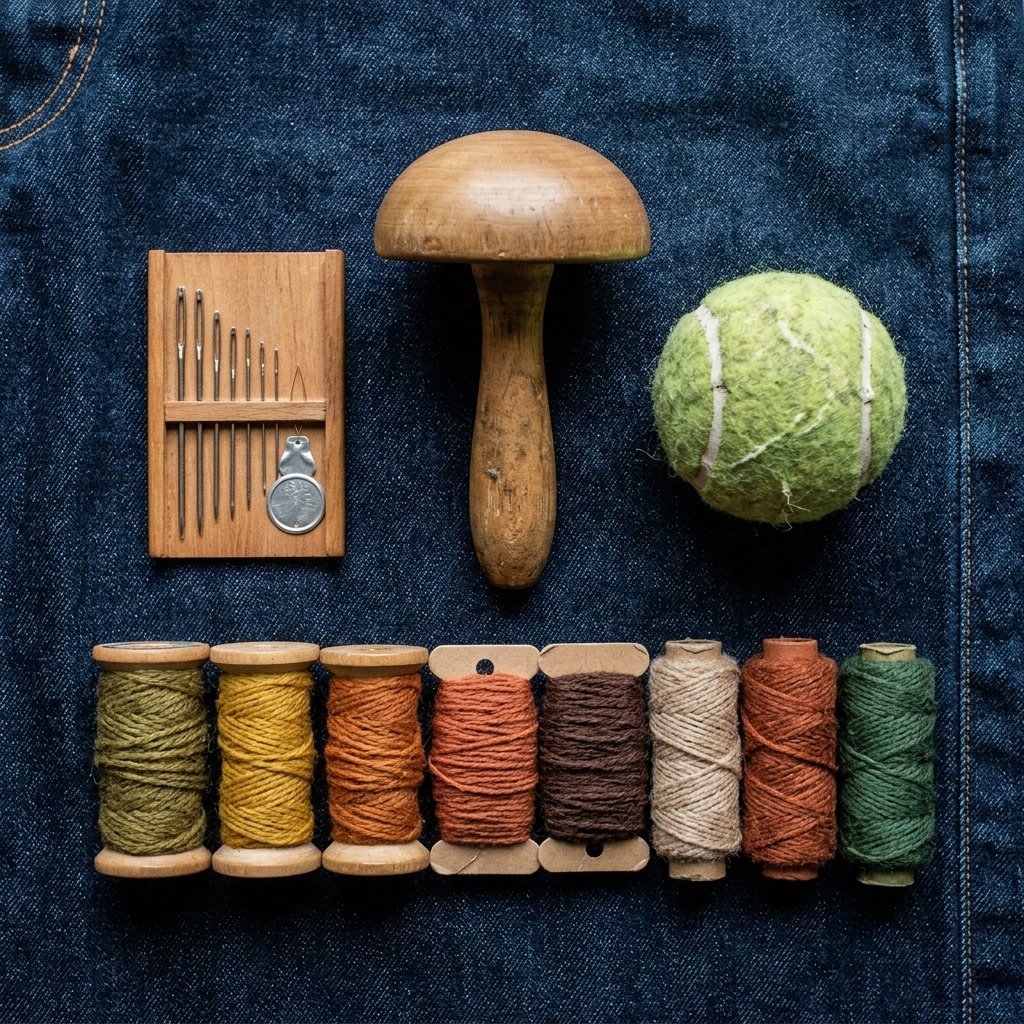
Before we dive into the stitches, we need to gather our tools. You don’t need an expensive sewing machine or a professional tailor’s studio. In fact, most of these items are already sitting in your junk drawer or can be found for less than $2 at a local thrift shop. The key to an invisible repair is matching your materials to the weight and color of the sock. If you are fixing a rugged hiking sock, you want a thicker embroidery floss or darning wool; for a thin dress sock, a standard polyester thread will do the trick.
| Essential Tool | Purpose | Budget Hack |
|---|---|---|
| Darning Needle | Blunt-tipped needle for weaving through knit loops. | Use a large-eye embroidery needle ($1.25). |
| Darning Mushroom | A hard surface to stretch the sock over while sewing. | Use a tennis ball, a lightbulb, or a smooth stone. |
| Matching Yarn/Thread | The ‘ink’ for your repair. | Unravel a bit of yarn from the top of an old, unfixable sock. |
| Small Scissors | For clean snips. | Nail clippers work in a pinch for a zero-budget fix. |
The Mender’s Mantra: A stitch in time saves nine, but a clever stitch saves the whole pair for a lifetime.
The Secret Weapon: Prepping the ‘Mushroom’ Method

The biggest mistake beginners make is trying to sew a hole shut while the sock is flat. This results in a puckered, uncomfortable lump that will rub against your foot and cause blisters. To get that high-end, professional look, you need to mimic the shape of a heel or toe. This is where the ‘Darning Mushroom’ comes in. If you don’t have a wooden one, don’t worry—this is where your resourceful creativity shines. Slide a tennis ball or an old-fashioned incandescent lightbulb into the sock and center the hole over the curved surface. This tension ensures that your repair has the same elasticity as the rest of the sock. Pro Tip: Use a rubber band to secure the sock around the base of your ‘mushroom’ to keep the fabric taut while you work.
The Invisible Ladder Stitch: Perfect for Seams and Small Tears
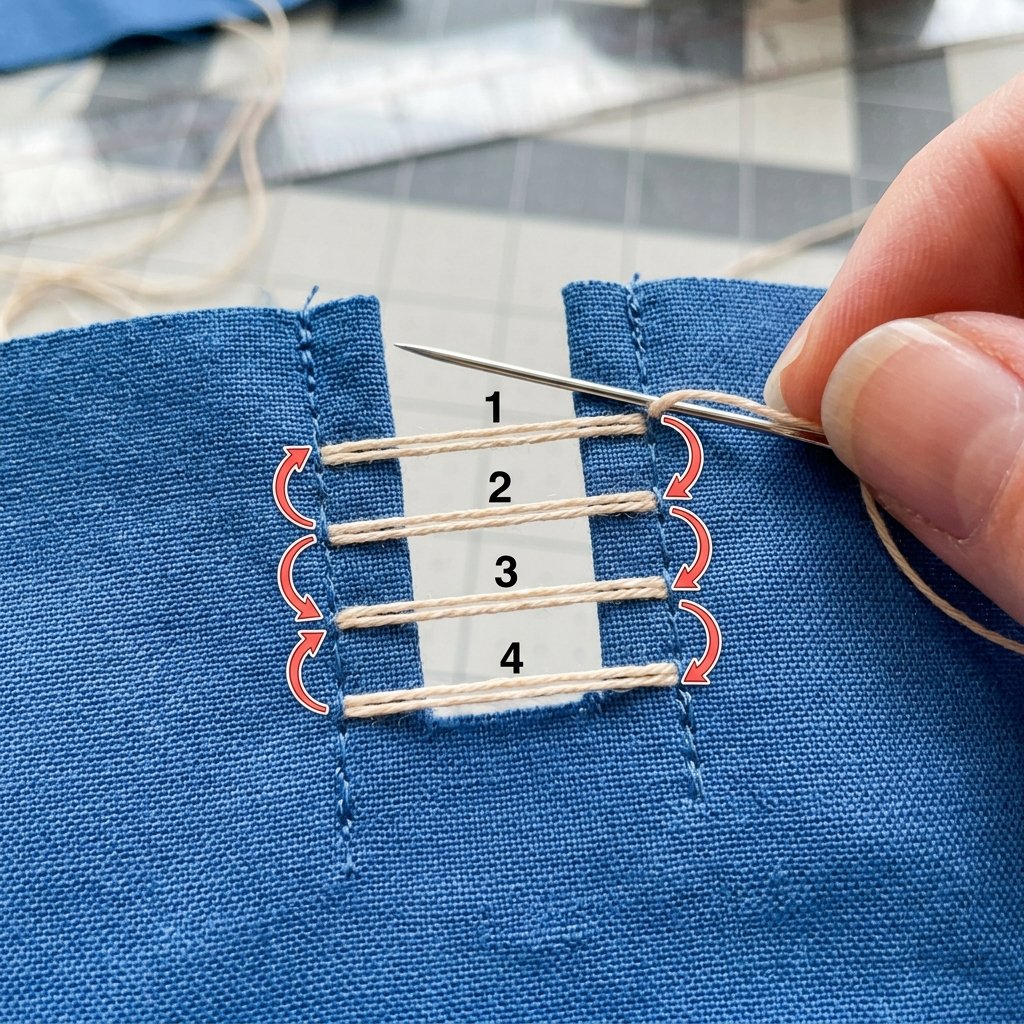
For holes that appear along a seam or small vertical tears, the Ladder Stitch (also known as the invisible stitch) is your best friend. It works by bridging the gap between two edges of fabric and pulling them together like a drawstring. This technique is so effective because the thread remains entirely hidden inside the folds of the knit. Follow these steps for a 5-minute fix:
- Anchor your thread: Start about 1/4 inch before the hole begins, pulling your needle through from the inside.
- The Rung: Take a small horizontal stitch on the right side of the tear.
- The Bridge: Move directly across to the left side and take an identical horizontal stitch.
- Repeat: Continue this ‘ladder’ pattern until you reach the end of the tear.
- The Magic Pull: Gently pull the thread. Watch as the two sides zip together invisibly.
This method is ideal for budget-conscious parents fixing leggings or the toes of dress socks where a bulky knot would be uncomfortable.
Darning 101: Weaving a New Fabric for Heel Blowouts
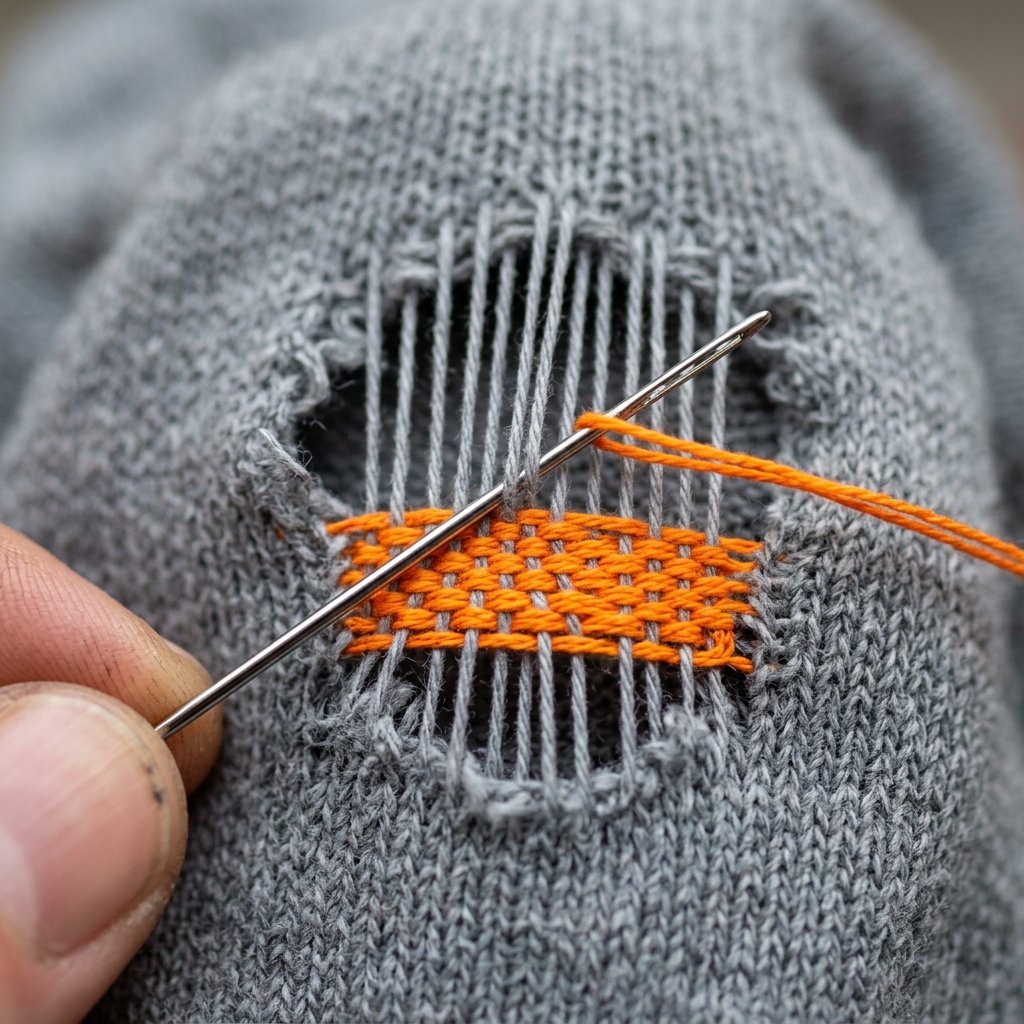
When you have a ‘blowout’—a large hole where the fabric is completely gone—you can’t just pull the edges together. You have to literally weave new fabric. This is traditional darning, and it is the hallmark of a crafty expert. We are going to create a ‘warp’ and a ‘weft’ just like a loom. This creates a patch that is just as strong, if not stronger, than the original sock.
| Repair Stage | Action Required | Time Estimate |
|---|---|---|
| The Warp | Vertical long stitches across the hole. | 3 Minutes |
| The Weft | Horizontal weaving over and under the warp. | 5 Minutes |
| Finishing | Weaving ends back into the sock body. | 2 Minutes |
Start by making vertical lines across the hole, anchoring them into the healthy fabric about 1/2 inch away from the edge. Once the hole is covered with vertical bars, turn your work 90 degrees. Now, weave your needle over the first thread, under the second, and so on. On the next pass, reverse the order (under then over). This creates a tiny, reinforced square of fabric that fills the void perfectly.
Rugged Reinforcement: The Sashiko Style for Longevity

If you want to embrace the ‘rugged-elegant’ aesthetic, consider Sashiko mending. Originally a Japanese technique for reinforcing workwear, it uses functional running stitches to create beautiful geometric patterns. Instead of trying to hide the repair, you celebrate it. Use a contrasting thread color—like white on navy or red on grey—to turn a simple repair into a bespoke design element. This is perfect for those thick, expensive cabin socks or even denim jeans. Not only does it fix the hole, but it also reinforces the surrounding area to prevent future thinning. It’s the ultimate upcycler’s trick for adding personality to your wardrobe while saving money.
Mending Mantra: Don’t hide the history of your clothes; highlight their journey with a stitch of pride.
Conclusion
Step Into a More Sustainable Future
By learning these simple, budget-savvy stitching tricks, you have officially graduated from the cycle of ‘buy-break-bin.’ You now possess the skills to maintain your wardrobe for a fraction of the cost of buying new. Whether you choose the invisible ladder stitch for a clean finish or the rugged darning weave for a heavy-duty repair, you are contributing to a more sustainable, resourceful lifestyle. Remember, the goal isn’t perfection; it’s longevity. So next time you see a hole, don’t reach for the trash can—reach for your needle. Your feet (and your bank account) will thank you. Happy mending!

Makenzie is the founder and lead writer at MoneyHackTips.com — a personal finance blog dedicated to delivering street-smart financial wisdom for real people on real budgets. With 300+ published articles covering everything from debt management to investing fundamentals, Makenzie’s mission is to make every dollar work harder. When not writing about money hacks, Makenzie is testing frugal living strategies, optimizing side hustles, and helping readers build financial freedom from scratch.