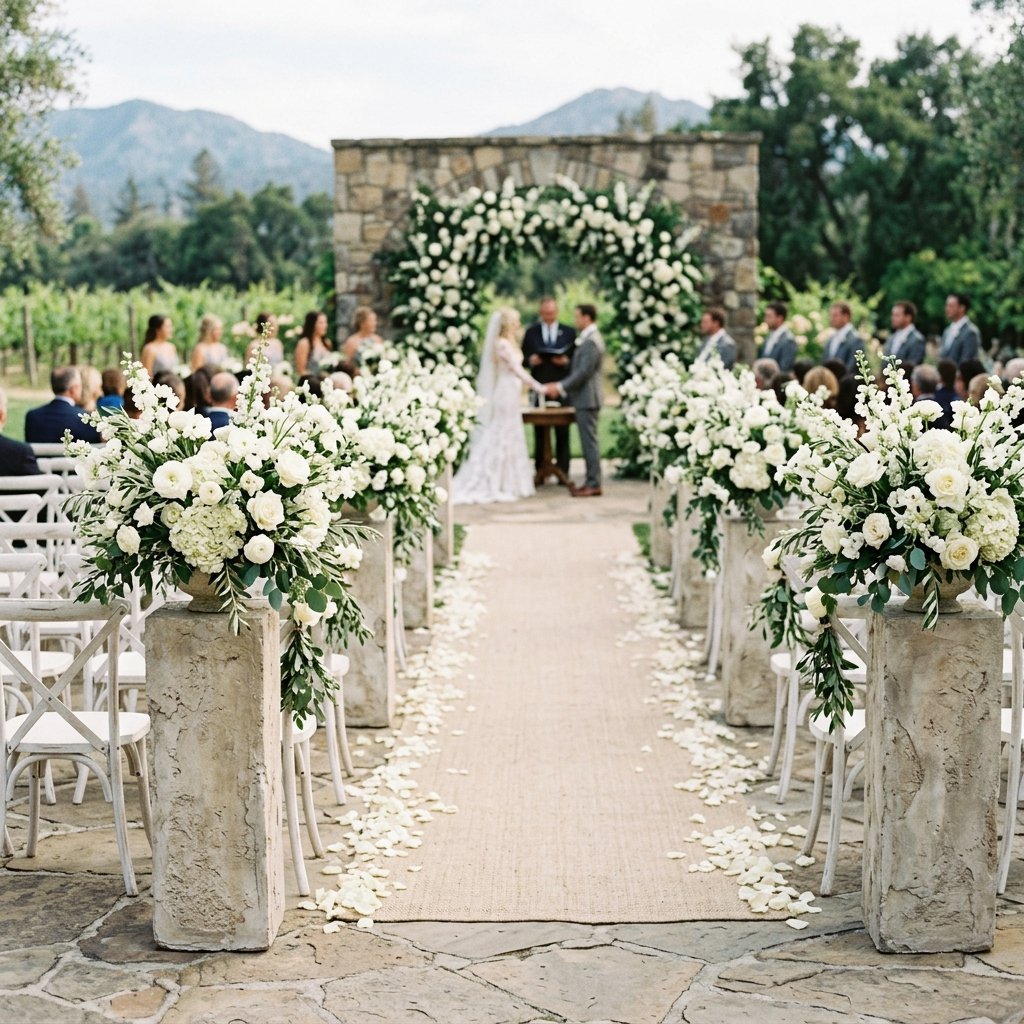

Let us talk about the elephant in the room when it comes to wedding planning: the dreaded rental markup. You want your ceremony to look like a million bucks, featuring those gorgeous, heavy, architectural stone plinths flanking the altar, dripping with lush florals. Then, you look at the rental quote. Suddenly, you are staring down a bill for thousands of dollars just to borrow some heavy rocks for four hours. As a resourceful, budget-savvy creator, you know there has to be a better way. And there is.
Welcome to the ultimate trash-to-treasure masterclass. Today, we are going to channel our inner crafty-expert and build bulletproof, stunning faux stone wedding pedestals using materials you can literally pull from a recycling bin or grab at the hardware store for pocket change. We are talking about upcycling heavy-duty cardboard boxes and transforming them with a little joint compound alchemy into architectural masterpieces that look like they weigh 200 pounds each, but can be carried under one arm.
Whether you are a frugal DIYer, a handy parent helping out with wedding prep, or a creative upcycler looking to stage an event on a dime, this project is going to blow your mind. Your guests will walk past these pedestals, admire the rugged, elegant stone texture, and never in a million years guess that beneath that luxurious facade is the box your new vacuum cleaner came in. Grab your putty knife, roll up your sleeves, and let us build something beautiful.
The Illusion of Weight: Why Faux Stone is a Budget Bride’s Best Friend
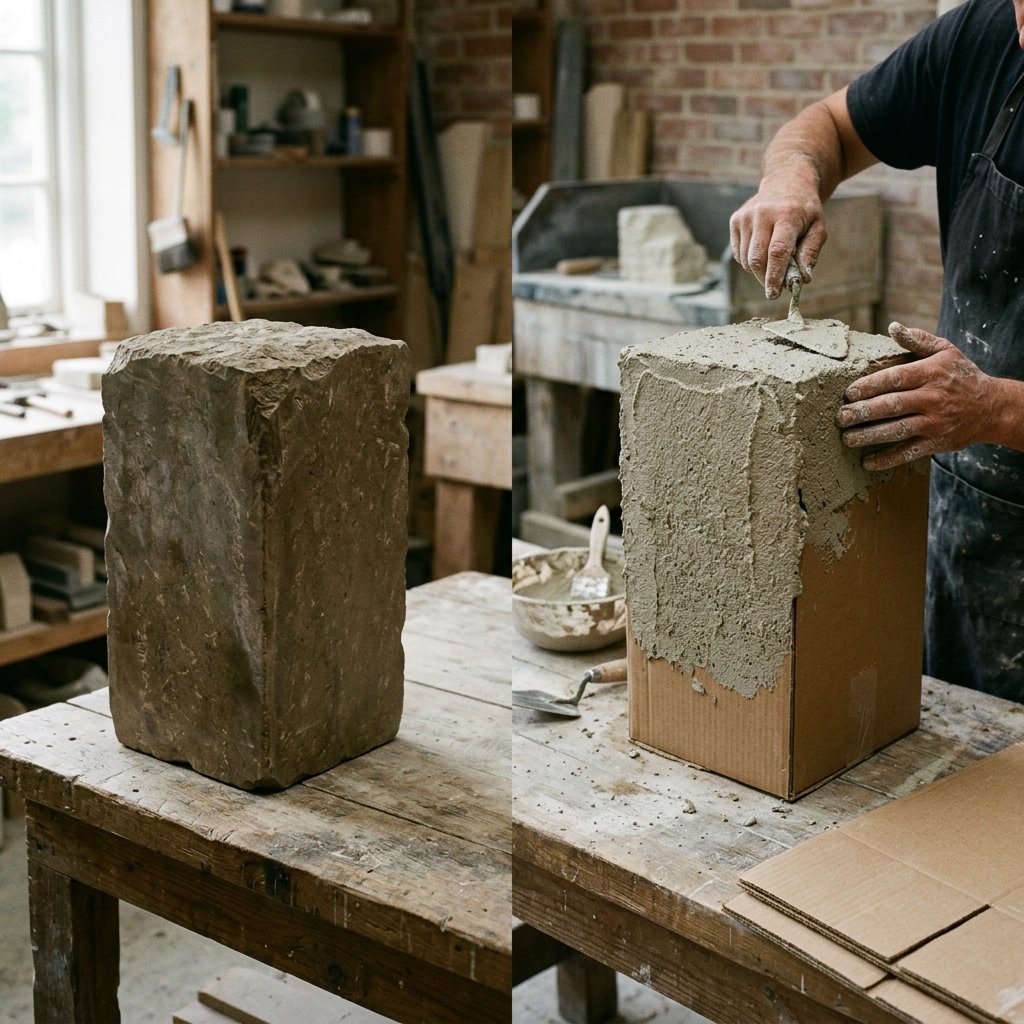
In the event styling world, perception is everything. When guests see a matte, textured, gray or cream-colored pillar holding a massive floral arrangement, their brains automatically register it as heavy, expensive stone or concrete. The reality? Real stone is an absolute nightmare for events. It requires a forklift to move, costs a fortune in shipping, and threatens to crack venue floor tiles. Faux stone, on the other hand, is the ultimate practical solution.
By utilizing upcycled materials like heavy-duty shipping boxes or cheap foam board, we are completely eliminating the weight issue while retaining 100% of the visual impact. This is not just a crafty hack; it is a professional set-design secret used in theater and film. You are essentially building a Hollywood prop for your big day.
“Craftsmanship beats cash every single time. When you understand the basic principles of texture and structure, you can turn literal garbage into high-end gallery decor.”
Let us break down the staggering difference in cost. When you rent a stone pedestal, you are paying for the item, the delivery team, the fuel, and the insurance. When you build it yourself, you are paying for drywall mud and elbow grease.
| Expense Category | Professional Rental (Set of 2) | Zero-Budget DIY (Set of 2) |
|---|---|---|
| Pedestal Base/Structure | $150.00 (Rental Fee) | $0.00 (Scavenged Boxes) |
| Texture & Finish | $0.00 (Included) | $14.50 (Joint Compound & Paint) |
| Delivery & Setup | $125.00 (Heavy Freight) | $0.00 (Fits in a sedan) |
| Total Estimated Cost | $275.00+ | $14.50 |
Gathering Your Arsenal: The Ultimate Hardware Store & Upcycling List

Before we start slinging plaster, we need to gather our materials. The beauty of this project lies in its rugged simplicity. You do not need expensive power tools or a dedicated workshop. You just need a few basic supplies from the hardware store and a keen eye for scavenging.
The Upcycled Base Materials
The core of your pedestal is going to be cardboard. But not just any cardboard—you want double-walled, heavy-duty corrugated cardboard. The best places to find these for 100% free are appliance stores, furniture shops, or large retail dumpsters (always ask the manager first!). Look for tall, narrow boxes. If you cannot find the perfect size, you can easily cut and tape larger boxes into the exact dimensions you need, such as 12x12x36 inches or 14x14x42 inches.
The Hardware Store Run
- All-Purpose Joint Compound: Do not buy the lightweight stuff. You want the standard, heavy all-purpose drywall mud (usually comes in a green lid bucket). It dries harder and gives a better stone texture.
- Drywall Tape: Essential for reinforcing the corners of your boxes so they look sharp and architectural, not rounded and floppy.
- Putty Knife or Trowel: A cheap plastic or metal 4-inch or 6-inch putty knife is perfect.
- Matte Paint & Baking Soda: For the final faux finish. The baking soda adds that crucial gritty, stone-like texture to standard acrylic or latex paint.
- Heavy-Duty Duct Tape or Hot Glue: For structural reinforcement.
Safety Note: Joint compound creates fine dust when sanded. Always work in a well-ventilated area and wear a basic dust mask if you decide to sand down any rough edges, though for a rustic stone look, sanding is usually unnecessary!
Structural Integrity: Building a Bulletproof Base
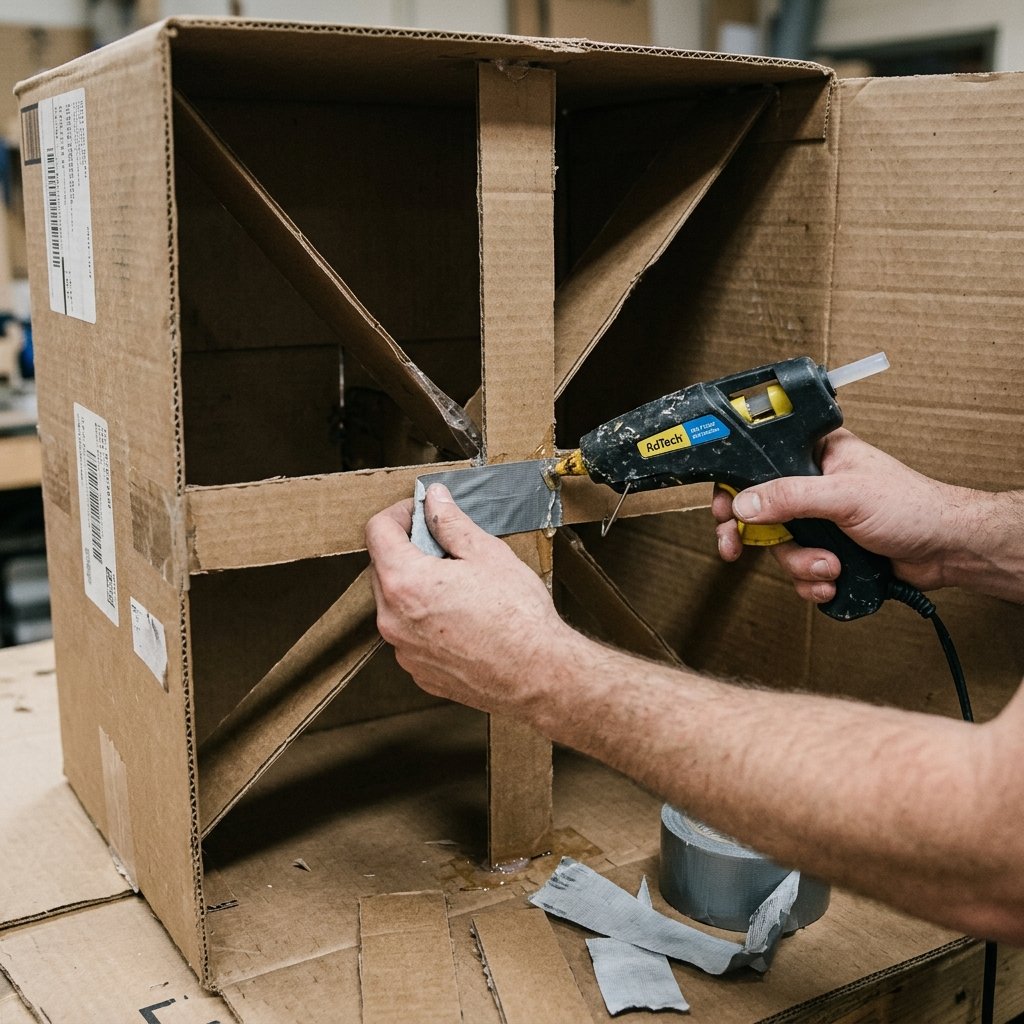
A beautiful pedestal is useless if it collapses under the weight of your floral arrangements. Structural integrity is not just a buzzword; it is the foundation of practical, masculine-elegant crafting. We need to reinforce these hollow boxes so they can hold serious weight.
Step-by-Step Base Construction
- Shape and Seal: Stand your box upright. If it is the right height, great. Fold the top and bottom flaps inward and seal them aggressively with heavy-duty duct tape. Ensure the box sits perfectly flat on the ground.
- The Internal X-Brace: If you are building a box from scratch or modifying one, cut two pieces of scrap cardboard to the exact internal height and diagonal width of your box. Cut a slit halfway up the middle of both pieces and slide them together to form an ‘X’. Insert this into your box before sealing it. This internal cross-bracing will allow the cardboard to support up to 50 pounds of top-weight without buckling.
- Crisp the Corners: Cardboard boxes have slightly rounded edges. Real stone has sharp, distinct architectural lines. Take your drywall tape (the paper kind, not the mesh) and run it down all four vertical corners of your box. Secure it with a thin layer of joint compound or hot glue. This gives you a rigid, sharp corner to plaster against.
- Prime the Surface: Cardboard is porous and will suck the moisture out of your joint compound, potentially causing it to warp. Give the entire box a quick coat of any cheap primer or even a layer of Mod Podge to seal the paper fibers. Let it dry for 30 minutes.
The Alchemist’s Plaster: Mixing and Applying the Faux Stone Texture
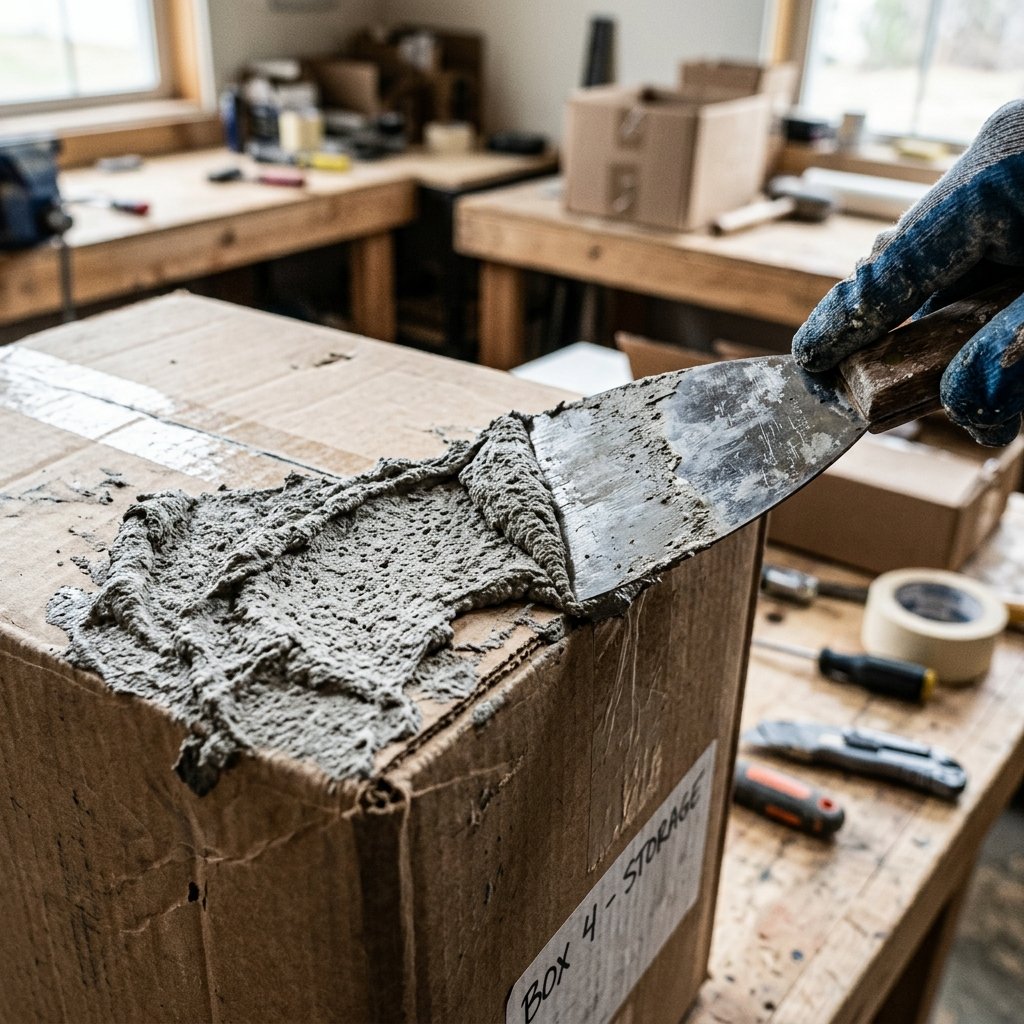
Now comes the fun part—the messy, creative alchemy where trash becomes treasure. We are going to coat our reinforced cardboard in joint compound. The goal here is not a perfectly smooth drywall finish; we want organic, rugged imperfections that mimic natural stone.
The Slap and Drag Technique
Open your tub of joint compound. It should be the consistency of thick cake frosting. If it is too stiff, mix in a tiny splash of water. Scoop a generous amount onto your putty knife.
- The Base Coat: Start at the bottom of the pedestal and work your way up. Apply a layer about 1/8 inch thick over the entire surface. Do not worry about making it perfectly smooth.
- Creating Texture: Once the box is covered, take your putty knife and press it flat against the wet compound, then pull it straight away. This creates a stippled, spiky texture. Next, lightly drag the blade of the knife over those spikes to knock them down. This “slap and drag” method creates the deep pits and flat plateaus characteristic of aged limestone or concrete.
- The Curing Process: This is crucial. Let the pedestal dry completely. Depending on humidity, this can take 24 to 48 hours. As it dries, the compound may crack slightly over the cardboard. Do not panic! Embrace it. Hairline cracks make the faux stone look incredibly authentic and aged.
“Do not overthink the texture. Natural stone is formed by millennia of chaotic geological pressure. Your erratic trowel movements are just speeding up the process. Keep it loose, keep it rugged.”
Painting the Illusion: Faux Finishing Techniques for Depth and Realism
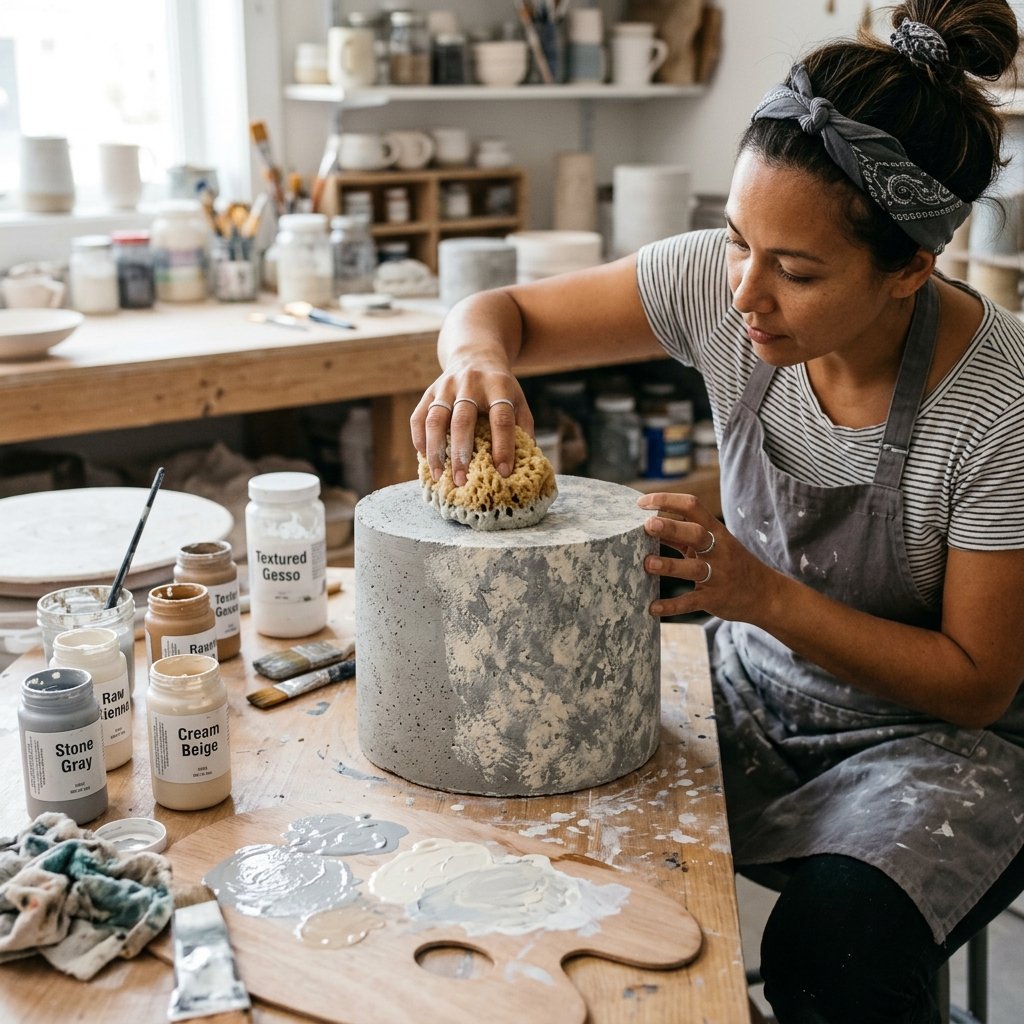
Your pedestal is dry, hard, and textured. Right now, it looks like a messy white box. Paint is what sells the illusion. We are going to use a layered, budget-savvy painting technique that costs pennies but looks like a high-end faux finish.
The Baking Soda Paint Trick
To give the paint a gritty, chalky finish that reflects light exactly like stone, we use the baking soda trick. Mix standard latex house paint (or cheap acrylic craft paint) with baking soda. The ratio is forgiving, but a good starting point is 1 cup of paint to 1/4 cup of baking soda.
The Three-Step Stone Finish
- The Base Color (The Anchor): Paint the entire pedestal with a solid coat of your base color. For a concrete look, use a medium gray. For limestone, use a warm beige or cream. The baking soda will make the paint thick, so push it deep into all those textured pits you created with the trowel. Let it dry for 1 hour.
- The Shadow Wash (Depth): Mix a slightly darker version of your base color and water it down until it is the consistency of milk. Brush this wash over the pedestal, working in small sections, and immediately wipe off the surface with a damp rag. The dark wash will stay in the deep crevices, instantly giving the texture massive depth and age.
- The Dry Brush (Highlights): Take a lighter shade (white or pale cream) and dip just the very tips of a dry, stiff-bristled brush into it. Wipe almost all the paint off onto a paper towel. Lightly dust the brush over the pedestal. The paint will only catch on the highest ridges of the texture, creating a beautiful, realistic highlight.
| Stone Style | Base Color | Wash Color (Shadow) | Highlight Color |
|---|---|---|---|
| Modern Concrete | Medium Cool Gray | Charcoal Gray (Watered down) | Pure White |
| Classic Limestone | Warm Beige | Dark Taupe (Watered down) | Ivory / Cream |
| Aged Sandstone | Terracotta / Tan | Dark Brown (Watered down) | Pale Yellow / White |
Transport, Setup, and Styling: Fooling the Toughest Critics
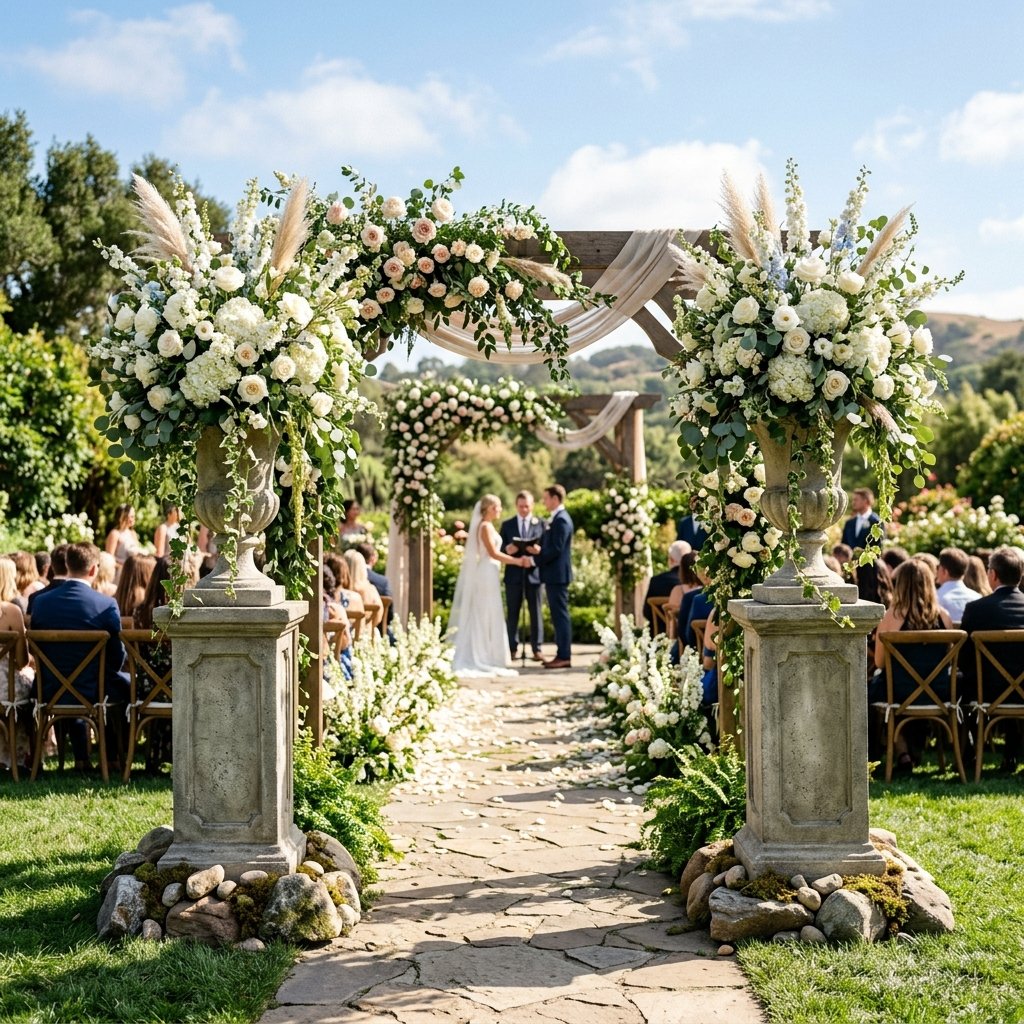
You have successfully built a masterpiece. Now, we have to deploy it in the real world. Because these pedestals are made of cardboard and lightweight plaster, they are incredibly easy to transport. You can fit four of them in the back of a standard SUV without breaking a sweat. However, their lightweight nature means we need to plan for venue logistics, especially if your wedding is outdoors.
Anchoring the Illusion
If you set a 5-pound pedestal outside and a gust of wind hits your massive floral arrangement, the whole thing will tip over. The solution is hidden weight. Cut a small, discreet flap in the back of the pedestal near the bottom. Once you place the pedestal at the venue, slip a 10-pound sandbag or a few heavy bricks inside the base. Tape the flap shut. Your pedestal is now grounded and completely wind-proof.
Weatherproofing (Optional but Recommended)
If you are expecting high humidity or a chance of rain, joint compound can soften if exposed to too much moisture. To protect your hard work, spray the finished pedestals with two coats of a matte, clear polyurethane sealer. Do not use a glossy sealer! Stone is naturally matte; gloss will instantly ruin the illusion and make it look like painted cardboard.
Styling for Maximum Impact
To complete the high-end look, drape a piece of raw-edge chiffon or cheesecloth around the base of the floral arrangement where it meets the pedestal. This softens the transition and adds a touch of romantic elegance to the rugged stone. When the photographer captures the altar, the contrast between the delicate flowers and the heavy, brutalist “stone” will look incredibly chic and sophisticated.
Conclusion
And there you have it—a masterclass in resourceful, budget-savvy wedding design. By looking past the garbage bin and seeing the architectural potential in a simple cardboard box, you have saved yourself hundreds, if not thousands, of dollars. More importantly, you have poured your own creativity, elbow grease, and love into the very foundation of your wedding ceremony.
These DIY faux stone wedding pedestals prove that you do not need an unlimited budget to create an event that looks incredibly luxurious and high-end. All it takes is a little clever upcycling, some joint compound alchemy, and the confidence to build it yourself. So go ahead, set up your altar, arrange those florals, and watch your guests marvel at the heavy, expensive “stone” plinths you sourced for your big day. Your secret is safe with us. Happy crafting, and congratulations!

Makenzie is the founder and lead writer at MoneyHackTips.com — a personal finance blog dedicated to delivering street-smart financial wisdom for real people on real budgets. With 300+ published articles covering everything from debt management to investing fundamentals, Makenzie’s mission is to make every dollar work harder. When not writing about money hacks, Makenzie is testing frugal living strategies, optimizing side hustles, and helping readers build financial freedom from scratch.