Welcome, fellow frugal DIYers, handy parents, and upcycling enthusiasts! If you have a toddler running around the house, you already know that establishing a solid daily routine is the holy grail of peaceful parenting. Toddlers thrive on predictability. When they know what comes next, the tantrums decrease, and their independence skyrockets. But if you have browsed the aisles of high-end educational toy stores or scrolled through trendy Montessori catalogs, you have probably noticed that a beautifully crafted, interactive wooden routine calendar can easily set you back anywhere from $60 to $120. For the budget-savvy parent, that price tag is a tough pill to swallow for something your child might accidentally color on with a permanent marker.
Enter the ultimate trash-to-treasure project: The DIY Cardboard Montessori Routine Calendar. We are going to take that stack of empty Amazon delivery boxes sitting in your garage and transform them into a rugged, beautiful, and highly functional educational tool. This isn’t your average flimsy paper craft. We are talking about employing clever structural techniques, heavy-duty layering, and resourceful design to create a piece of learning decor that looks masculine-elegant, rustic, and expensive, but costs absolute pennies.
“True craftsmanship isn’t about buying the most expensive materials; it’s about seeing the hidden potential in what others throw away. A sturdy piece of corrugated cardboard is just a blank canvas waiting for a resourceful mind.”
In this comprehensive masterclass, we will cover everything from selecting the right corrugated grain for structural integrity, to crafting interactive velcro weather dials, to sealing the final product so it survives the sticky, enthusiastic hands of a toddler. Roll up your sleeves, grab your utility knife, and let’s get to work building a premium Montessori tool on a zero-dollar budget!
The Frugal Parent’s Arsenal: Materials, Tools, and the Budget Breakdown
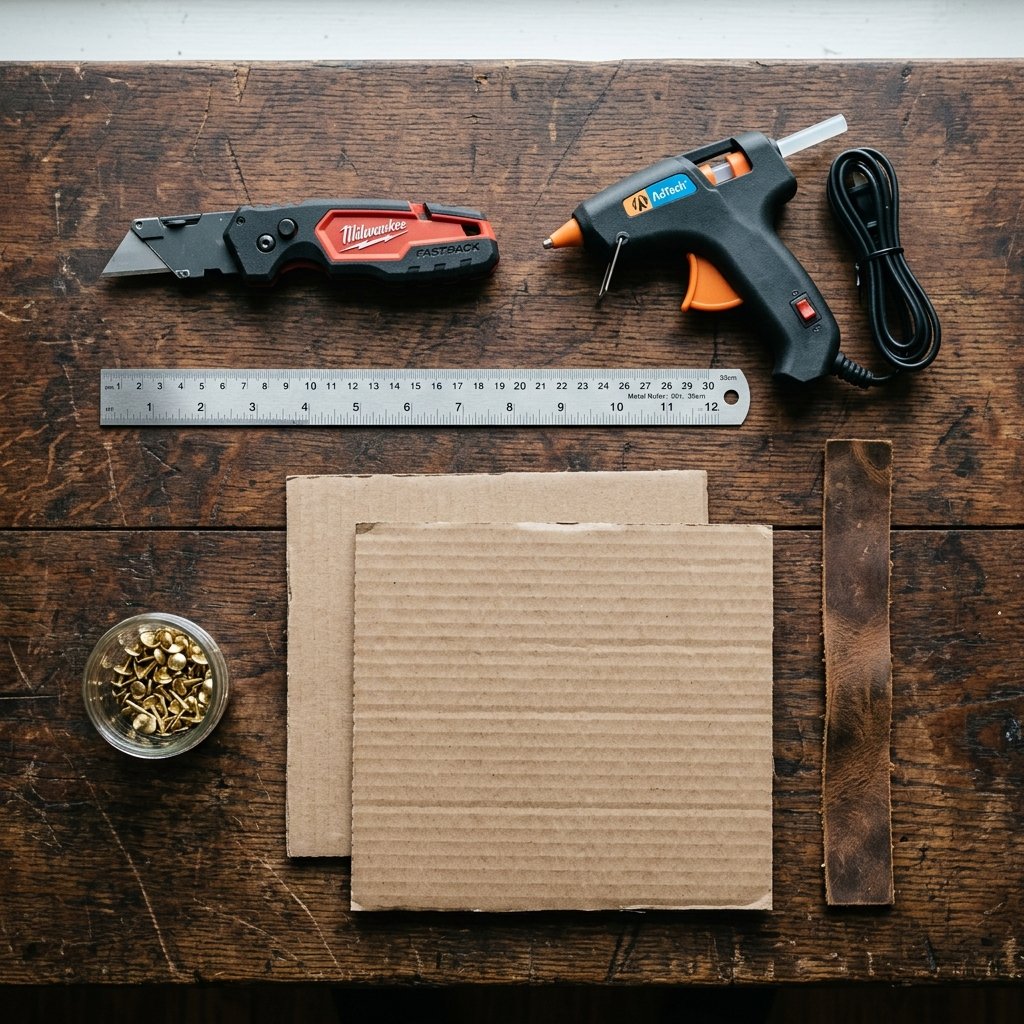
Before we make our first cut, we need to gather our materials. The beauty of this project lies in its extreme resourcefulness. We are raiding the recycling bin, the craft drawer, and maybe even the toolbox to pull this off. To achieve that rugged, premium look without the premium price tag, we will utilize materials you likely already have lying around the house.
Your Upcycling Material Checklist
- Heavy-Duty Corrugated Cardboard: You want double-walled cardboard if possible (think appliance boxes or heavy shipping boxes). This will serve as our sturdy base.
- Scrap Cardboard: Single-walled boxes (like standard shoe boxes or cereal boxes) for cutting out the smaller interactive tiles and dials.
- Adhesives: A hot glue gun (the upcycler’s best friend), standard PVA school glue, and a glue stick.
- Fasteners & Hardware: Velcro dots or strips, a brass paper fastener (brad) for the weather dial, and some rugged twine, paracord, or scrap leather strips for hanging.
- Paints & Finishes: Non-toxic acrylic paints in your choice of colors, and Mod Podge (or a homemade mixture of 50/50 water and school glue) for sealing.
- Tools of the Trade: A sharp utility knife (a fresh blade is crucial for clean cuts), a metal ruler or straight edge, a cutting mat, pencils, and a fine-tip permanent marker.
Let’s take a look at the hard numbers. When you apply a little elbow grease and creative ingenuity, the savings are absolutely undeniable.
| Component / Material | Store-Bought / Premium Equivalent Cost | Our Zero-Budget DIY Cost |
|---|---|---|
| Base Board & Tiles | $45.00 (Solid wood or thick acrylic) | $0.00 (Upcycled shipping boxes) |
| Interactive Fasteners | $15.00 (Magnetic backing systems) | $2.50 (Dollar Tree Velcro dots) |
| Hanging Hardware | $10.00 (Metal brackets or D-rings) | $0.00 (Scrap leather or twine) |
| Design & Finish | $20.00 (Pre-painted & sealed) | $3.00 (Leftover craft paint & Mod Podge) |
| Total Estimated Cost | $90.00+ | Under $6.00 |
By choosing the upcycling route, you are keeping $84.00 in your pocket—money much better spent on a weekend family adventure or adding to the college fund. Plus, you get the unparalleled satisfaction of telling guests, “Thanks, I built it myself from an old diaper box.”
Prepping Your Canvas: Structural Integrity and Precision Cutting
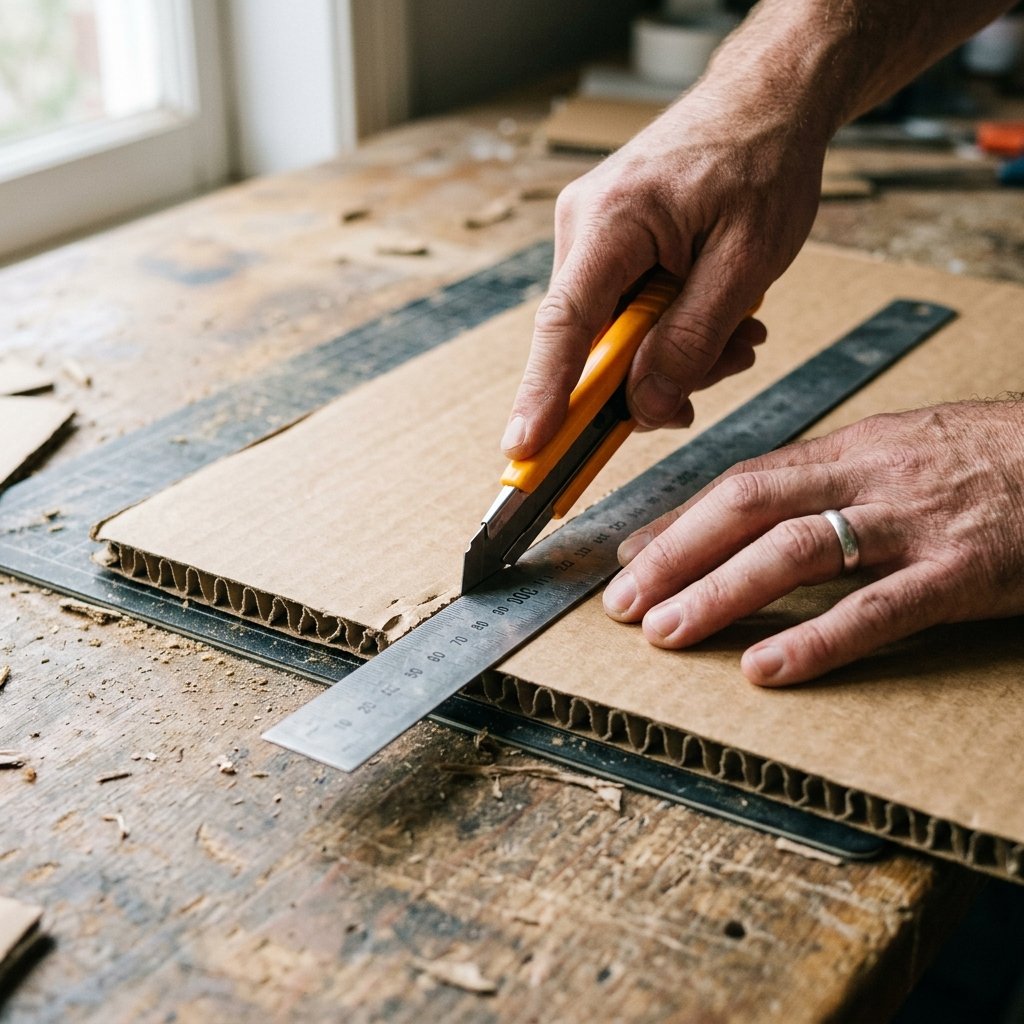
We aren’t just taping paper together; we are engineering a toddler-proof interface. Cardboard gets a bad rap for being flimsy, but when handled correctly, it boasts incredible strength-to-weight ratios. The secret lies in understanding the “flutes” (the wavy layers inside the cardboard).
Step 1: Selecting and Sizing the Base
Find the largest, cleanest piece of double-walled cardboard you have. For a comprehensive daily routine calendar, a dimension of 18 inches by 24 inches provides ample real estate without overwhelming the child. Use your metal ruler and utility knife to cut the base. Crucial Tip: Never try to cut through thick cardboard in one pass. Score the top layer first, then make a second pass to cut the flutes, and a third to cut the bottom layer. This guarantees a crisp, professional edge rather than a crushed, jagged mess.
Step 2: The Cross-Hatch Laminating Technique
If you only have thin, single-walled cardboard, do not despair! You can create a bulletproof base using a technique I call “Cross-Hatch Laminating.” Cut two identical pieces of 18×24 cardboard. Look at the direction of the internal flutes. Glue the two pieces together so that the flutes of the top piece run perpendicular (at a 90-degree angle) to the flutes of the bottom piece. Spread a thin, even layer of PVA glue between them, press them together, and weigh them down with heavy books overnight. The resulting board will be as rigid as a piece of 1/4-inch plywood.
“Measure twice, score once, cut thrice. Patience with the blade yields the polished look that separates a premium DIY from a rushed craft project.”
Step 3: Finishing the Raw Edges
Exposed corrugated edges scream “homemade box.” To elevate the aesthetic to a masculine-elegant, finished piece, we need to bind the edges. You can use standard masking tape, pulling it tightly over the edges to seal the flutes, or for a more rugged look, use strips of brown kraft paper attached with Mod Podge. Smooth it down firmly to create a seamless bevel around your entire board.
Designing the Layout: Zonal Architecture for Toddler Comprehension
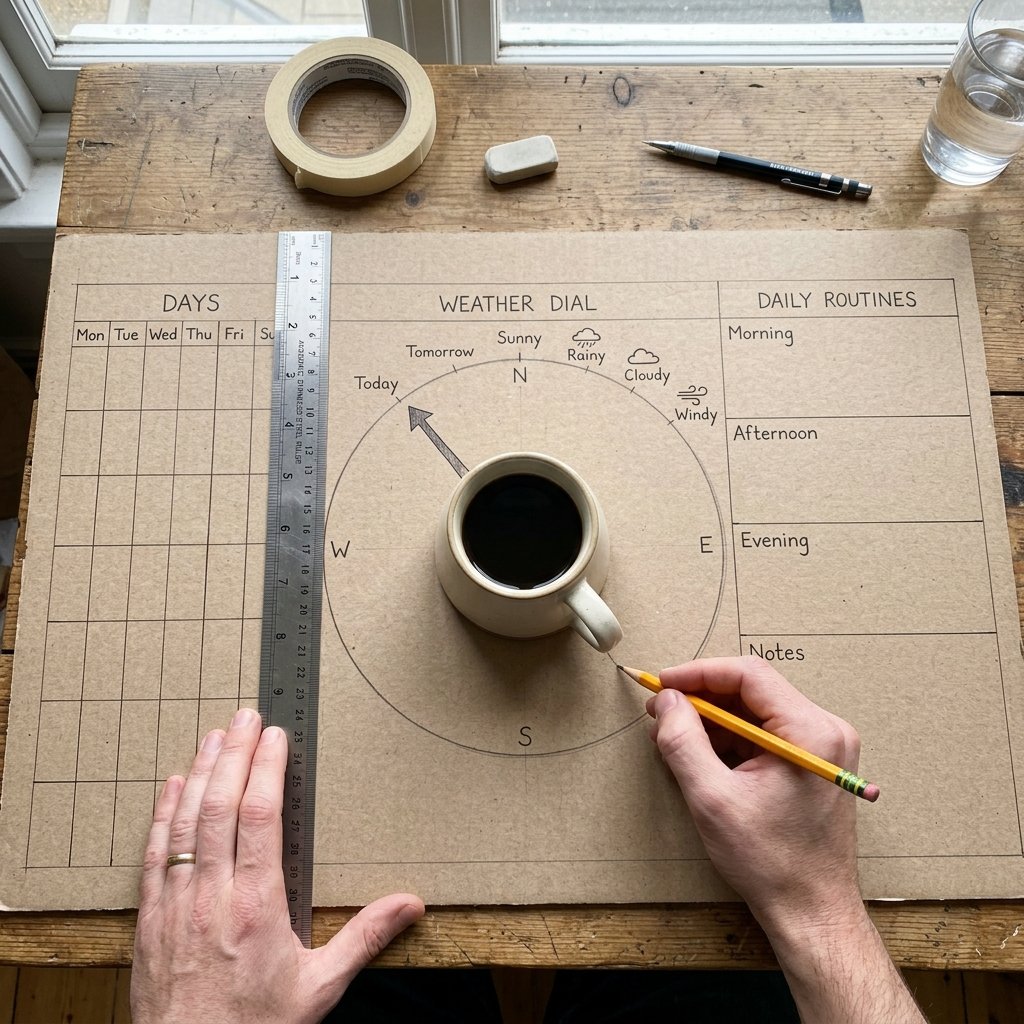
A Montessori tool must be intuitive, uncluttered, and visually accessible to a young mind. If we cram too much information onto the board, it becomes visual noise. We need to divide our 18×24 canvas into clear, distinct zones. Grab your pencil and ruler, and let’s map out the architecture of our calendar.
Zone 1: The Daily Header (Top 20%)
This top section is for the macro-level information. We need placeholders for “Today is [Day]”, “The Month is [Month]”, and “The Date is [Number]”. Draw three distinct, evenly spaced rectangular boxes. We will eventually place the soft side of our Velcro dots right in the center of these boxes.
Zone 2: The Weather Station (Middle Right 30%)
Toddlers are fascinated by the weather, and checking it is a fantastic grounding activity for the morning. Instead of velcro cards, we are going to build a mechanical spinner dial here. Draw a large circle (about 6 inches in diameter). You can trace a cereal bowl to get a perfect circle. Divide this circle into four or six pie slices for different weather conditions (Sunny, Cloudy, Rainy, Snowy, Windy, Stormy).
Zone 3: The Routine Tracker (Bottom 50% & Left Side)
This is the core functional area. Divide this space into two columns: “Morning Routine” and “Evening Routine.” Under each heading, draw a vertical sequence of 4 to 5 square boxes (about 2.5 x 2.5 inches each). This vertical layout mimics a checklist, which is naturally satisfying for a child to follow from top to bottom.
| Routine Zone | Recommended Icon/Tile Concepts | Toddler Benefit |
|---|---|---|
| Morning Routine | Toilet, Wash Face, Get Dressed, Eat Breakfast, Brush Teeth | Builds independence and reduces morning power struggles. |
| Evening Routine | Clean Up Toys, Bath Time, Put on PJs, Read Book, Lights Out | Signals the brain that it is time to wind down for sleep. |
| Special Activities | Park, Grocery Store, Grandparents, Doctor, Playdate | Provides predictability for the day’s main event, easing transitions. |
Keep the layout symmetrical. Use a fine-tip permanent marker to trace over your final pencil grid lines. Using a ruler for this step is non-negotiable; crisp, straight lines are the hallmark of a high-end design.
Crafting the Interactive Elements: Tiles, Sliders, and the Weather Dial

Now comes the crafty part: building the movable pieces that make this calendar interactive. This tactile engagement is exactly what Montessori learning is all about. The physical act of moving a tile solidifies the concept in the toddler’s brain.
Making the Routine and Date Tiles
Using your thinner scrap cardboard (cereal boxes work perfectly because they are easy to cut but sturdier than paper), cut out your tiles. You will need:
- 7 Day Tiles: Monday through Sunday.
- 12 Month Tiles: January through December.
- 31 Number Tiles: 1 through 31.
- 10-15 Routine Tiles: Based on the table in the previous section.
To make these look uniform and stylish, paint all the tiles a solid base color—perhaps a warm, creamy off-white or a soft, sage green. Once dry, use your permanent marker to write the words and numbers. For the routine tiles, sketch simple, minimalist icons. You don’t need to be Picasso; a simple toothbrush, a t-shirt, or a sun will perfectly convey the message. If you are not confident in your drawing skills, you can print simple icons from your computer, cut them out, and glue them onto the cardboard tiles.
Engineering the Weather Dial
Cut out a 5-inch cardboard arrow. This needs to be sturdy, so use your double-walled scraps. Paint the arrow a contrasting color, like a bold mustard yellow or a deep navy blue, so it pops against the board. Poke a small hole through the base of the arrow and the exact center of the weather circle on your main board. Push your brass paper fastener (brad) through the arrow, then through the board, and bend the legs flat on the back. Grandpa’s Workshop Hack: Place a tiny plastic washer (or a small square cut from a plastic milk jug) between the arrow and the board. This acts as a bearing, allowing the arrow to spin smoothly without grinding down the cardboard over time.
Applying the Velcro System
Take your Dollar Tree Velcro dots. Always put the soft (loop) side on the main calendar board, and the scratchy (hook) side on the back of your movable tiles. Why? Because the main board will be exposed when tiles are missing, and the soft side is much more pleasant to touch and won’t catch on your toddler’s sweater.
Painting, Sealing, and Bomb-Proofing Your Masterpiece

A raw cardboard calendar is fine, but a painted, sealed calendar is a durable heirloom. Toddlers are notoriously messy—they have sticky fingers, they sneeze, and they occasionally decide to test the durability of their toys with a rogue sippy cup. We must protect our investment of time.
Choosing Your Color Palette
To maintain that elegant, high-end look, avoid overly loud, primary color explosions. Stick to a sophisticated, muted palette. Think natural tones: terracotta, slate grey, mustard, olive green, and cream. Paint the background of the main board in a solid, neutral tone. You may need two coats of acrylic paint to completely cover any printed logos or shipping labels on your upcycled box.
The Magic of Mod Podge Sealing
Once your paint is 100% dry (give it at least 4 hours), it is time to seal the board and every single tile. If you don’t have store-bought Mod Podge, simply mix standard white school glue with water in a 1:1 ratio. Use a wide foam brush to apply a thin, even layer over the entire surface of the board and the faces of the tiles.
“Sealing is the invisible armor of the upcycler. A good coat of decoupage medium turns porous, vulnerable cardboard into a wipeable, water-resistant surface that can survive the chaotic ecosystem of a toddler’s playroom.”
Safety Note: Ensure all paints and sealants used are non-toxic and child-safe. While the child shouldn’t be chewing on the calendar, peace of mind is paramount.
Adding the Rugged Hanging Hardware
To hang the calendar, we want something stronger and more stylish than a simple thumbtack. Punch two holes at the top corners of your board, about two inches in from the edges. For a highly practical, masculine-elegant finish, thread a thick piece of natural jute twine, paracord, or even a strip of upcycled leather (salvaged from an old belt or purse) through the holes. Tie thick, sturdy knots at the front to secure it. This not only provides a reliable hanging mechanism but adds a beautiful, rustic, mixed-materials aesthetic to the finished piece.
The Implementation Strategy: Teaching Routines to Your Toddler
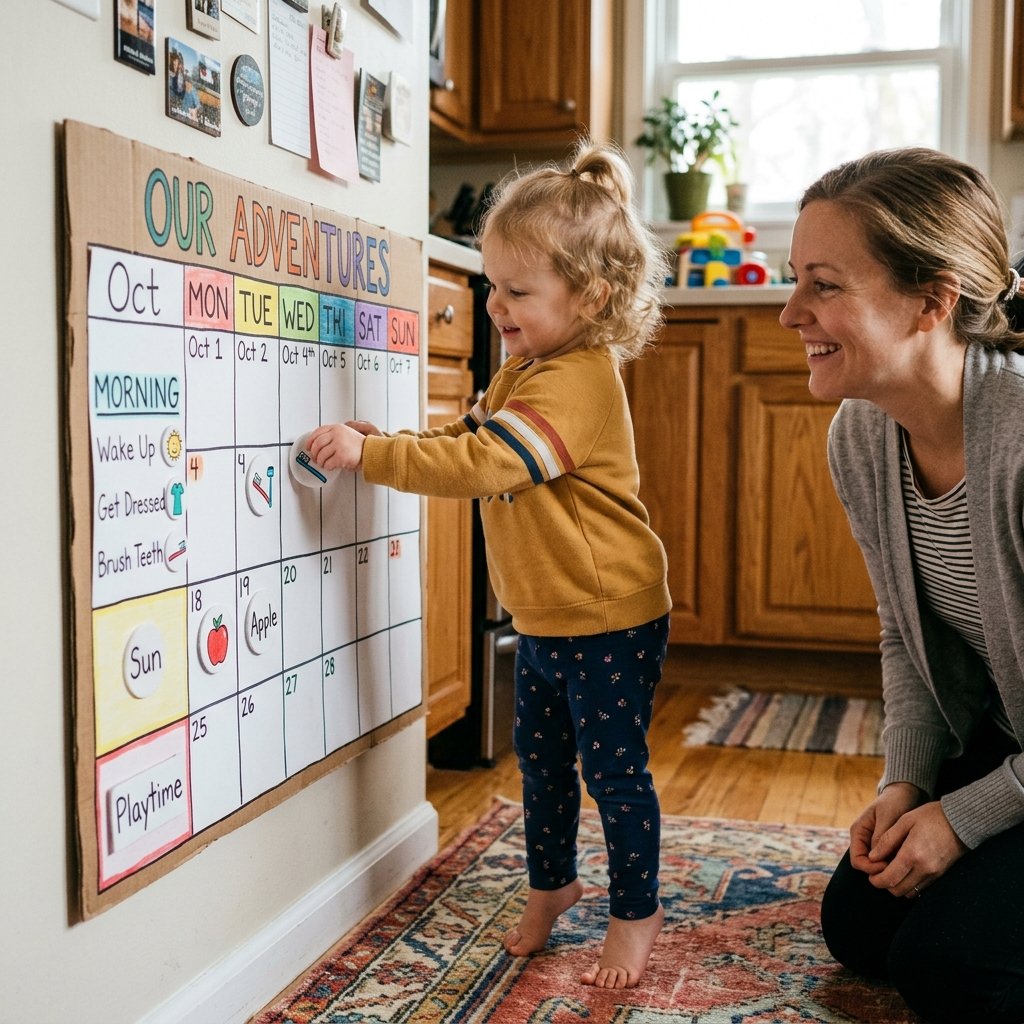
You have built a masterpiece. Now, how do you get your fiercely independent two-and-a-half-year-old to actually use it? The tool is only as good as the master’s implementation. Here is the frugal parent’s guide to integrating the calendar into your daily life without it becoming just another ignored toy.
Step 1: The Grand Reveal
Hang the calendar at the child’s eye level. This is a Montessori fundamental: the environment must be accessible to the child. If they have to ask you to lift them up to move the “Brush Teeth” tile, you have defeated the purpose. Present the calendar to them in the morning with enthusiasm. Explain that this is their special command center for the day.
Step 2: The Morning Briefing
Make the calendar the very first stop after waking up. Guide them to the board. Ask them to look out the window: “Is it raining or is the sun shining?” Have them physically turn the weather dial to the correct setting. Next, hand them the day of the week tile and let them press it onto the velcro. The tactile feedback of the velcro “scrunch” is highly rewarding for toddlers.
Step 3: Gamifying the Routine
As you move through the morning, use the board as a visual checklist. When it is time to get dressed, point to the shirt icon. Say, “Look, the board says it’s time to get dressed!” Once they are dressed, let them remove the tile and drop it into a small “Finished” basket or move it to a designated “Done” column. This physical act of completion releases dopamine, reinforcing the positive behavior.
- Be Consistent: Use the board every single day. If you skip weekends, the habit breaks.
- Offer Choices: Let them choose the order of some routines. “Do you want to brush your teeth first, or get dressed first? You move the tiles to set the schedule!”
- Praise the Process: Acknowledge their independence. “You checked the calendar and got your shoes all by yourself! What a big helper.”
By empowering them to manage their own schedule via this rugged, upcycled tool, you are fostering executive functioning skills, time management, and self-confidence—all from a piece of trash that was destined for the recycling bin.
Conclusion
And there you have it, folks—a masterclass in transforming literal garbage into a premium, highly effective educational tool. By leveraging a little bit of structural know-how, some clever upcycling hacks, and a few drops of paint, you have bypassed the expensive toy catalogs and built a custom Montessori daily routine calendar for mere pennies. This project proves that you don’t need a massive budget to provide enriching, beautiful, and functional learning materials for your children. You just need a sharp utility knife, a hot glue gun, and the resourceful spirit of a true DIY crafter. So go ahead, raid that recycling bin, fire up your creativity, and start building a better, smoother morning routine for your family today. Happy crafting, and keep upcycling!

Makenzie is the founder and lead writer at MoneyHackTips.com — a personal finance blog dedicated to delivering street-smart financial wisdom for real people on real budgets. With 300+ published articles covering everything from debt management to investing fundamentals, Makenzie’s mission is to make every dollar work harder. When not writing about money hacks, Makenzie is testing frugal living strategies, optimizing side hustles, and helping readers build financial freedom from scratch.