There is a unique kind of magic in a large cardboard box. To most, it is just a piece of recycling taking up space in the garage, but to a resourceful DIYer with a toddler, it is a blank canvas for interstellar travel. In this guide, we are going to bypass those flimsy, expensive plastic store-bought playhouses and engineer something far superior: a rugged, custom-built space rocket. We aren’t just taping boxes together; we are employing clever structural hacks and upcycled household items to create a high-end ‘Trash-to-Treasure’ masterpiece. This project is perfect for the budget-savvy parent who wants to provide hours of imaginative play for the cost of a roll of duct tape and some leftover spray paint. We will focus on durability, masculine-elegant design, and ‘mission-critical’ details that will make your little astronaut feel like they are truly heading for the moon.
The Blueprint: Gathering Your Galactic Materials
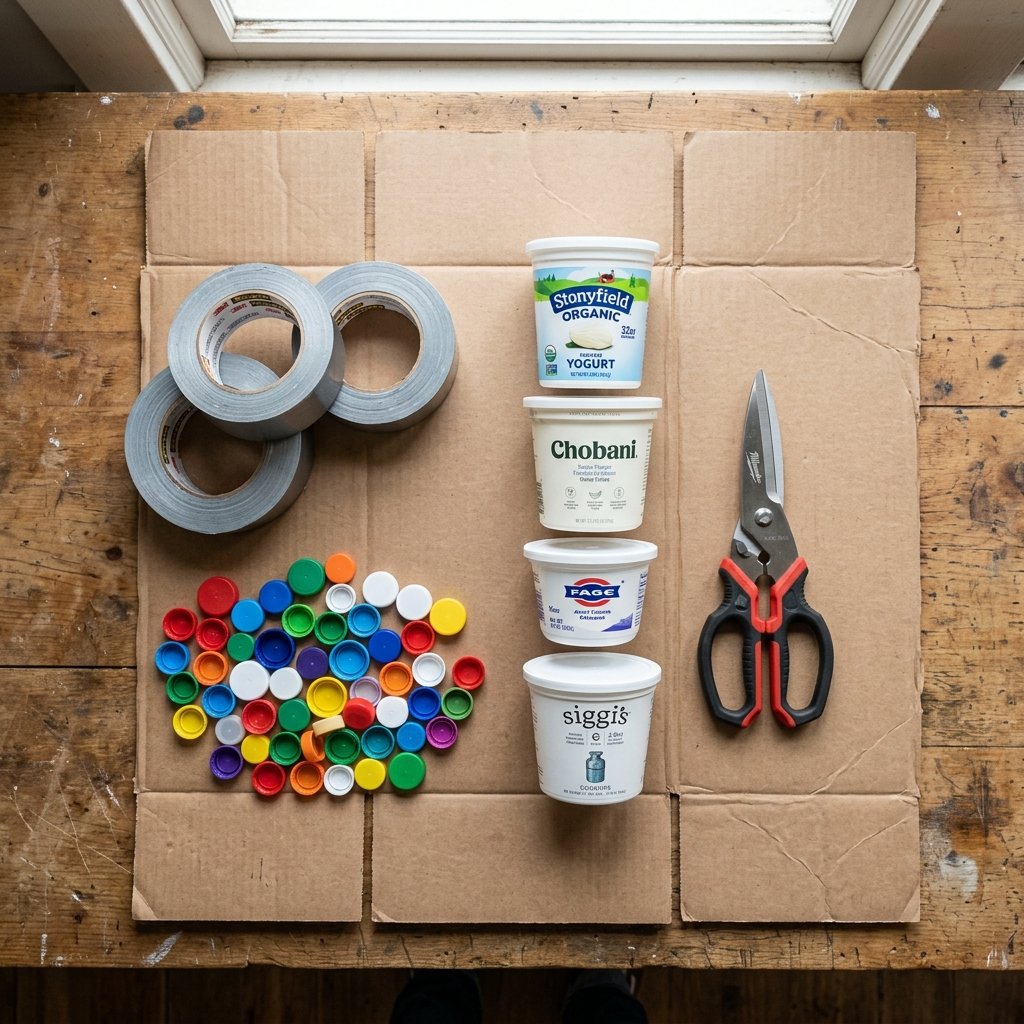
Before we begin our countdown, we need to secure the right components. The beauty of this project lies in its 0% waste philosophy. You likely already have these items in your pantry or recycling bin. We are looking for structural integrity and tactile interest. Look for a box that is tall enough for your toddler to stand or sit comfortably inside—refrigerator or large appliance boxes are the gold standard here.
| Material | Upcycled Source | Estimated Cost |
|---|---|---|
| Main Fuselage | Large Appliance Box | $0.00 |
| Nose Cone | Scrap Cardboard/Triangles | $0.00 |
| Thrusters | 4 Large Paper Cups or Yogurt Tubs | $0.00 |
| Mission Controls | Bottle Caps & Old Calculator | $0.00 |
| Structural Binding | Silver Duct Tape | $4.00 |
| Exterior Finish | Silver Spray Paint (Optional) | $6.00 |
By choosing the DIY route, you are saving approximately $120 compared to high-end cardboard kits sold in boutique toy stores. Our total budget for this epic build is roughly $10 if you need to buy tape and paint, or $0 if you raid your workshop supplies.
Structural Integrity: Building the Fuselage and Nose Cone
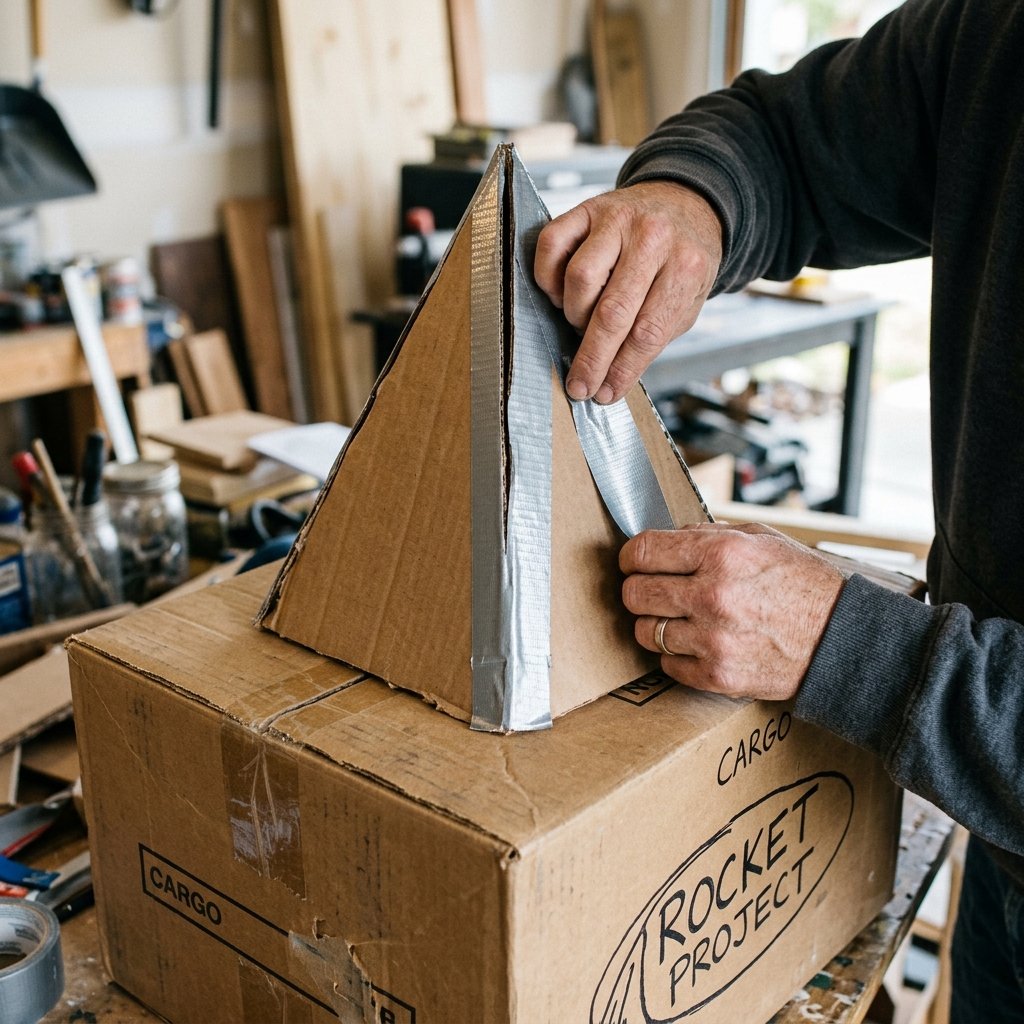
The first step in our mission is to establish the rocket’s frame. We want a structure that can withstand the ‘turbulence’ of a toddler’s enthusiasm. Begin by standing your large box upright and sealing the bottom flaps securely with heavy-duty duct tape. For the top, we will create the iconic pointed nose cone.
Step-by-Step Nose Cone Engineering
- Cut the four top flaps of your box into identical triangles. Use a straight edge to ensure precision.
- Fold these triangles inward so their tips meet in the center.
- Secure the seams with silver duct tape, creating a pyramid shape. This adds significant height and that classic ‘NASA’ silhouette.
- For a more rounded look, you can score the cardboard lightly on the inside to allow it to curve before taping.
Pro-Tip: When cutting the door, leave one side attached to act as a hinge. Reinforce this ‘hinge’ with extra tape on both the inside and outside to prevent it from tearing off during high-intensity play.
This phase should take approximately 45 minutes. Remember, the goal is a rugged build—don’t be afraid to over-tape the interior seams for maximum durability.
Propulsion Systems: Crafting Thrusters and Stabilizers
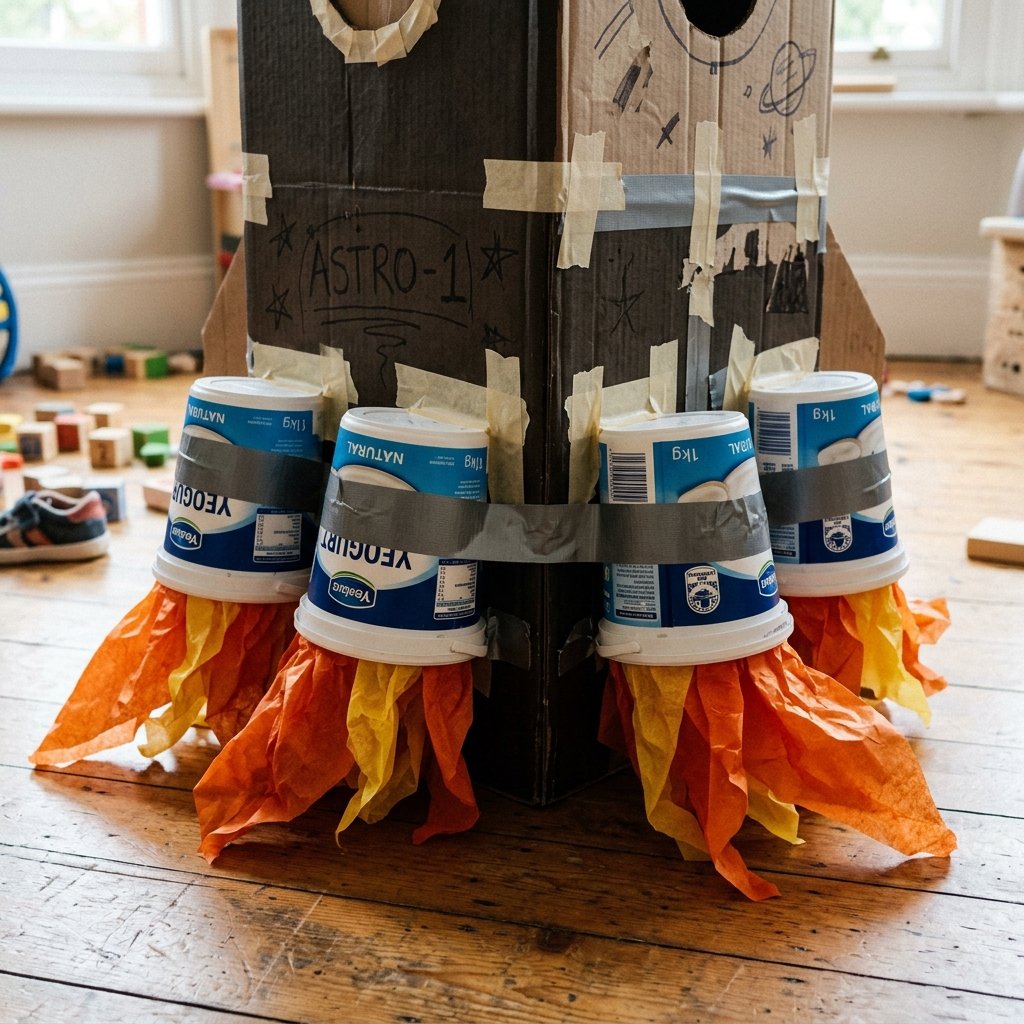
A rocket is nothing without its engines. For this, we are going to upcycle four large containers—think yogurt tubs, oatmeal canisters, or large stadium cups. These will be mounted to the base of the rocket to give it a wide, stable stance and an aggressive, powerful look.
Installing the Thrusters
- Position one container at each bottom corner of the box.
- Trace the circumference of the container and cut a slightly smaller hole in the box.
- Wedge the container into the hole and secure it from the inside with a ‘star-burst’ pattern of tape.
- Bonus: Stuff some red and orange tissue paper into the openings of the cups to simulate ‘fire’ during lift-off.
Next, we add the stabilizers (the fins). Cut three or four large right-angled triangles from your scrap cardboard. Attach these to the sides of the rocket, ensuring they are flush with the ground. This not only looks great but prevents the rocket from tipping over when your toddler is climbing in and out. This engineering trick adds 100% more stability to the final product.
Mission Control: Designing the Interior Cockpit
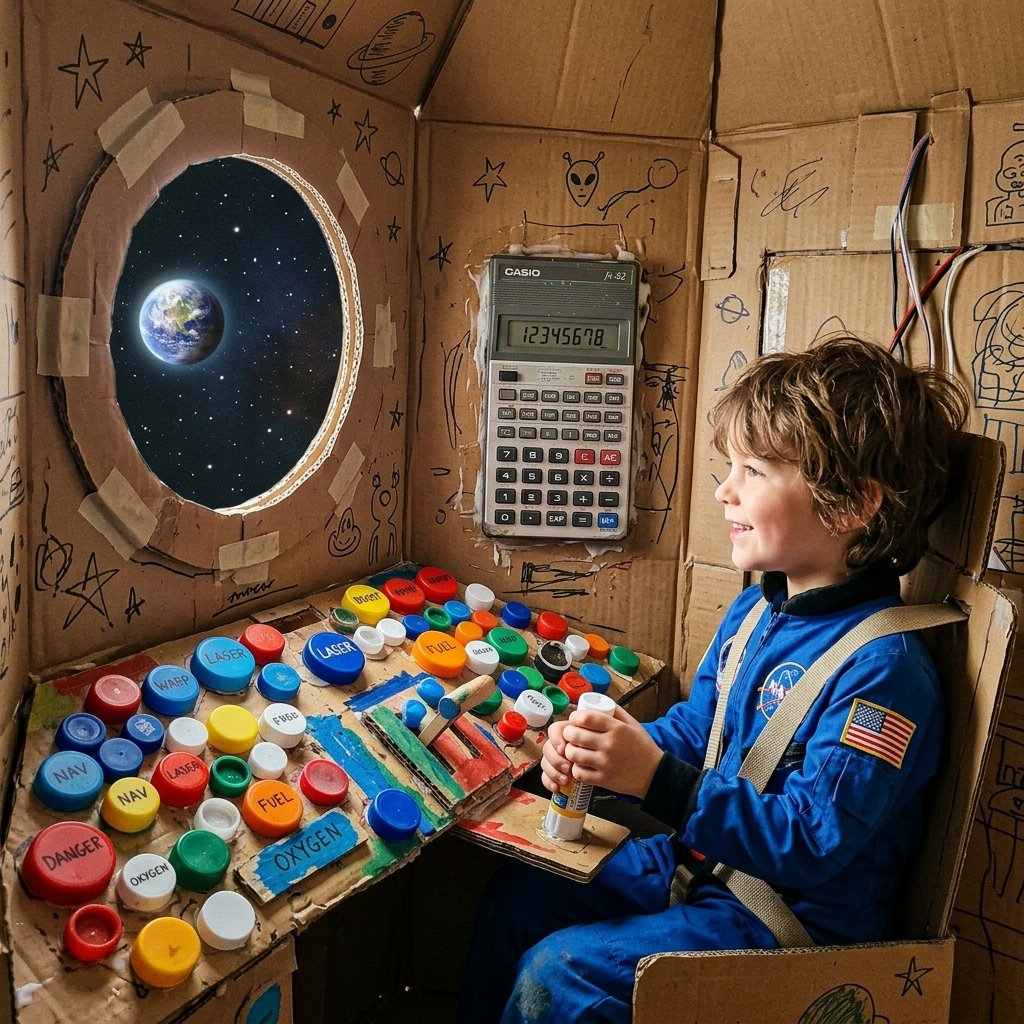
This is where the ‘Crafty-Expert’ side of the project shines. The interior must be as engaging as the exterior. We want buttons that click, dials that turn, and screens that show the stars. This is a great way to use up those random bits of ‘junk’ you’ve been saving.
Cockpit Features to Include
- The Dashboard: Glue a smaller rectangular box inside at waist height. This is your main control panel.
- Tactile Buttons: Use hot glue to attach various sizes of bottle caps. Paint them different colors to represent ‘Oxygen,’ ‘Turbo,’ and ‘Snack Release.’
- The Viewport: Cut a circular hole at eye level and cover it with a piece of clear plastic from a toy package or a mesh fruit bag to create a ‘space-rated’ window.
- Navigation: Tape an old, broken calculator or a printed ‘star map’ to the wall.
Budget Mantra: The more textures, the better. Toddlers love the tactile feel of different materials, and it costs you nothing but a few drops of glue.
Spend about 30 minutes detailing the interior. This is the ‘cockpit experience’ that will keep them occupied for hours.
Exterior Aesthetics: The Finishing Touches
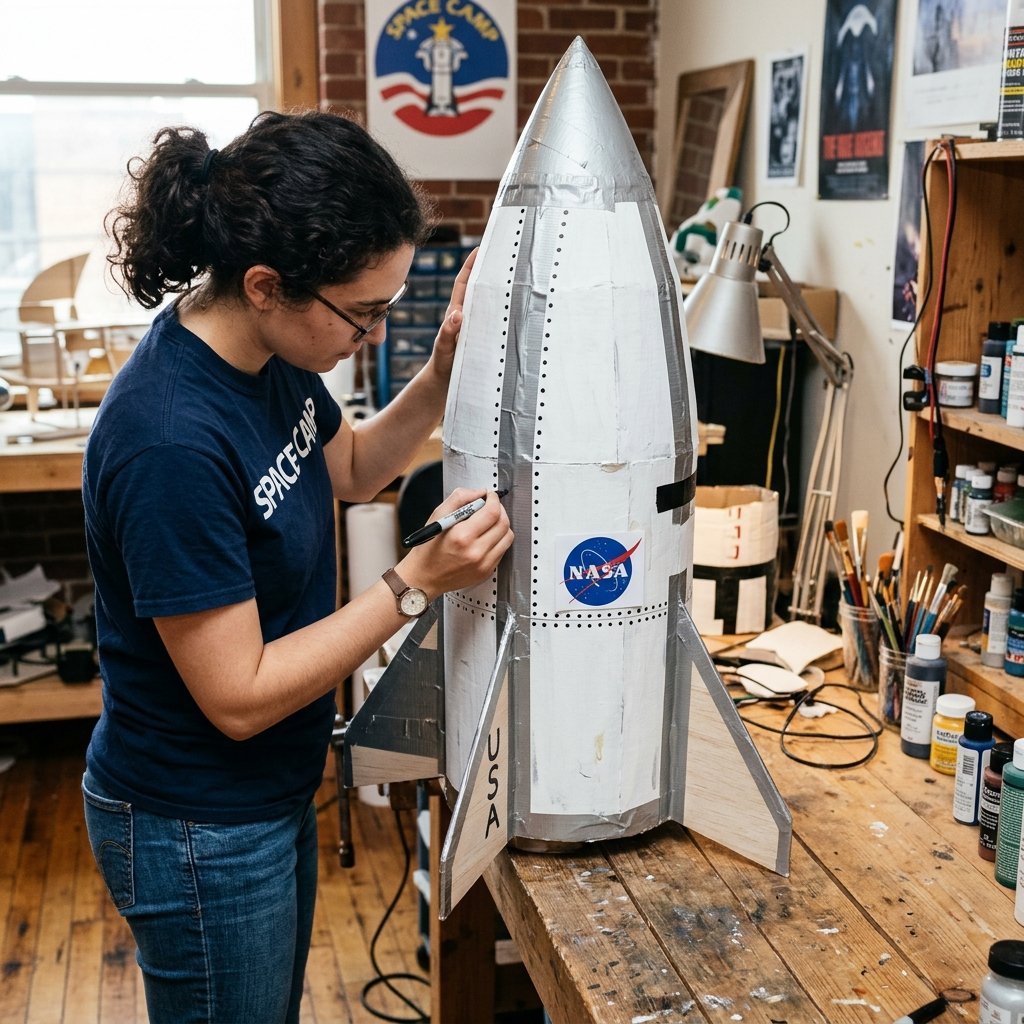
To give your rocket that ‘Masculine-Elegant’ and professional finish, we need to address the exterior. While raw cardboard has a certain charm, a coat of silver paint transforms it into a high-end toy. If you prefer a mess-free version, you can use silver contact paper or simply leave it natural and use a black permanent marker to draw ‘rivets’ and ‘panel lines’ along the seams.
| Design Element | Method | Visual Impact |
|---|---|---|
| Rivets | Black Marker Dots | Industrial/Rugged |
| NASA Logo | Printed Paper or Stencil | Official/Authentic |
| Solar Panels | Aluminum Foil Squares | Shiny/High-Tech |
| Rocket Name | Stencil (e.g., ‘APOLLO 5’) | Personalized |
Apply your paint in a well-ventilated area. If using spray paint, two light coats are better than one heavy one to avoid soggy cardboard. This step adds about 20 minutes of active work plus drying time, but the visual upgrade is massive.
Pre-Flight Check: Safety and Durability Tips

Before you hand over the keys to the Commander, perform a final safety inspection. Our goal is a fun, hazard-free mission.
Safety Note: Ensure all edges of the cardboard, especially around the door and window, are covered with duct tape. Raw cardboard edges can be surprisingly sharp and cause ‘paper cuts’ on little hands. Always supervise play, especially if the rocket has a heavy nose cone.
- Ventilation: Ensure there are at least two openings (the door and a window) to keep the interior cool and airy.
- Soft Landing: Place a small cushion or a folded blanket inside the rocket to make the ‘cockpit’ comfortable for long-duration missions.
- Reinforcement: If your toddler is particularly active, add a second layer of cardboard to the floor of the rocket to prevent it from sagging.
By following these steps, you’ve created a toy that is built to last through dozens of moon landings.
Conclusion
And there you have it—an epic, mission-ready space rocket built from nothing more than ‘trash’ and a little bit of DIY grit. In just one afternoon, you have transformed a simple box into a vessel for infinite adventures. You’ve saved over $100, kept materials out of the landfill, and provided your toddler with a toy that is far more meaningful because it was built by hand. This project proves that you don’t need a massive budget to create a high-end childhood experience; you just need a bit of resourcefulness and a few rolls of tape. Now, clear the launchpad, start the countdown, and watch your little astronaut blast off into a world of their own making. Happy building!

Makenzie is the founder and lead writer at MoneyHackTips.com — a personal finance blog dedicated to delivering street-smart financial wisdom for real people on real budgets. With 300+ published articles covering everything from debt management to investing fundamentals, Makenzie’s mission is to make every dollar work harder. When not writing about money hacks, Makenzie is testing frugal living strategies, optimizing side hustles, and helping readers build financial freedom from scratch.