The Art of the Frugal Artisan: Why Settle for Plastic When You Can Have Patina?
Let’s be honest: the nylon strap that came in the box with your DSLR or mirrorless camera is, well, uninspired. It’s scratchy, screams ‘tourist,’ and lacks the soul that a piece of precision machinery deserves. But then you look at those designer leather straps online—the ones handcrafted in small workshops in Italy or Portland—and you see price tags upwards of $150. As a savvy DIYer, your internal alarm should be going off. Why pay for a logo when you can build a legacy? Creating a luxury DIY personalized leather camera strap is the ultimate ‘trash-to-treasure’ or ‘raw-to-refined’ project. Whether you are upcycling an old heavy-duty leather belt or starting with a premium vegetable-tanned scrap, this guide will show you how to achieve that rugged, masculine-elegant look for a total cost of under $20.
In this masterclass, we aren’t just slapping some leather together. We are talking about edge burnishing, custom stamping, and using solid brass hardware that will outlast the camera body itself. This is about creating an heirloom-quality piece that feels as good as it looks. So, clear off the workbench, grab a cup of coffee, and let’s dive into the world of bespoke leatherwork without the bespoke price tag.
The Blueprint: Material Sourcing & Budget Breakdown

High-End Aesthetics on a Thrift Store Budget
The secret to a ‘designer’ look is the quality of the materials, but ‘quality’ doesn’t have to mean ‘expensive.’ To keep this project frugal, we look for sources of leather that others overlook. A thick, 100% genuine leather belt from a thrift store (look for ‘Full Grain’) is a goldmine. Alternatively, many leather supply shops sell ‘remnants’ or ‘belly scraps’ for pennies on the dollar. For the hardware, we avoid the flimsy plastic clips and opt for solid brass or stainless steel split rings and Chicago screws or copper rivets.
| Material Item | Designer Store Price | DIY Frugal Cost |
|---|---|---|
| Full-Grain Leather Strap | $85.00 | $4.00 (Thrifted/Scrap) |
| Solid Brass Hardware | $30.00 | $3.50 |
| Personalized Embossing | $25.00 | $0.00 (DIY Stamp) |
| Edge Finishing/Wax | $15.00 | $1.50 (Beeswax/Water) |
| Total | $155.00 | $9.00 |
Choosing Your Leather Type
- Vegetable Tanned: The gold standard. It starts stiff but develops a beautiful dark patina over time. Best for stamping.
- Oil-Tanned: Rugged and water-resistant. Perfect for outdoor or wildlife photographers.
- Upcycled Belt: The most budget-friendly option. Ensure it is not ‘bonded leather,’ which will peel and crack.
The Essential Toolkit: Professional Results with Simple Tools
You Don’t Need a Factory to Build a Masterpiece
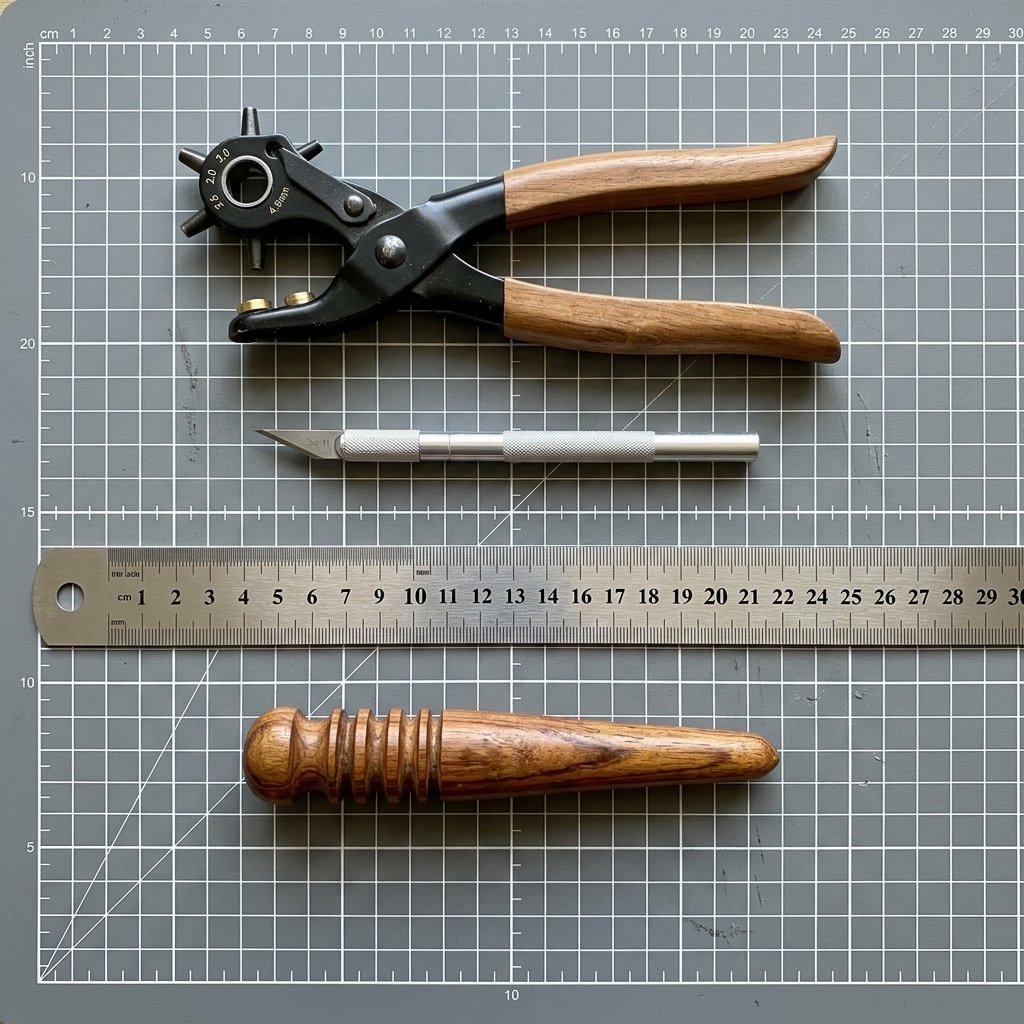
Many beginners are intimidated by leatherworking because they think they need a thousand-dollar sewing machine. The truth? Some of the world’s most expensive leather goods are made entirely by hand. For this camera strap, we are going to use a ‘no-stitch’ or ‘minimal-stitch’ approach, relying on mechanical fasteners for a rugged, industrial aesthetic that is incredibly secure.
The DIYer’s Toolkit
- Rotary Hole Punch: A $10 tool that is a lifetime investment for belts and crafts.
- Utility Knife & Metal Ruler: For those crisp, straight designer edges.
- Hammer & Nail (or Awl): If you don’t have a punch, a large nail can create the starter holes.
- Sandpaper (220 and 600 grit): The secret to those smooth, rounded edges found on luxury goods.
- A Wooden Spoon: Our ‘frugal burnisher’ for polishing the leather edges to a glass-like finish.
Pro-Tip: If you are cutting leather for the first time, always cut on the ‘flesh’ (fuzzy) side to keep your lines straighter, but use a fresh blade to ensure you don’t tear the ‘grain’ (smooth) side.
Step-by-Step Construction: Measuring, Cutting, and Punching
Measure Twice, Cut Once, Style Forever
The standard camera strap length is usually between 35 and 45 inches, but the beauty of DIY is customization. If you like to wear your camera ‘cross-body,’ aim for 50 inches. If you want a neck strap, 38 inches is usually the sweet spot.
The Assembly Process
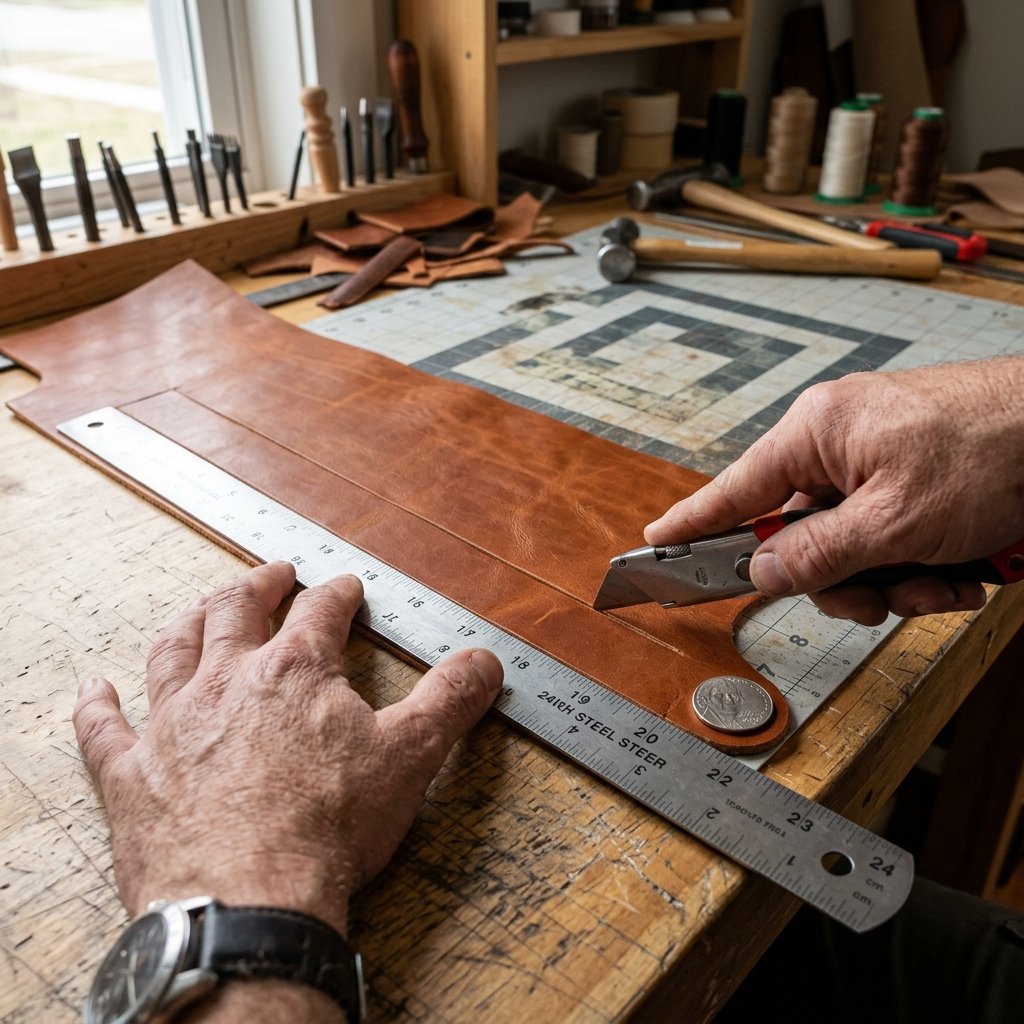
- Straightening the Strip: Use your metal ruler and utility knife to cut a strip of leather 1 inch wide. This width is the perfect balance between strength and comfort.
- Rounding the Ends: Use a coin (a nickel works great) as a template to trace a curve on the ends of your strap. Trim carefully with your knife.
- Punching the Attachment Points: At each end, you will need to punch two holes. The first hole should be 1 inch from the tip, and the second hole should be 3 inches from the tip. This allows you to fold the leather over the camera’s split ring and secure it.
- Personalization (The ‘Designer’ Touch): Before assembling, this is the time to stamp your initials. Wet the leather slightly with a sponge (this is called ‘casing’), place your metal stamps, and give them a firm, singular strike with a hammer.
Safety Note: Always use a self-healing cutting mat or a scrap piece of wood under your leather when punching holes to avoid damaging your table or dulling your tools.
The Professional Finish: Burnishing and Conditioning
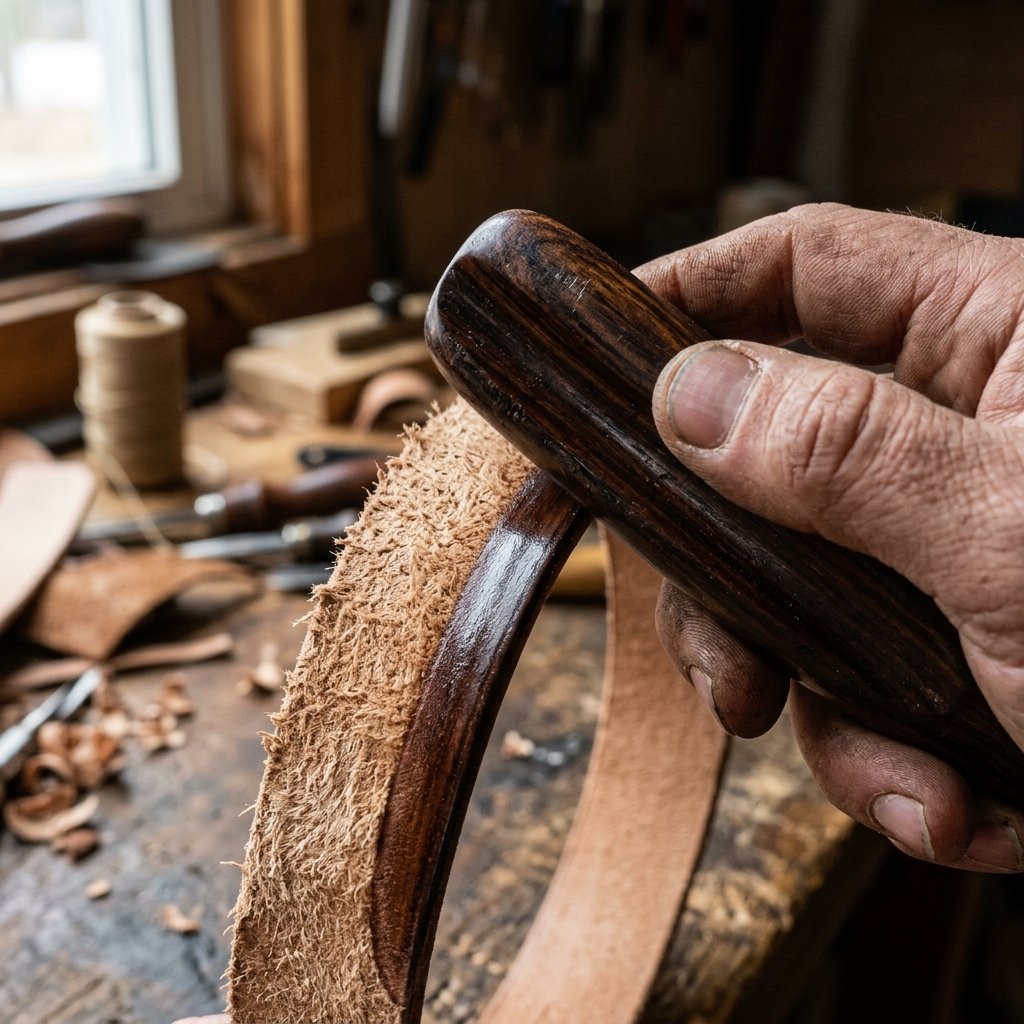
How to Get That Glass-Smooth Edge
What separates a ‘craft project’ from a ‘designer product’ is the finish. Raw leather edges look hairy and unfinished. We are going to ‘burnish’ them using friction. This costs $0 but adds $50 of perceived value.
The Burnishing Technique
- Sand: Take your 220-grit sandpaper and sand the edges of the strap until they are flush and rounded.
- Dampen: Run a slightly damp finger along the edge of the leather. You don’t want it soaked, just moist.
- Friction: Take your wooden spoon (or a dedicated wood slicker) and rub the edge of the leather rapidly back and forth. The heat from the friction will collapse the fibers and create a shiny, hard, professional edge.
- Seal: Rub a bit of beeswax or even clear lip balm (in a pinch!) over the edge and do one final pass with the wood.
Homemade ‘Rugged’ Leather Conditioner
To give your strap that supple feel and deep color, mix 2 parts olive oil with 1 part melted beeswax. Rub this into the strap with a soft cloth. It will darken the leather slightly and provide a protective barrier against sweat and rain.
Final Assembly: Securing the Hardware
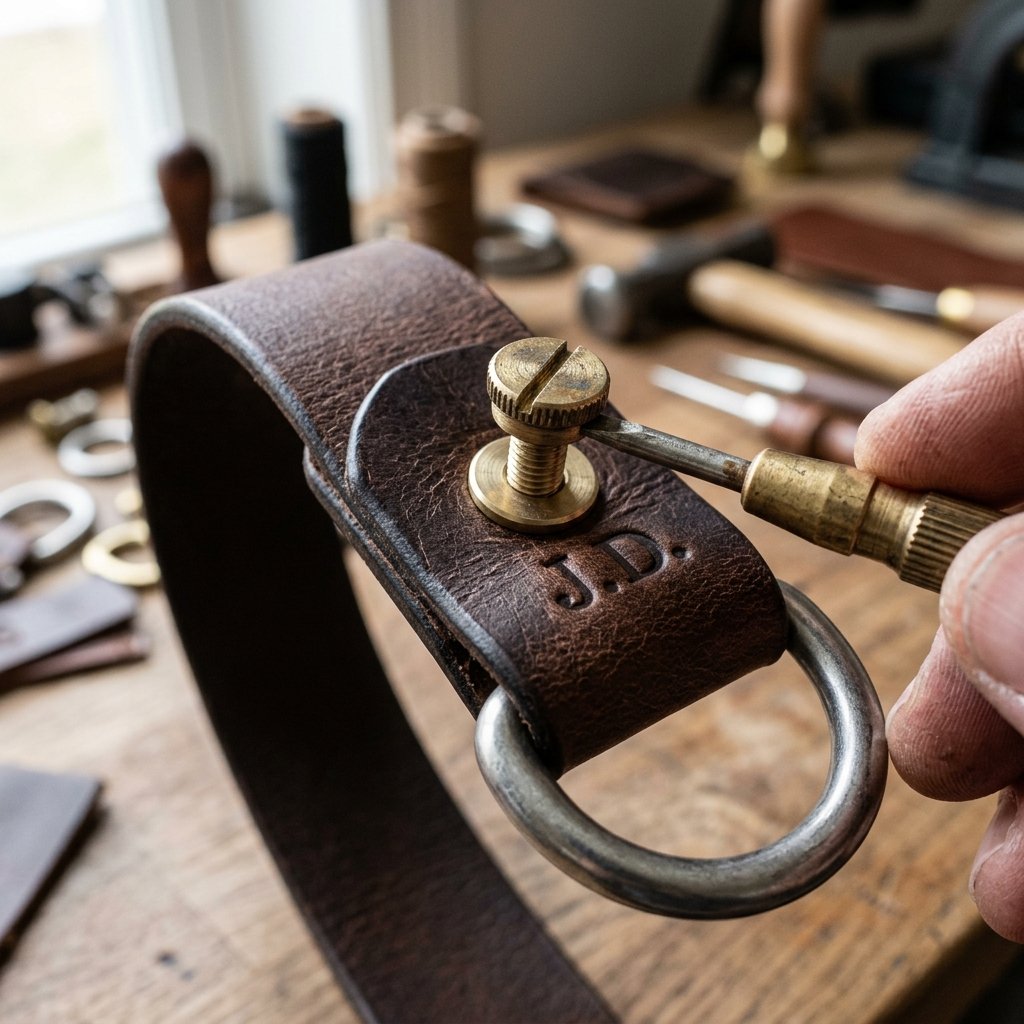
Locking It Down for the Long Haul
Now we bring it all together. We are using Chicago Screws because they allow you to swap out hardware later, but they look incredibly high-end. They consist of a post and a screw that join through the holes we punched earlier.
The Final Steps
- Looping: Slide your metal split ring (the part that connects to the camera) onto the end of the strap.
- Folding: Fold the leather end over so the two holes you punched align perfectly.
- Fastening: Push the post of the Chicago screw through both holes. Twist the screw into the post.
- Security Check: Use a small drop of clear nail polish or ‘thread locker’ on the screw threads before tightening. This ensures that the vibrations of walking won’t loosen the screw over time. Total security for your expensive gear!
| Hardware Option | Vibe | Security Level |
|---|---|---|
| Chicago Screws | Industrial / Modern | High (with thread locker) |
| Copper Rivets | Vintage / Rugged | Permanent / Ultra-High |
| Hand-Stitching | Classic / Artisan | High (requires more time) |
Styling and Maintenance: The Heirloom Life

Wearing Your Work with Pride
Your new strap will be a bit stiff at first. This is the hallmark of quality leather. The best way to ‘break it in’ is to use it. The oils from your hands and the movement of your body will soften the leather over the first few weeks, creating a ‘pull-up’ effect where the oils shift and create beautiful highlights in the grain.
Care Tips for the Frugal Photographer
- Avoid Saltwater: If you’re shooting at the beach, wipe the leather down with a damp cloth afterward to remove salt, which can dry out the fibers.
- Annual Re-Oiling: Once a year, give it a light coat of your homemade conditioner to keep it from cracking.
- The ‘Patina’ Goal: Don’t be afraid of scratches! On high-quality leather, scratches tell the story of your travels and can often be rubbed out with just the warmth of your thumb.
Mantra: A designer buys things to look good; a maker builds things to live well. Your camera strap isn’t just an accessory; it’s a testament to your craft.
Conclusion
Your Journey from Scrap to Sophistication
You’ve done it. You’ve taken a simple strip of leather—perhaps even a discarded belt—and through a bit of elbow grease and ‘frugal genius,’ transformed it into a luxury camera strap that would look right at home in a high-end boutique. You didn’t just save over $100; you gained a skill that allows you to create bespoke gifts for friends and family. This strap is more than a tool; it’s a conversation starter. Every time you lift your camera to take a photo, you’ll be reminded that you don’t need a massive budget to own the best gear in the world—you just need the resourcefulness to make it yourself. Now, get out there and capture some memories with your new, designer-level gear!

Makenzie is the founder and lead writer at MoneyHackTips.com — a personal finance blog dedicated to delivering street-smart financial wisdom for real people on real budgets. With 300+ published articles covering everything from debt management to investing fundamentals, Makenzie’s mission is to make every dollar work harder. When not writing about money hacks, Makenzie is testing frugal living strategies, optimizing side hustles, and helping readers build financial freedom from scratch.