Listen up, frugal hackers. If you have ever walked into a high-end furniture store, looked at a piece of pet furniture, and thought, ‘Are they seriously charging $300 for a glorified stick?’—you are in the right place. We all love our cats, and we all want our apartments to look chic and put-together. But draining your bank account for a cat tree that your feline friend might just ignore in favor of the cardboard box it came in? That is a rookie mistake. Today, we are taking back our power and our hard-earned cash.
The pet industry is notorious for the ‘Pet Tax’—slapping a massive markup on basic materials just because they are marketed for animals. When you add words like ‘modern,’ ‘rustic,’ or ‘luxury’ to the mix, prices skyrocket. But here is the street-smart truth: you do not need to spend $300, $200, or even $50 to give your cat a beautiful, sturdy, and aesthetic place to climb. You just need a little hustle, some basic tools, and the willingness to look at nature as your personal hardware store.
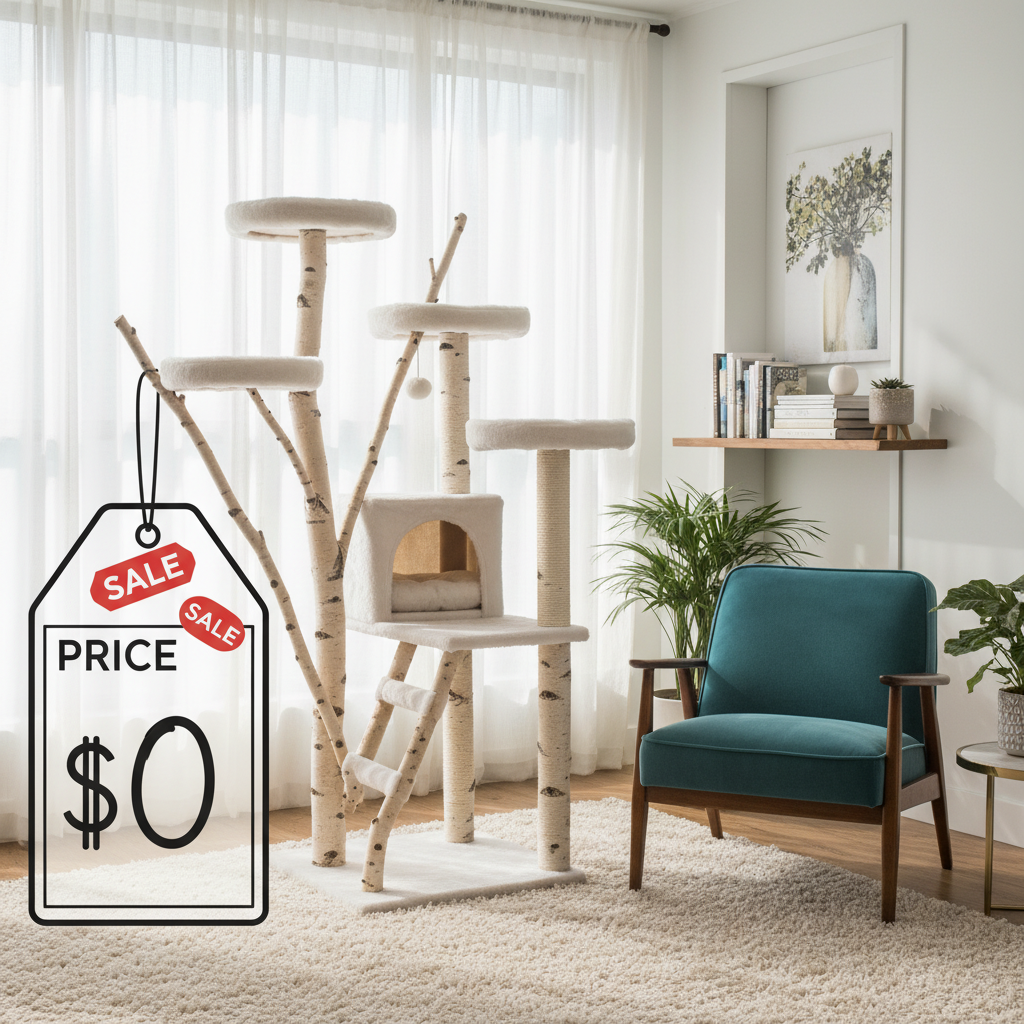
In this comprehensive tutorial, I am going to walk you through exactly how I built a gorgeous, real-wood cat tree inspired by high-end retailers for exactly $0. Yes, you read that right. Zero dollars. We are going to cover everything from safely foraging for the right branches, to scoring free building materials, to bug-proofing your wood, and assembling a masterpiece that will make your houseguests ask, ‘Where did you buy that?’ Grab your work gloves, because it is time to hack the system and build something amazing.
The Reality Check: Why Are We Paying for Sticks?
Before we get our hands dirty, we need to talk about the psychology of retail and why so many of us fall into the trap of buying overpriced pet furniture. Retailers like West Elm, Pottery Barn, and even high-end boutique pet shops know exactly what they are doing. They prey on your desire for a beautiful home and your love for your pet. They take materials that cost pennies on the dollar, assemble them in a factory, slap a designer label on them, and charge you $300 or more.
The Frugal Hacker Rule #1: Never pay retail for something nature provides for absolutely free. Wood grows on trees. Literally.
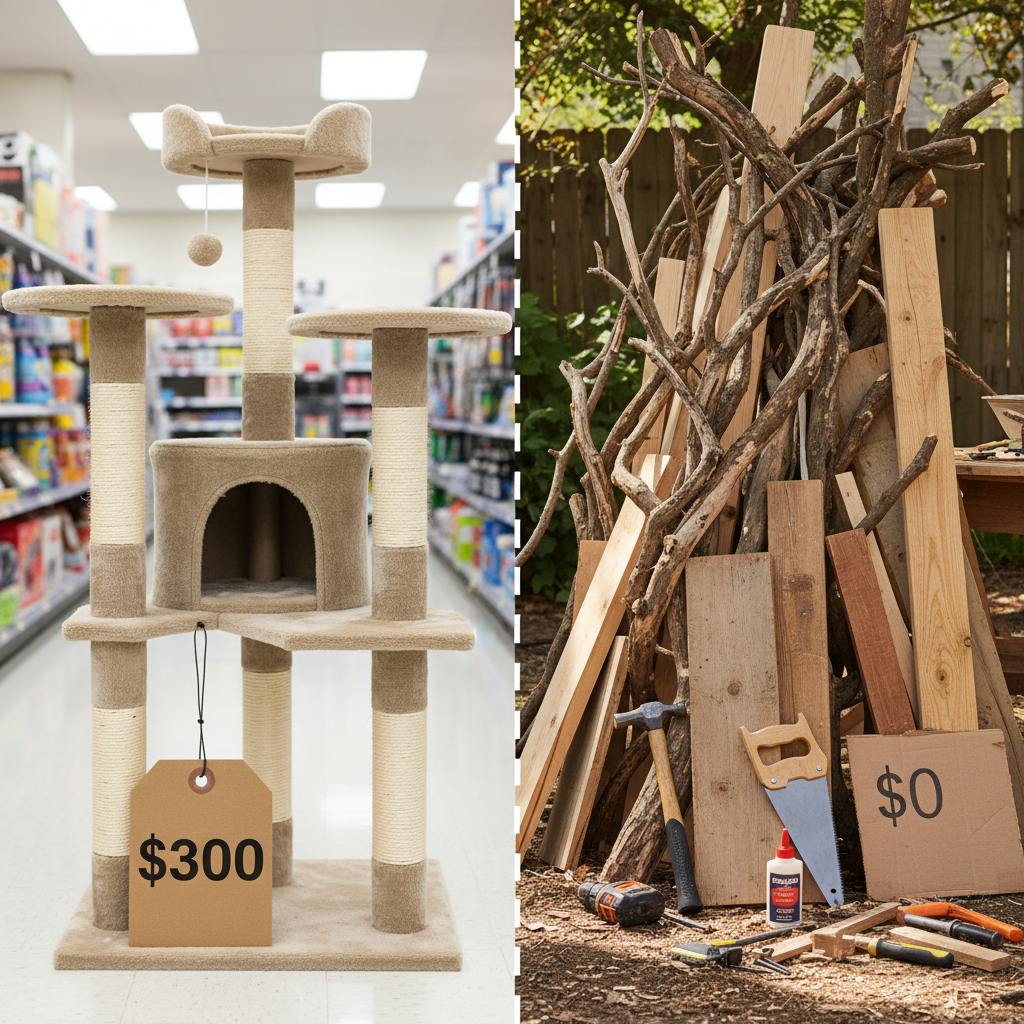
When you break down a luxury cat tree, what is it really? It is a heavy base, some vertical supports (branches or cardboard tubes), a few platforms, and some texture for scratching and sleeping. That is it. There is no magical engineering involved that you cannot replicate in your own living room or garage. To prove my point, let’s look at the cold, hard math. As frugal living enthusiasts, we know that numbers do not lie. Here is the exact cost breakdown comparing a high-end store-bought cat tree to our zero-dollar DIY method.
| Material / Component | Retail Price Estimate | Our Frugal DIY Cost |
|---|---|---|
| Heavy Wood Base & Platforms | $75 | $0 (Upcycled Scrap Wood) |
| Vertical Supports (Real Branches) | $120 | $0 (Foraged from Nature) |
| Scratching Material (Sisal Rope) | $45 | $0 (Buy Nothing Groups/Repurposed) |
| Cozy Toppers (Faux Fur/Carpet) | $60 | $0 (Old Rugs/Thrifted Scraps) |
| Total Investment | $300 | $0 |
Seeing those numbers side-by-side should be all the motivation you need. By choosing to DIY this project, you are effectively paying yourself $300 for a weekend of fun, creative work. That is money you can put toward your emergency fund, your investments, or your next side hustle. Now that we are in the right mindset, let’s talk about sourcing our materials without spending a dime.
Step 1: The Urban Forager’s Guide to Sourcing Materials

The secret sauce to a $0 project is resourcefulness. You cannot just walk into Home Depot and walk out with free stuff. You have to hustle. Let’s start with the star of the show: the branches. You want thick, sturdy branches that can support the weight of a leaping cat. But you cannot use just any wood. Some woods are toxic to cats.
Safe vs. Toxic Woods
Safety is our top priority. You must correctly identify the wood before bringing it indoors. Safe woods for cats include Oak, Maple, Birch, Apple, and Hickory. These are hardwoods that are sturdy and non-toxic. Woods to strictly avoid include Pine, Cedar, Yew, and Walnut. Pine and cedar contain phenols that are toxic to cats and can cause respiratory issues. If you are unsure what kind of tree a branch came from, do not use it. Use a free plant identification app on your phone to be certain.
Where to Find Free Branches
- After a Storm: Nature does the pruning for you. After a heavy windstorm, walk around your neighborhood or local public parks (check local laws on foraging). You will often find massive, beautiful branches lying on the ground.
- Tree Trimming Services: If you see a crew cutting down trees in your area, walk up and politely ask if you can take a branch or two. They are usually thrilled to have less to haul away to the woodchipper.
- Friends and Family: Put out a blast on your social media. ‘Hey friends, does anyone have a hardwood tree down on their property? I need a thick branch for a DIY project!’
Sourcing the Base, Platforms, and Hardware
Now you need a heavy base (like thick plywood or MDF) and some smaller pieces for the platforms. This is where your street-smarts come in. You are going to leverage the digital community.
The Frugal Sourcing Script: ‘Hi [Name]! I saw your listing for scrap wood. I am a beginner DIYer working on a zero-budget project to build a tree for my rescue cat. Do you happen to have any sturdy leftover plywood pieces you’d be willing to part with? I can pick them up today at your convenience!’
Use that script on Facebook Marketplace, Craigslist (check the ‘Free’ section), and your local Buy Nothing group. People who have recently finished home renovations almost always have scrap wood they want gone. For the faux fur or carpet, ask your Buy Nothing group for old bath mats, clean carpet remnants, or thrift an old faux fur coat from a family member’s donation pile. For screws and hardware, ask to dive into your dad’s, neighbor’s, or friend’s random hardware bucket. Everyone has a jar of mixed screws in their garage.
Step 2: Prep Work and Bug-Proofing (Crucial Step)
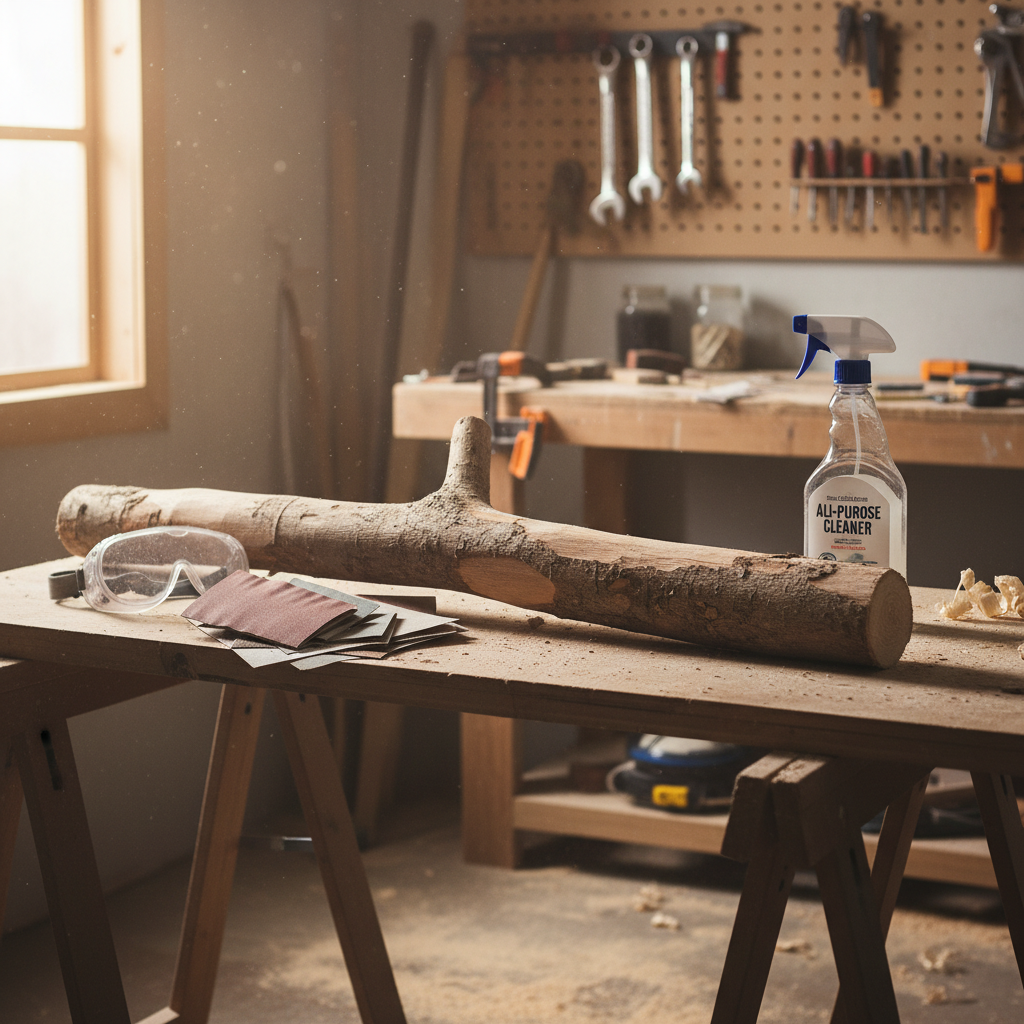
Do not skip this section! Bringing raw wood from the outdoors directly into your living room is a one-way ticket to a bug infestation. Termites, ants, and spiders love dead wood. Plus, the wood needs to be completely dry to prevent it from rotting or snapping under your cat’s weight. Here is how to process your foraged branches like a pro.
The Drying and De-Bugging Process
- Strip the Bark (Optional but Recommended): Depending on the look you want, you might want to strip the bark. Bark holds moisture and bugs. Use a chisel, a drawknife, or even a sturdy flathead screwdriver to peel away the bark. Underneath, you will find smooth, beautiful wood.
- The Bleach Wash: Mix a solution of 1 part bleach to 10 parts water in a spray bottle. Take your branches outside and spray them down thoroughly. This kills surface mold, fungi, and insect eggs. Let the branches sit in the sun for 24 hours.
- Baking the Wood (If it fits): If your branches are small enough to fit in your oven, this is the ultimate bug-killing method. Bake them at 200 degrees Fahrenheit for 2 to 3 hours. Keep a close eye on them to ensure safety. This draws out all the moisture and kills anything living inside.
- The Sun-Baking Method (For large branches): If your branch is a massive 5-foot piece, you cannot put it in the oven. Instead, wrap the branch tightly in black plastic trash bags and leave it in direct, hot sunlight for a week or two. The heat inside the black bag will act like a kiln, baking the wood and exterminating pests.
Sanding for Safety
Once your wood is completely dry and bug-free, it is time to make it safe for your cat’s paws. You do not want your cat getting splinters. Grab some sandpaper (start with a rough 80-grit and finish with a smooth 120-grit or 220-grit). Sand down any sharp knots, rough patches, or splintered ends. If you sourced your sandpaper for free from a neighbor, you are still sitting at a solid $0 budget.
Step 3: The Build – Engineering Your Frugal Masterpiece
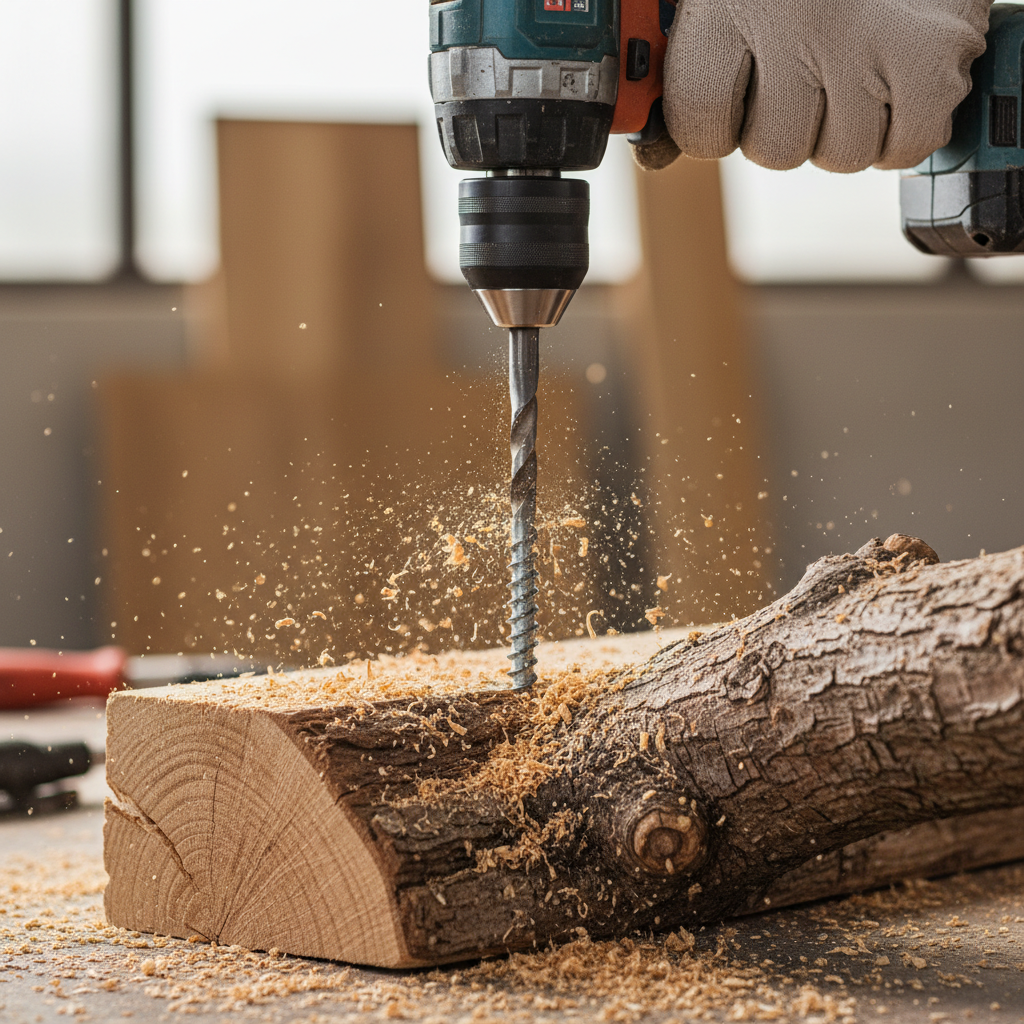
Now comes the fun part: assembly. You are going to need a drill, some long wood screws (or lag screws for the main base), and a saw. If you do not own these tools, do not go buy them! Borrow them from a friend, or check if your city has a ‘Tool Library’ where you can check out power tools for free just like books.
Step-by-Step Assembly Instructions
- Prepare the Base: Your base needs to be heavy and wide to prevent the tree from tipping over when your cat jumps on it. A 24×24 inch piece of thick plywood or solid wood is ideal. Sand the edges so they are smooth.
- Level the Branch: This is the trickiest part. Your branch likely has an uneven bottom. Use your saw to cut the absolute bottom of the main branch perfectly flat. You want it to stand up straight on its own without wobbling.
- Attach Branch to Base: Flip your base upside down. Pre-drill a hole through the bottom of the base where you want the branch to sit. Then, pre-drill a hole into the bottom of the branch. This prevents the wood from splitting. Apply some wood glue (if you have it) to the bottom of the branch, stand it up, and drive a heavy-duty lag screw or multiple long wood screws up through the bottom of the base directly into the core of the branch. Ensure it is rock solid.
- Cut and Attach Platforms: Determine where you want your cat to sit. Look for natural forks in the branches. Cut your scrap wood into circles, ovals, or natural shapes for the platforms. To attach them, pre-drill holes through the platforms and into the branches. Use at least two screws per platform to ensure they do not spin or tilt. For extra support, you can use small scrap wood pieces as angled brackets underneath the platforms.
Test the stability. Give the tree a good shake. Push down on the platforms. If anything wobbles, add more screws or a wider base. Safety first—a vet bill for a fallen cat will quickly erase your $300 savings!
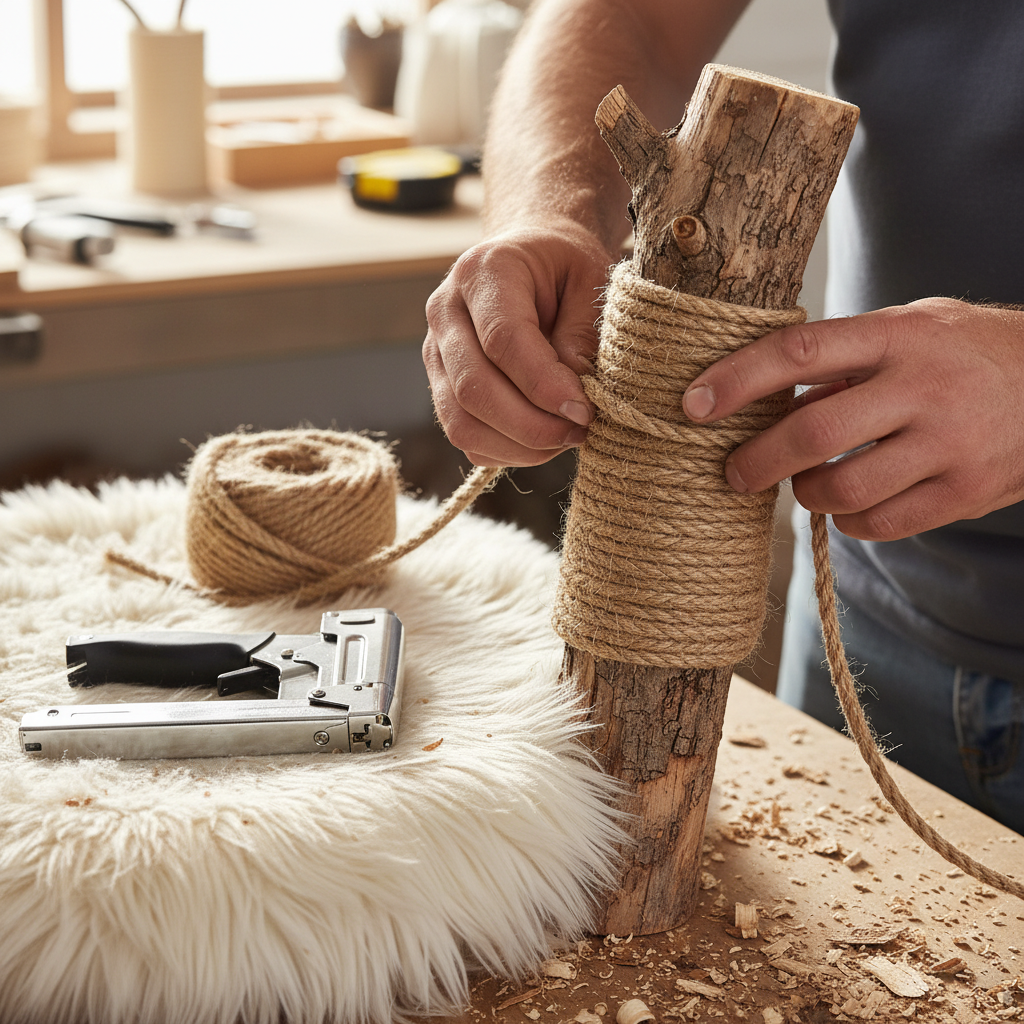
Step 4: The Finishing Touches – Making it Look Expensive
Right now, you have a solid structure, but it probably looks a bit like a high school shop class project. It is time to elevate the aesthetic and make it look like a high-end, West Elm-inspired piece of furniture. This is where the scratching elements and cozy textures come in.
Wrapping the Sisal Rope
Cats need to scratch. It is in their DNA. Wrapping parts of the branch in sisal rope not only gives them an outlet that isn’t your couch, but it also adds that modern, nautical, high-end look. If you managed to score free sisal rope from a Buy Nothing group, great! If you only found regular thick twine or jute, that works too.
- Find a straight, vertical section of your branch.
- Staple or hot glue the very end of the rope to the bottom of the section.
- Wrap the rope tightly around the branch, pushing each layer down so there are no gaps.
- Every 5 or 6 wraps, add a dab of hot glue or a staple to keep it secure.
- Finish it off tightly at the top and trim the excess.
Upholstering the Platforms
Bare wood is slippery for cats. They need grip, and they love soft places to sleep. Take your thrifted faux fur, old bath mat, or carpet remnant. Place your wooden platform on top of the fabric and trace around it, leaving a 2-inch border. Cut out the fabric. Wrap the fabric over the edges of the platform and use a staple gun (borrowed, of course) to secure it tightly underneath. Pull the fabric taut as you staple so there are no wrinkles. Trim any excess fabric hanging underneath.
If you want to go the extra mile, you can stain the exposed wood on the base with a natural, pet-safe stain (like strong brewed coffee or tea!) to give it a rich, warm tone. Let it dry completely before letting your cat near it.
Conclusion
And there you have it! You just bypassed the retail trap, learned a new skill, and built a stunning, luxury-tier piece of pet furniture for exactly $0. By taking the time to forage responsibly, source materials from your community, and put in a little elbow grease, you kept $300 in your pocket. That is the true essence of frugal hacking. You do not have to sacrifice aesthetics or your pet’s happiness just because you are on a budget. You just have to be smarter than the marketers.
Your cat now has a one-of-a-kind, natural playground, and your living room has a gorgeous conversation piece. Remember, frugality is not about deprivation; it is about resource allocation. Keep hacking, keep building, and keep saving!
Disclaimer: I am a frugal living enthusiast, not a professional carpenter or a veterinarian. This tutorial is for informational and entertainment purposes. Always ensure your DIY projects are structurally sound and use non-toxic materials to keep your pets safe. Not a financial advisor.

Makenzie is the founder and lead writer at MoneyHackTips.com — a personal finance blog dedicated to delivering street-smart financial wisdom for real people on real budgets. With 300+ published articles covering everything from debt management to investing fundamentals, Makenzie’s mission is to make every dollar work harder. When not writing about money hacks, Makenzie is testing frugal living strategies, optimizing side hustles, and helping readers build financial freedom from scratch.