The Viral Tufted Mirror Hack: Make High-End Decor for Dollar Store Prices
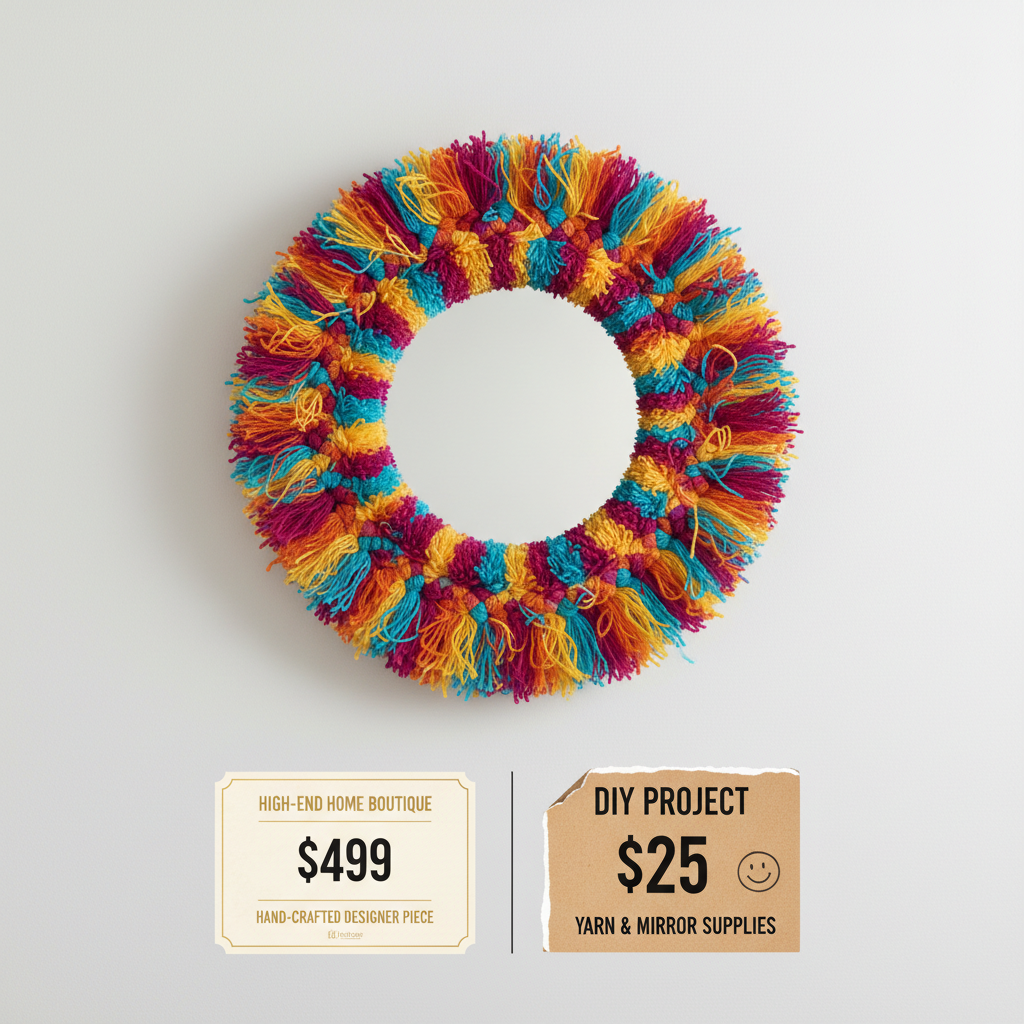
Let’s be real: scrolling through high-end decor sites is a special kind of torture. You see that perfect, fluffy, oh-so-trendy tufted mirror, click on it, and BAM—a $500 price tag hits you in the face. Who are they kidding? Your rent is due. That’s not a price, that’s a joke. But what if I told you that you could get that same luxe, influencer-approved vibe for less than the cost of a few fancy coffees?
Forget dropping hundreds of dollars to keep up with trends. We’re about to beat the system. This is the ultimate guide to the viral tufted mirror hack. It’s more than a craft project; it’s a power move for your home and your bank account. You don’t need to be a DIY guru or have a workshop full of expensive tools. All you need is a little hustle, a glue gun, and a trip to the dollar store. Get ready to transform your space from bland to brilliant without blowing your budget.
The Heist: Gathering Your Supplies for Pennies

First things first, we’re not walking into a fancy craft store with a blank check. We’re on a mission, and the goal is maximum style for minimum spend. Think of this as a scavenger hunt where the prize is a killer piece of decor. Your main battlegrounds are the dollar store, the thrift store, and maybe that junk drawer you haven’t opened in a year. Here’s your shopping list:
- The Mirror: Don’t overthink it. A simple, cheap round or oval mirror from the dollar store, a thrift shop, or even Walmart is perfect. We’re covering the frame anyway, so nobody will know it cost you $5.
- The Base: Corrugated cardboard or foam board. You need something sturdy enough to hold the yarn but easy to cut. You probably have a shipping box lying around that’s perfect for this. Cost: $0.
- The Fluff (Yarn): This is where you bring the personality. Chunky yarn gives the best, most luxurious look. Check out dollar store craft aisles, Walmart, or wait for sales at big craft stores. You’ll need 2-3 skeins depending on the size of your mirror.
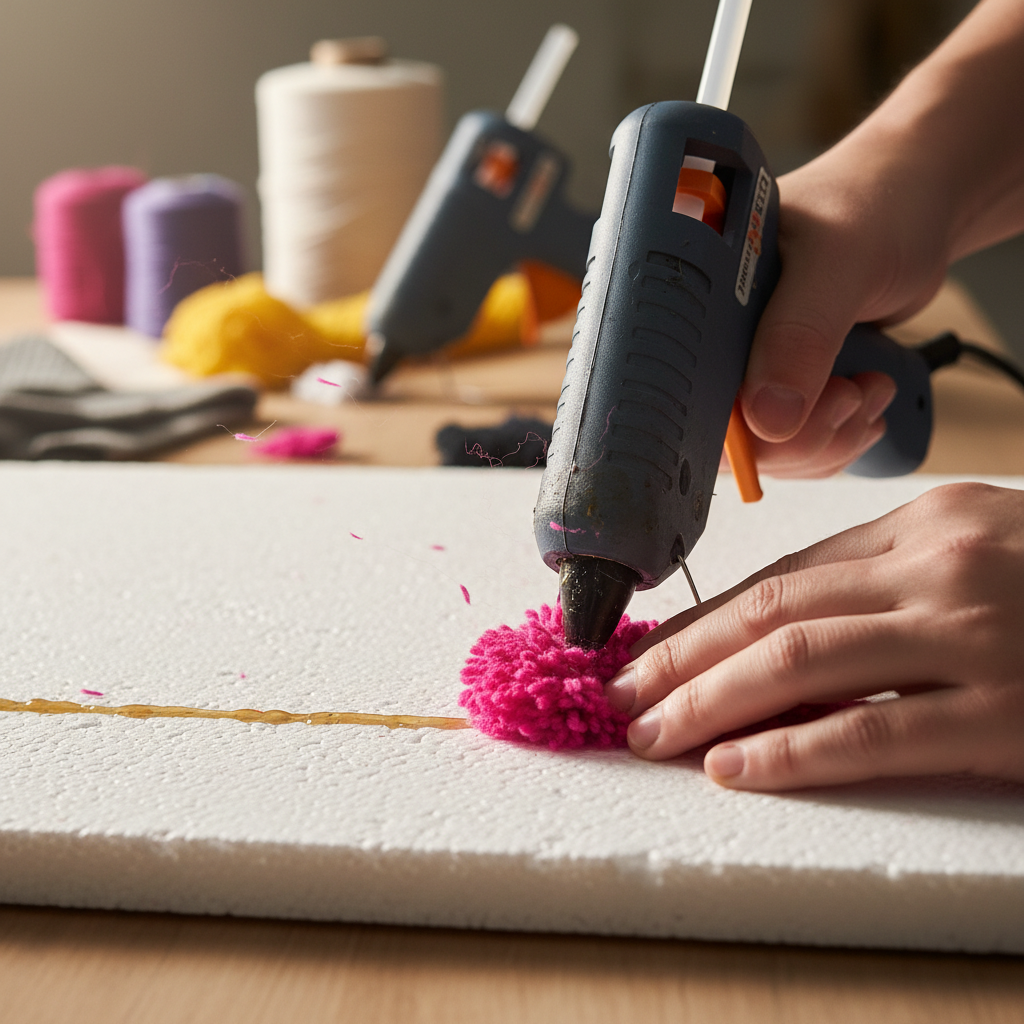
- The Muscle (Adhesive): A trusty hot glue gun is your best friend here. If you don’t have one, it’s a $10 investment that will pay for itself a hundred times over in future projects. Grab plenty of extra glue sticks.
- The Tools: Nothing fancy. You need a good pair of scissors, a box cutter or craft knife for the base, and a pencil for tracing.
The game is to get this pile of stuff for under $25. It’s completely doable if you shop smart and use what you’ve already got. This isn’t about spending money; it’s about being resourceful.
The Blueprint: Your Step-by-Step Tufting Tutorial
Alright, you’ve got your supplies. Now it’s time to build. Put on some music, clear a space, and let’s get to it. Follow these steps exactly, and you can’t mess this up.
- Create the Frame Base: Place your mirror in the center of your foam board or cardboard. Trace around it. Now, decide how thick you want your fluffy frame to be—a 3 to 4-inch border is a great place to start. Draw a larger circle around your first tracing. Carefully cut out the large circle, and then cut out the inner circle. You should be left with a big doughnut-shaped frame. This is your canvas.
- Prep Your Yarn Bundles: This is the most repetitive part, so zone out and get it done. You need to create dozens of little yarn bundles. Wrap the yarn around four of your fingers about 15-20 times. Carefully slide the loop off your fingers and snip a small piece of yarn (about 4 inches) to tie tightly around the middle of the loop. You’ll have a little bow-tie shape. Now, take your scissors and snip through the loops on both ends of the ‘bow-tie’. Fluff it up, and you have your first ‘tuft’ or pom-pom. Repeat this until you have a massive pile of them. Yes, it takes time, but this is what creates that high-end look.
- The Tufting Process: Fire up that glue gun. Start on the outer edge of your foam board frame. Apply a generous line of hot glue and press your yarn tufts into it, side-by-side, packed tightly together. Don’t be shy with the glue or the yarn. The key to a luxe look is density. No one wants a bald-looking mirror. Work your way from the outer edge inward, row by row, until the entire frame is covered in a fluffy, glorious cloud of yarn.
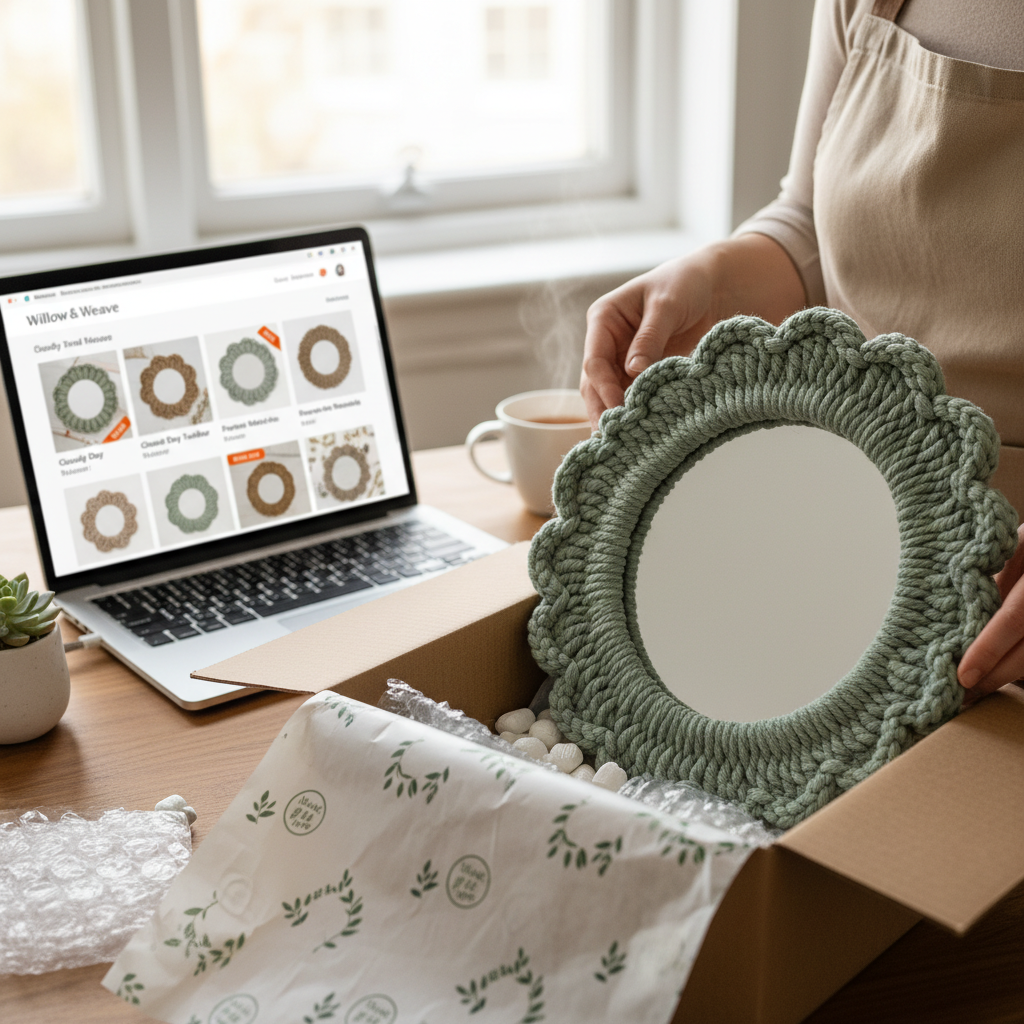
- Attach the Mirror: Once the entire frame is covered and the glue is dry, flip it over. Apply a strong adhesive like E6000 or a heavy-duty construction adhesive to the back of your mirror (hot glue might not be strong enough to hold the weight long-term). Carefully press it into place on the back of your tufted frame, centered in the opening. Let it cure completely according to the adhesive’s instructions—usually 24 hours.
- Finishing Touches: Give your mirror a final ‘haircut’. Trim any wild or uneven yarn pieces to create a clean, uniform shape. Attach a picture hanger to the back of the foam board, and you’re ready to hang your masterpiece. Step back and admire the fact that you just made a $500 mirror for pocket change.
The Numbers Don’t Lie: DIY vs. Store-Bought
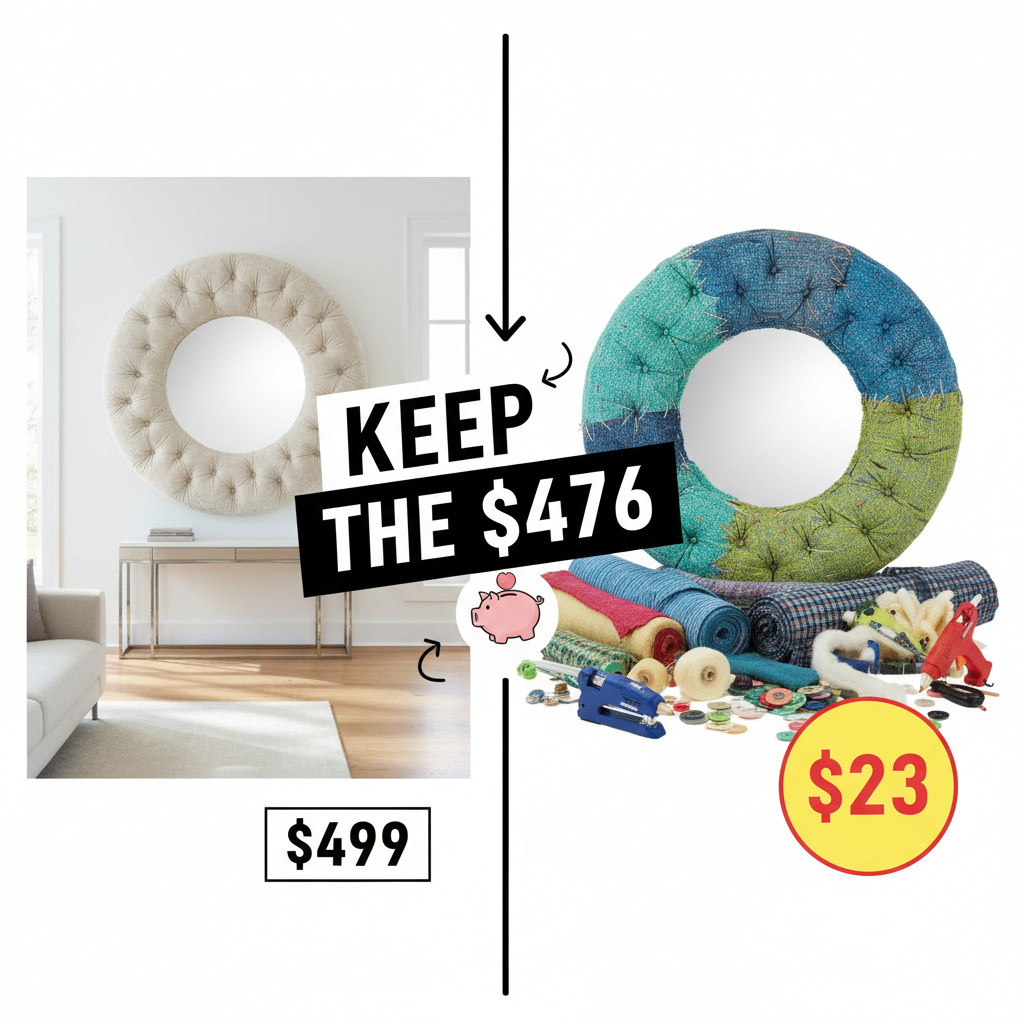
This is the part that really hits home for frugal hackers. It’s not just about making something cool; it’s about the cold, hard cash you’re keeping in your pocket. High-end decor brands rely on you thinking you can’t create this look yourself. We’re here to prove them wrong. Let’s break down the math.
| Item | High-End Retail Store Cost | Your DIY Cost |
|---|---|---|
| Tufted Mirror (Approx. 24-inch) | $499.00 | See breakdown below |
| Mirror | Included | $5.00 – $10.00 (Dollar Store/Thrift) |
| Frame Base | Included | $1.25 (Foam Board) or $0 (Cardboard) |
| Chunky Yarn (3 Skeins) | Included | $15.00 |
| Glue Sticks | Included | $2.00 |
| TOTAL COST | $499.00 | ~$23.25 |
| TOTAL SAVINGS | $475.75 | |
Look at that. You’re saving nearly $500. That’s not just savings; that’s money you can put toward debt, an investment, or a hundred other things that are more important than an overpriced mirror. This isn’t just a craft; it’s a financial strategy.
The Side Hustle Angle: Flip Your Fluff for Profit
Now that you’ve mastered the craft, why stop at one? You’ve just learned a skill that people are willing to pay top dollar for. Your weekend project could easily become your next side hustle. The market for custom, handmade decor is huge, and you have a massive advantage: low overhead. You can undercut the big stores and still make a fantastic profit.
Pricing Your Masterpiece
Don’t undervalue your time. A common formula is: (Cost of Supplies) + (Your Hourly Rate x Hours to Make) = Price. If your supplies cost $25 and it takes you 2 hours to make a mirror at a $20/hour rate, your price would be $65. That’s a $40 profit and still an absolute steal for a buyer compared to retail.
Where to Sell
- Facebook Marketplace: Perfect for local sales. No shipping fees, and you can get cash in hand. Take bright, well-lit photos of the mirror in a nicely decorated corner of your home.
- Etsy: The go-to for handmade goods. You’ll need to figure out shipping, but you reach a national or even global audience. Invest time in great photography and use keywords like ‘Tufted Mirror,’ ‘Funky Decor,’ and ‘Handmade Mirror’ in your listings.
- Local Craft Fairs: Rent a booth and sell your creations in person. Make a few in different colors and sizes to create an eye-catching display.
Earning Potential Breakdown
Let’s say you get efficient and can make a mirror in 1.5 hours. You sell them for $75 each.
| Mirrors Sold Per Week | Weekly Revenue | Weekly Profit (approx.) | Monthly Profit (approx.) |
|---|---|---|---|
| 1 Mirror | $75 | $50 | $200 |
| 3 Mirrors | $225 | $150 | $600 |
| 5 Mirrors | $375 | $250 | $1,000 |
Scam Warning: Be wary of ‘dropshipping’ deals or people asking you to buy supplies through a specific, weird link. Always handle your own materials and money. Sell through reputable platforms to protect yourself and your customers. Never agree to take payment via gift cards or wire transfers—stick to PayPal Goods & Services, Etsy Payments, or cash for local pickups.
Conclusion
So there you have it. You didn’t just learn how to make a mirror; you learned how to defy ridiculous retail markups and take control of your own style. You’ve turned dollar store items into a piece of decor that looks like it belongs in a magazine. Whether you make one for yourself or start slinging them on Etsy, you’ve proven that a street-smart approach is always more valuable than a big budget.
This is what frugal hacking is all about: seeing the hidden potential in everyday things and turning it into something amazing. You didn’t just save $475; you invested in your own creativity and resourcefulness. Now go hang that mirror, take a picture, and be proud of the hustle. You’ve earned it.