Save Your Favorite Socks: A 5-Minute Darning Tutorial Anyone Can Do
Let’s get real. You’ve got that one pair of socks. The perfect ones. They’re not just foot-covers; they’re a hug for your feet. And then it happens—the dreaded hole in the heel or toe. The gut punch is real. Your first instinct? Toss ’em. That’s what the big clothing brands want you to do. They want you on a never-ending cycle of buy, wear, tear, and replace. But we’re not playing that game.
Welcome to the ultimate frugal hack: darning. This isn’t your grandma’s dusty old hobby. This is a power move. It’s a five-minute rebellion against fast fashion and a direct deposit back into your own pocket. You’re about to learn a skill that will not only save your favorite socks but also shift your mindset from a passive consumer to a resourceful creator. Forget complicated sewing projects; if you can hold a needle, you can do this. Let’s get to work and save those socks from the landfill.
The Gear You Need (It’s Less Than You Think)
Before you think you need to run out and buy a $50 sewing kit, pump the brakes. The beauty of darning is its simplicity. You probably have most of what you need already, and if you don’t, it’s dirt cheap. We’re talking about a one-time investment that will pay for itself after saving just one pair of decent socks.
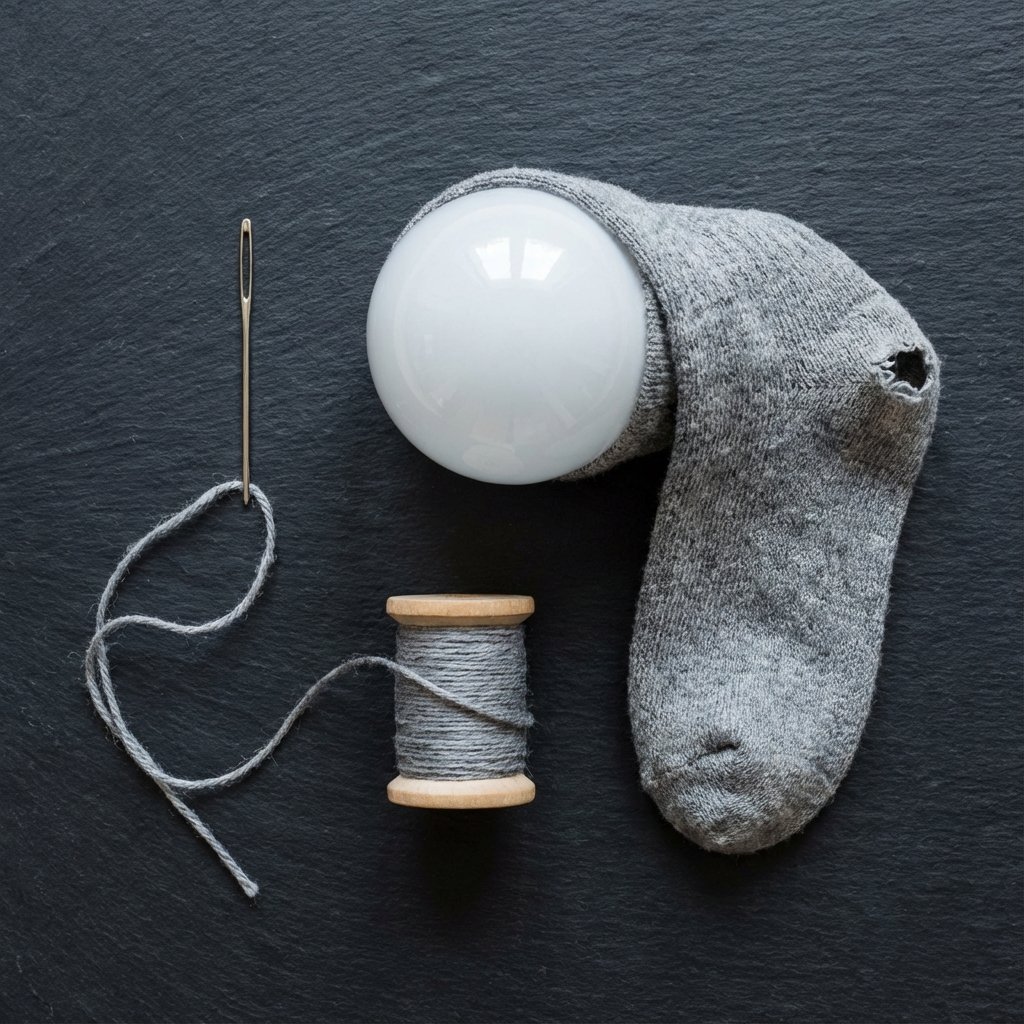
Your Darning Arsenal:
- A Darning Needle: This is the main event. Darning needles are a little longer than regular sewing needles and have a large eye, making them easier to thread. If you don’t have one, a regular needle will work in a pinch, but a proper darning needle makes life easier.
- Thread or Yarn: The goal is to match the thickness of your sock’s fabric. For thin dress socks, embroidery floss or standard sewing thread (doubled or tripled up) works great. For thick wool socks, you’ll want a thin yarn. Pro Tip: Don’t stress about a perfect color match. Using a contrasting color is a style called ‘visible mending,’ and it looks awesome.
- Something Round and Hard: This is your darning ‘egg.’ Its purpose is to stretch the fabric around the hole so you can work on a firm, curved surface. You absolutely do not need a fancy wooden egg. A lightbulb (be gentle!), a tennis ball, an orange, or even a smooth rock will do the job perfectly. Get creative and use what you have.
That’s it. That’s the whole list. No sewing machine, no complicated patterns. Just a few simple tools to get the job done and declare victory over planned obsolescence.
The Cost Breakdown: DIY vs. Buying New
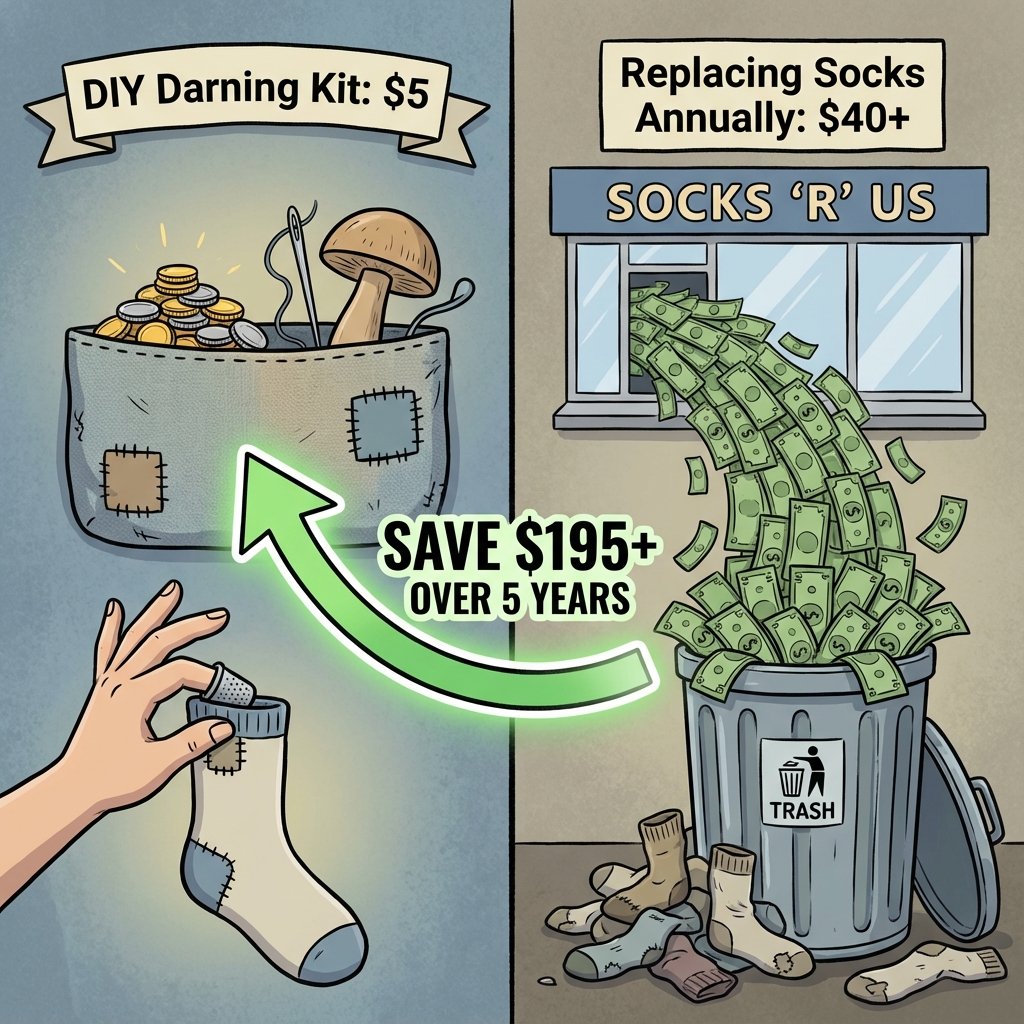
Numbers don’t lie. Let’s break down the real cost of being a ‘sock-tosser’ versus becoming a ‘sock-saver.’ The results are staggering when you look at it over a year. We’re not just saving a few cents; we’re talking about real money that can go towards your savings goals, a side hustle investment, or just a guilt-free pizza night.
Think about how many pairs of socks you or your family go through in a year. A decent pair of socks can cost anywhere from $5 to $20. Let’s be conservative and say you have to replace just five pairs of $8 socks a year because of holes. That’s $40 down the drain, year after year.
| Item | DIY Darning (One-Time Cost) | Buying New (Annual Recurring Cost) |
|---|---|---|
| Darning Needles (pack of 5) | $3.00 | N/A |
| Basic Thread/Yarn Spool | $2.00 | N/A |
| Darning ‘Egg’ (e.g., a lightbulb) | $0.00 (use what you have) | N/A |
| Cost of New Socks (5 pairs @ $8/pair) | N/A | $40.00 |
| Total First-Year Cost | $5.00 | $40.00 |
| Savings in Year 1 | You save $35.00! | |
| Savings Over 5 Years | You save $195.00! ($200 – $5 kit) | |
The math is a no-brainer. A tiny, one-time investment of about $5 saves you $35 in the very first year. And since that kit will last you practically forever, the savings just keep piling up. This is the essence of frugal living: small, smart actions that lead to huge financial wins over time.
The 5-Minute Darning Method: Step-by-Step
Alright, it’s go-time. No more talk. This is the method. Read it once, then grab that sad, holy sock and let’s bring it back to life. We’re essentially going to weave a new patch of fabric right over the hole. It’s simpler than it sounds. You’ve got this.
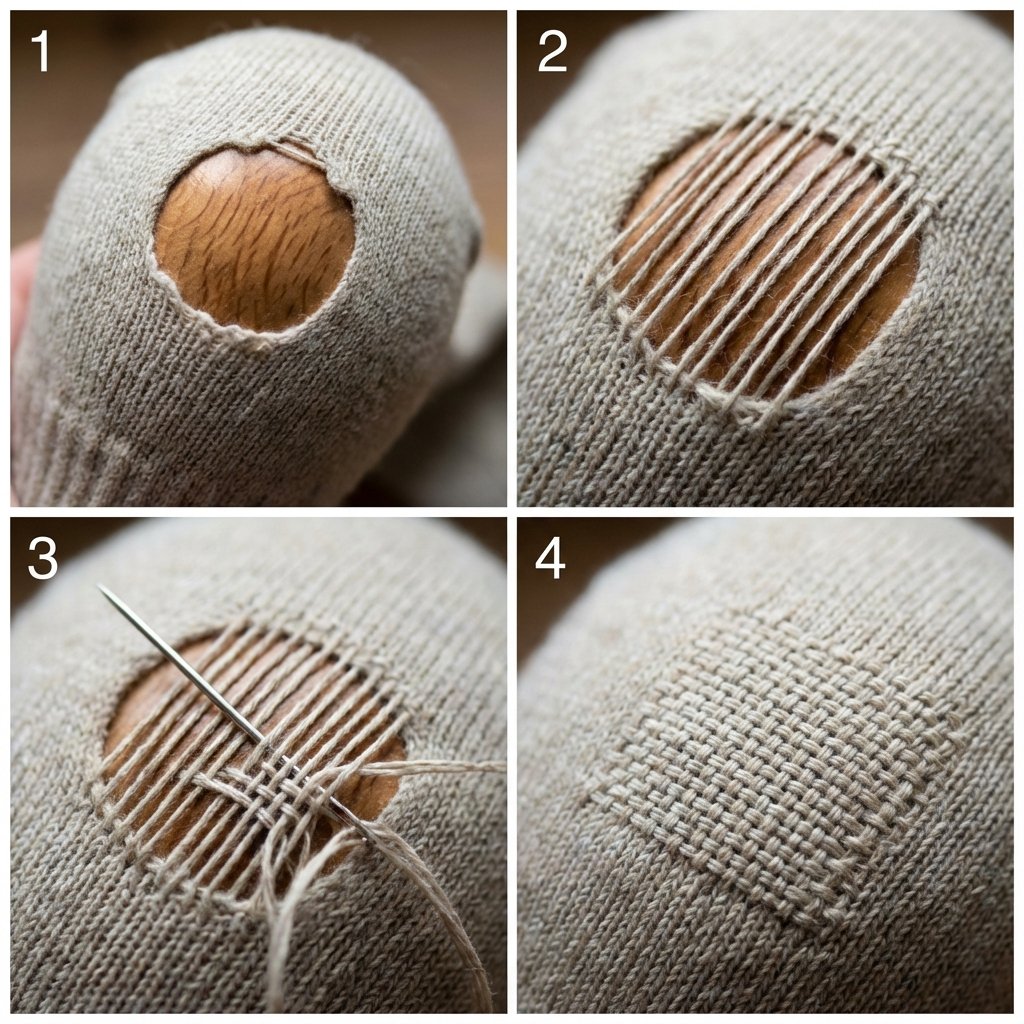
- Prep Your Station: Turn the sock inside out. Place your darning egg (or lightbulb, orange, etc.) inside the sock and stretch the area with the hole smoothly over the curve. This creates your mini-workbench. Thread your needle with about 18 inches of thread, but don’t tie a knot at the end yet.
- Lay the Foundation (The ‘Warp’ Threads): Starting about a quarter-inch from the edge of the hole, make a small stitch. Now, pull the thread across the hole to the other side and make another small stitch. Don’t pull it tight—you want it to lay flat. Continue sewing these parallel lines of thread back and forth across the entire hole, extending a bit into the sturdy fabric on all sides. These are your foundation threads. When you’re done, it should look like prison bars over the hole.
- Start Weaving (The ‘Weft’ Threads): Now, turn your work 90 degrees. You’re going to start weaving your needle over and under the foundation threads you just laid. Go over the first thread, under the second, over the third, and so on, all the way across. Pull the thread through.
- Weave Back: For the next row, do the opposite pattern. If you went over the last thread in the previous row, start by going under it on your way back. Go under the first, over the second, etc. Gently push this new row of weaving down against the previous one with your needle to keep it snug.
- Finish the Patch: Keep repeating this over-and-under weaving pattern until you have covered the entire hole and your foundation threads. You’ve just created a brand-new, sturdy patch of woven fabric!
- Secure and Snip: To finish, run your needle through the back of a few stitches on the underside of your patch to secure it, then snip the thread. Turn your sock right-side out and admire your work. You did it. You saved a sock.
Pro-Tips to Level Up Your Mending Game
You’ve mastered the basic darn. Now let’s take it from functional to fantastic. These tips will help you make your repairs stronger, faster, and either completely invisible or intentionally stylish.
- The Diagonal Advantage: For holes in high-stress areas like heels and toes, run your weaving stitches diagonally instead of at a 90-degree angle. This distributes the tension more evenly and creates a more durable patch that moves with the fabric.
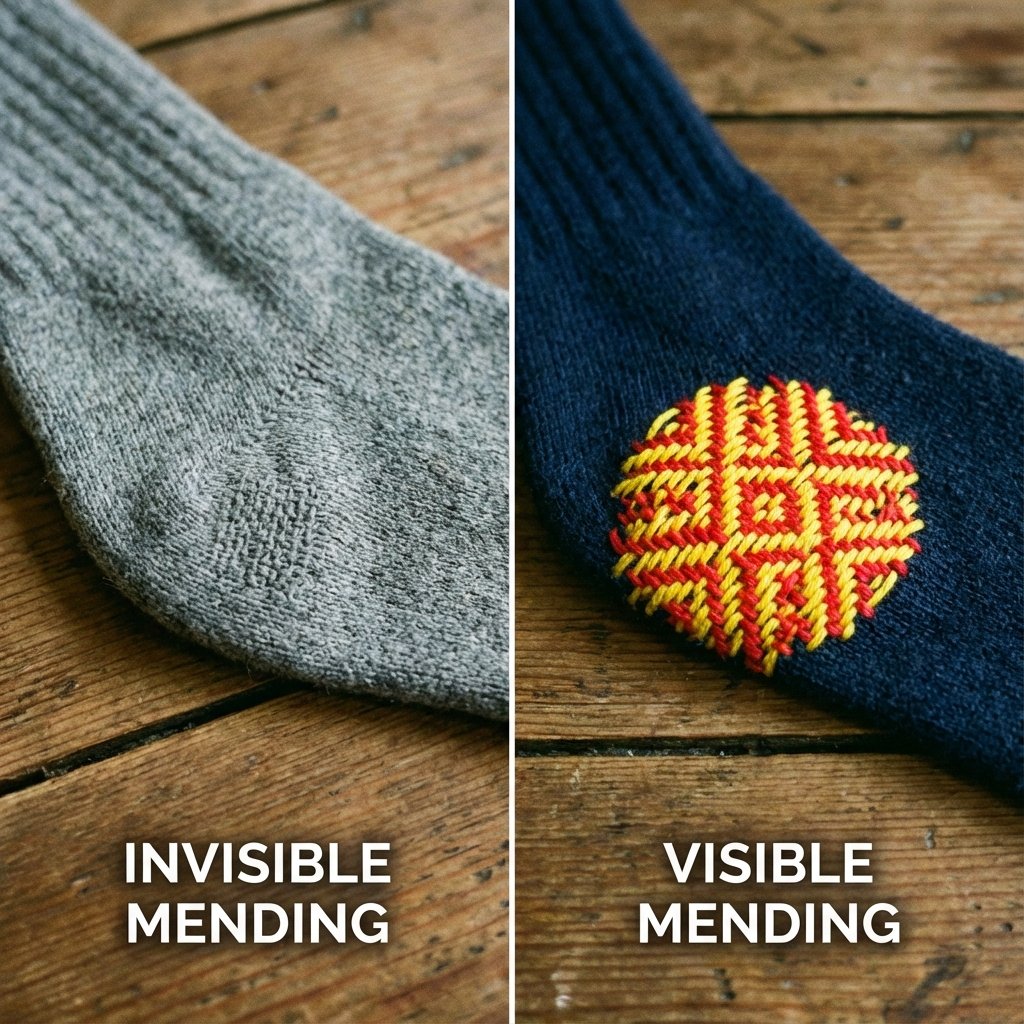
- Go Invisible: The key to a hidden mend is all in the thread. Try to harvest thread from another old, unrepairable garment of the same color. If that’s not possible, take your sock to a craft store and find the closest possible match of embroidery floss. When you split the floss down to one or two strands, it often blends in perfectly.
- Embrace Visible Mending: Who says a repair has to be invisible? Make a statement! Use brightly colored, contrasting embroidery floss to create a patch that pops. You can weave in different colors to create stripes or even a small checkerboard pattern. This turns a simple repair into a piece of custom art and a badge of honor for your sustainable lifestyle.
- Mind the Tension: The most common beginner mistake is pulling the weaving threads too tight. This can cause the fabric around your patch to pucker. Keep your stitches snug, but not strangling the fabric. The goal is to create a flat, flexible patch that integrates smoothly with the rest of the sock.
- Trim the Fuzz: Before you start darning, carefully trim away any frayed, fuzzy edges around the hole with a small pair of scissors. This gives you a cleaner edge to work with and prevents lumpy bits from getting trapped in your beautiful new patch.
Conclusion
There you have it. You are now officially a sock-saver. You’ve taken a stand against throwaway culture, saved yourself some hard-earned money, and learned a skill that’s both practical and incredibly satisfying. Every time you pull on that pair of darned socks, you’re not just wearing a repair; you’re wearing a story of resourcefulness. This isn’t just about socks. It’s about a mindset. What else in your life can be repaired instead of replaced? By taking five minutes to fix a small problem, you’re building a more sustainable, self-sufficient, and financially savvy life. Now go forth and darn!