Kitchen Makeover Hack: Spray Painting Hardware for a High-End Look
Let’s get real. You’ve been scrolling through Pinterest, drooling over those kitchens with the sleek, modern hardware. Then you check the price. $8 for a single cabinet pull? $5 for one knob? For a whole kitchen, you’re looking at hundreds of dollars. That’s a car payment. That’s a vacation day. It’s a rip-off. But what if I told you that you could get that same high-end, ‘I-hired-a-designer’ look for less than $30 and a Saturday afternoon? You don’t need to be a DIY guru or have a workshop full of fancy tools. You just need a can-do attitude and the ultimate frugal hack: spray painting your existing hardware. Forget getting played by big box stores. It’s time to take control, save your cash, and give your kitchen the glow-up it deserves. This isn’t just about saving money; it’s about being smarter with it and proving you can create a luxe space with your own two hands.
The Arsenal: Gear Up for a Flawless Finish
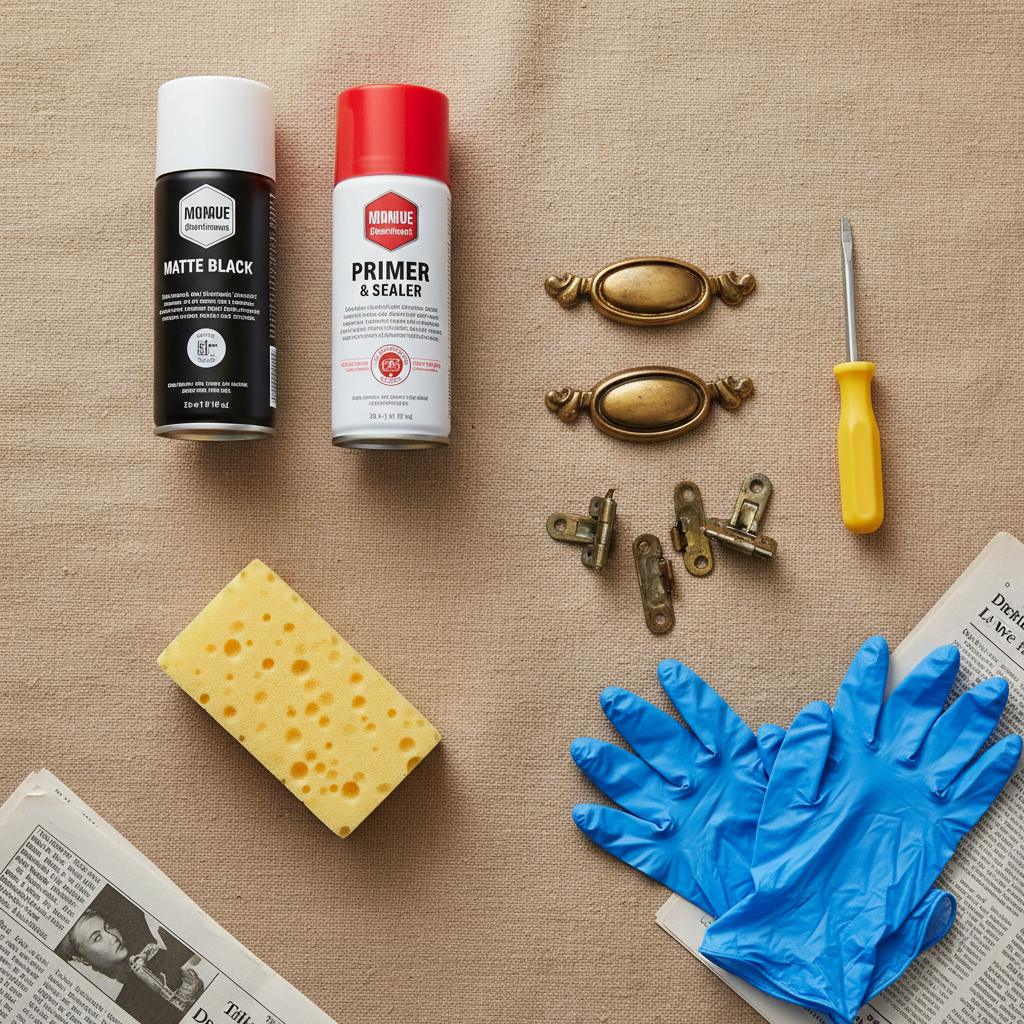
Before you go to battle with your dated hardware, you need the right weapons. Getting a pro-level finish is all about the prep and the products. Don’t cheap out on the wrong stuff, or you’ll be re-doing this in six months. Here’s the no-fluff list of what you actually need to get the job done right the first time.
Your Must-Have Supply List:
- Screwdriver: Whatever you need to remove your current knobs and pulls.
- Degreaser or Cleaner: Krud Kutter, TSP (trisodium phosphate), or even just simple dish soap and water will work. The goal is to get years of kitchen grime off so the paint can stick.
- Fine-Grit Sandpaper (220-grit): You’re not trying to strip the old finish, just ‘scuff it up’ to give the primer something to grip onto. A sanding sponge is great for this.
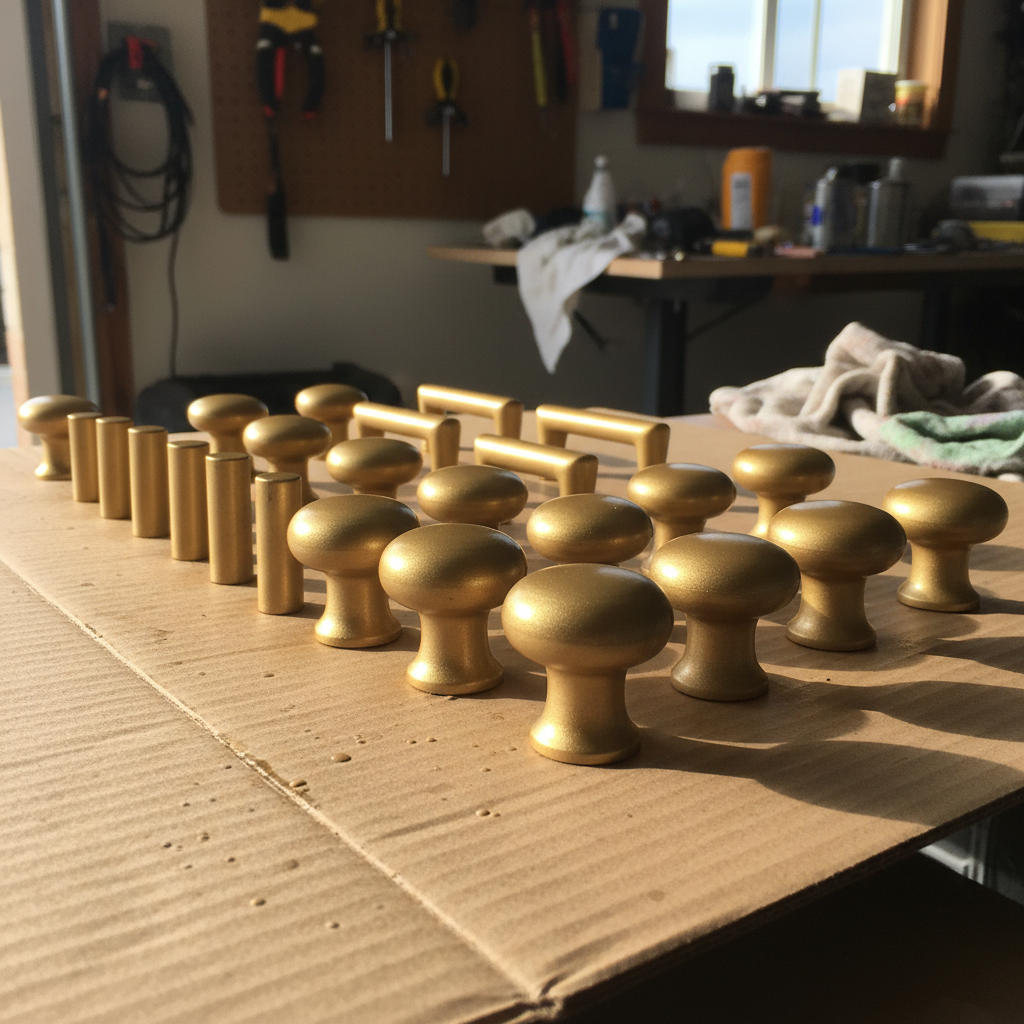
- Cardboard Box or Foam Block: This is the secret weapon. You’ll poke your hardware’s screws through it from the back so the knobs and pulls stand upright, allowing you to paint all sides at once without touching them. Genius, right?
- High-Quality Spray Primer: DO NOT SKIP THIS. A good self-etching or metal primer is your insurance policy against chipping. Rust-Oleum’s Clean Metal Primer is a solid choice.
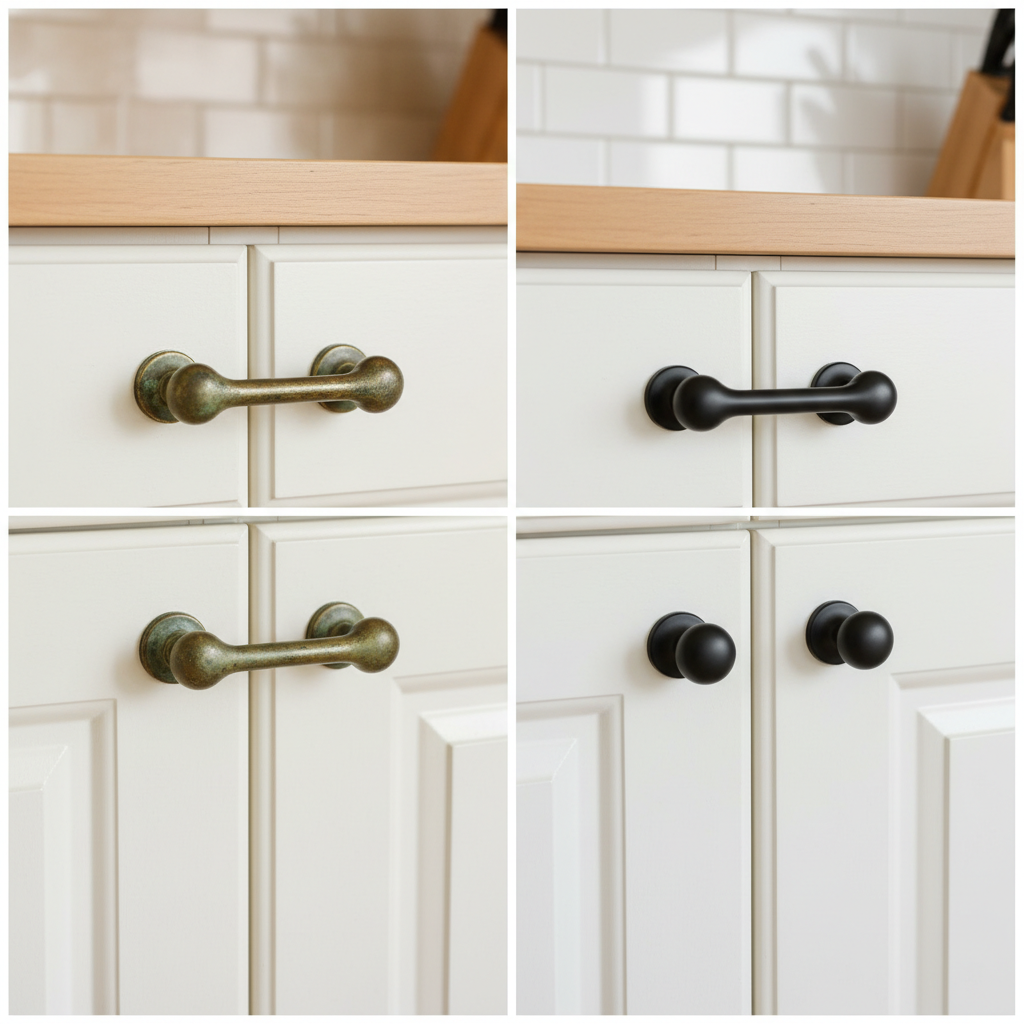
- High-Quality Spray Paint: Look for paint designed for metal. Enamel spray paints are super durable. Brands like Rust-Oleum 2X Ultra Cover or Krylon FUSION All-In-One are your best friends here. Pick your finish: matte black, brushed nickel, aged brass—the world is yours.
- Protective Clear Coat (Sealer): This is the final armor. A clear enamel or polyurethane spray in the same finish as your paint (e.g., matte clear coat for matte paint) will protect against daily wear, tear, and chipping.
- Drop Cloth or Old Sheets: To protect your workspace from overspray.
- Safety Gear: A mask/respirator and gloves. Seriously, don’t breathe this stuff in.
The Step-by-Step Playbook: From Grimy to Gleaming
This is where the magic happens. Follow these steps to the letter, and you’ll have hardware that looks like it came straight from a high-end catalog. The most important tool you have is patience. Rushing is your enemy.
- Step 1: Remove and Catalog: Unscrew all your knobs and pulls. Pro tip: grab some sandwich bags and label them by cabinet/drawer location (e.g., ‘upper cabinets by sink’). This saves you a headache later if you have different-sized screws.
- Step 2: Deep Clean: It’s time to obliterate the grime. Soak the hardware in a bucket of warm, soapy water or spray it down with a heavy-duty degreaser. Scrub every nook and cranny with an old toothbrush. Rinse thoroughly and let them dry completely. 100% dry. No shortcuts.
- Step 3: The Scuff-Up: Lightly sand every surface of the hardware with your 220-grit sandpaper. You’re just roughing up the surface to create a texture for the primer to grab. Wipe away all the dust with a clean, dry cloth afterward.
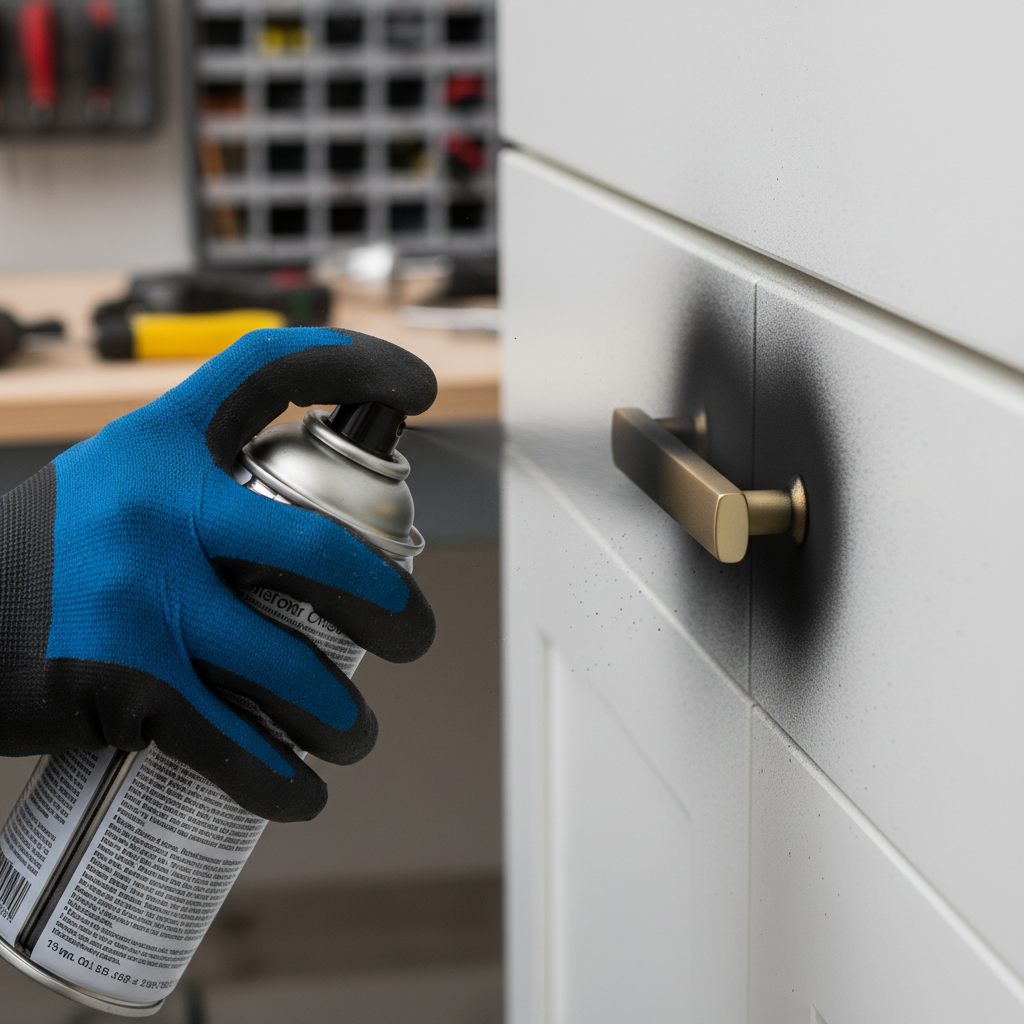
- Step 4: Set Up Your Paint Station: Head to a well-ventilated area—outdoors or a garage with the door open is ideal. Lay down your drop cloth. Take your cardboard box and poke the screws from your hardware through it from the underside, then screw your knobs and pulls onto them on the top side. They should be standing up, ready for a 360-degree paint job.
- Step 5: Prime Time: Shake your primer can for at least a minute. Holding the can about 8-10 inches away, apply a light, even coat over all the hardware. Don’t try to get full coverage on the first pass. A light mist is better than a thick, drippy coat. Let it dry completely according to the can’s instructions (usually about an hour).
- Step 6: The Color Transformation: Shake your spray paint can like you mean it. Apply your first coat using the same technique as the primer—light, sweeping motions from about 8-10 inches away. Wait the recommended time between coats (check the can, usually 15-30 minutes). Apply a second, and if needed, a third light coat until you have a smooth, solid color.
- Step 7: Lock It Down with a Clear Coat: After your final color coat has dried for at least a few hours (again, read the can!), it’s time to seal the deal. Apply one or two light coats of the protective clear sealer. This is what makes your finish last.
- Step 8: The Agonizing (But Crucial) Cure: This is the final boss. Do not touch or reinstall your hardware for at least 24-48 hours. Let it cure fully in a safe, dry place. Rushing this step will lead to nicks, fingerprints, and regret.
Patience is your most valuable tool. The difference between an amateur-looking job and a professional finish is allowing proper drying and curing time. Don’t sabotage your hard work by getting impatient.
Cost Breakdown: DIY Hack vs. Store-Bought Haul
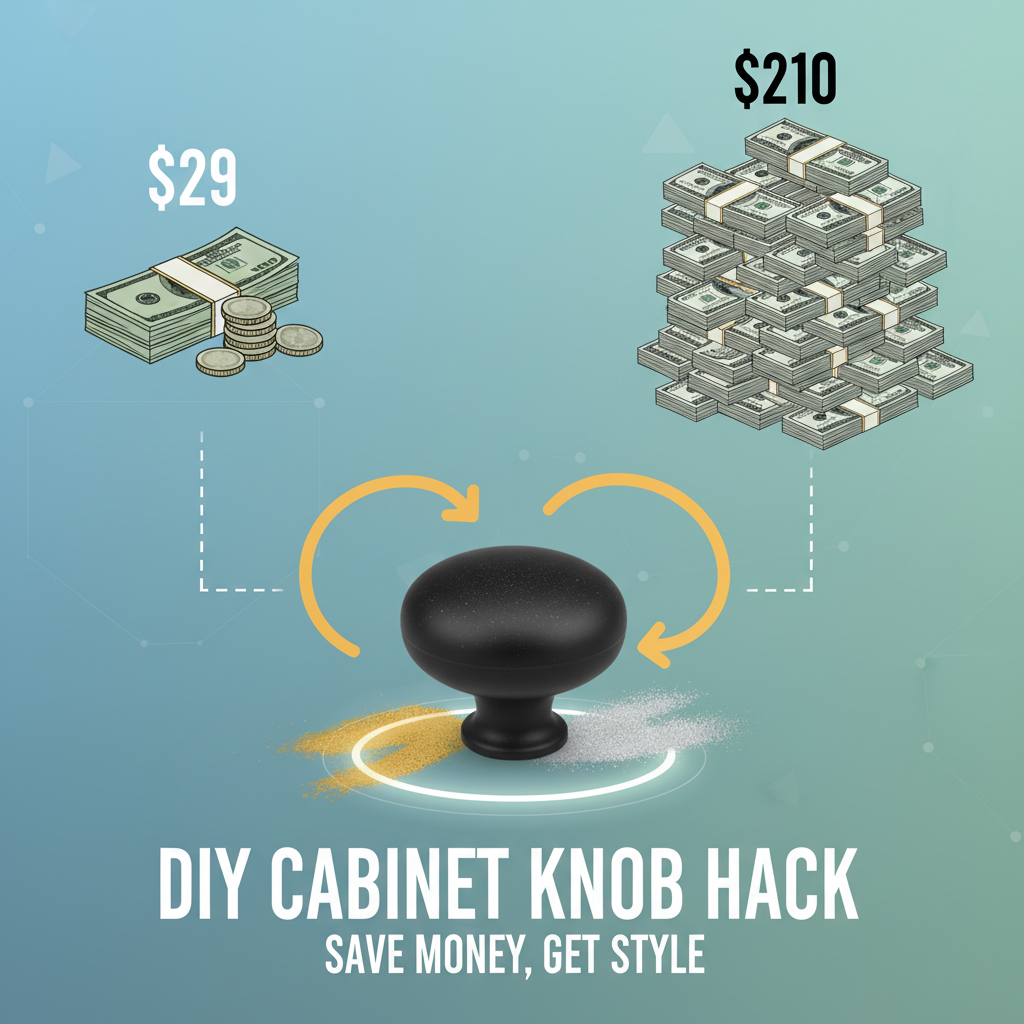
Still not convinced? Let’s talk numbers. The math doesn’t lie. We’ll base this on a small-to-medium kitchen with 30 pieces of hardware (20 knobs and 10 pulls). The store-bought prices are conservative averages from a big-box home improvement store. Prepare to be shocked.
| Item | DIY Project Cost | Store-Bought Replacement Cost |
|---|---|---|
| Hardware (20 Knobs, 10 Pulls) | $0 (You already own it!) | $210.00 (@ $5/knob, $11/pull) |
| Spray Primer Can | $8.00 | N/A |
| Spray Paint Can | $8.00 | N/A |
| Clear Sealer Can | $8.00 | N/A |
| Sandpaper/Supplies | $5.00 | N/A |
| TOTAL COST | $29.00 | $210.00 |
| TOTAL SAVINGS | $181.00 | |
You read that right. For less than $30, you get the same visual impact as spending over $200. That’s money you can put toward another house project, pay down debt, or just enjoy. This is what being street-smart with your money looks like. You’re not just painting hardware; you’re buying yourself financial freedom, one savvy project at a time.
Pro Moves & Avoiding Common DIY Disasters
You have the playbook, now here’s the inside scoop to make sure your project is a certified success. These are the tips that separate the rookies from the pros and ensure your hardware looks flawless for years.
Tricks of the Trade:
- Warm Up Your Cans: Before spraying, place your aerosol cans in a bucket of warm (not hot!) water for about 10-15 minutes. This warms the paint, thins it slightly, and helps it spray in a finer, more even mist.
- Start and Stop Off the Object: When you spray, start the spray just off to the side of your hardware, sweep across it in one continuous motion, and stop the spray after you’ve passed it. This prevents the dreaded paint ‘spit’ that can create blotches at the start and end of your pass.
- Humidity is the Enemy: Try to paint on a day with low humidity. High humidity can mess with drying times and the final finish, sometimes causing a cloudy or tacky result.
- Don’t Fear the Second Chance: If you get a drip or a fuzzy spot from dust, don’t panic. Let it dry completely, then gently sand that single spot with very fine-grit sandpaper (400-grit) and re-spray a light coat.
Common Fails to Dodge:
- Spraying Too Close: The number one mistake. Spraying too close to the hardware creates thick coats that drip and take forever to dry. Keep that 8-10 inch distance.
- Skipping the Primer: People think it’s an unnecessary step. It’s not. It’s the glue that holds your entire project together. Without it, your paint will chip off when you look at it wrong.
- Ignoring the Cure Time: You finished painting and it feels dry to the touch in an hour. Awesome. It’s NOT ready. The paint needs to cure and harden, which takes at least 24 hours. Reinstalling it too soon guarantees smudges and nicks.
Conclusion
There you have it—the ultimate strategy to completely transform your kitchen’s vibe without demolishing your budget. For the price of a few coffees, you’ve achieved a high-impact upgrade that looks like a million bucks. This project is more than just a frugal hack; it’s a testament to your resourcefulness. You saw a problem (ugly hardware), rejected the expensive solution (buying new), and created your own path with a little bit of effort and a whole lot of smarts. Every time you walk into your kitchen and see that sleek, ‘new’ hardware, you’ll feel a sense of pride. You didn’t just save money; you leveled up your space and your skills. Now, what’s next?