DIY Lash Lift: Save $100 A Month With This Viral Drugstore Beauty Hack
Listen up. That standing monthly appointment for your lash lift? It’s a budget killer. Salons are charging anywhere from $75 to $150 a pop for a service that lasts six to eight weeks. If you’re serious about your money game, that’s a massive leak in your financial bucket. We’re talking over $1,200 a year just to have curled eyelashes. That’s a vacation, a debt payment, or a serious boost to your emergency fund. It’s time to stop trading your hard-earned cash for something you can master yourself.
This isn’t about giving up the little luxuries that make you feel like a boss. It’s about being smarter with your money. The DIY lash lift is the ultimate beauty hack for the frugal-minded hustler. It’s a game-changer that delivers salon-quality results for a tiny fraction of the price, right from your own bathroom. Forget scheduling appointments, dealing with traffic, and handing over your credit card. We’re about to walk you through the entire process, from picking the right kit to perfecting your technique, so you can reclaim your time and your money. Get ready to empower yourself and your wallet.
The Math: Why Your Wallet Demands This Hack
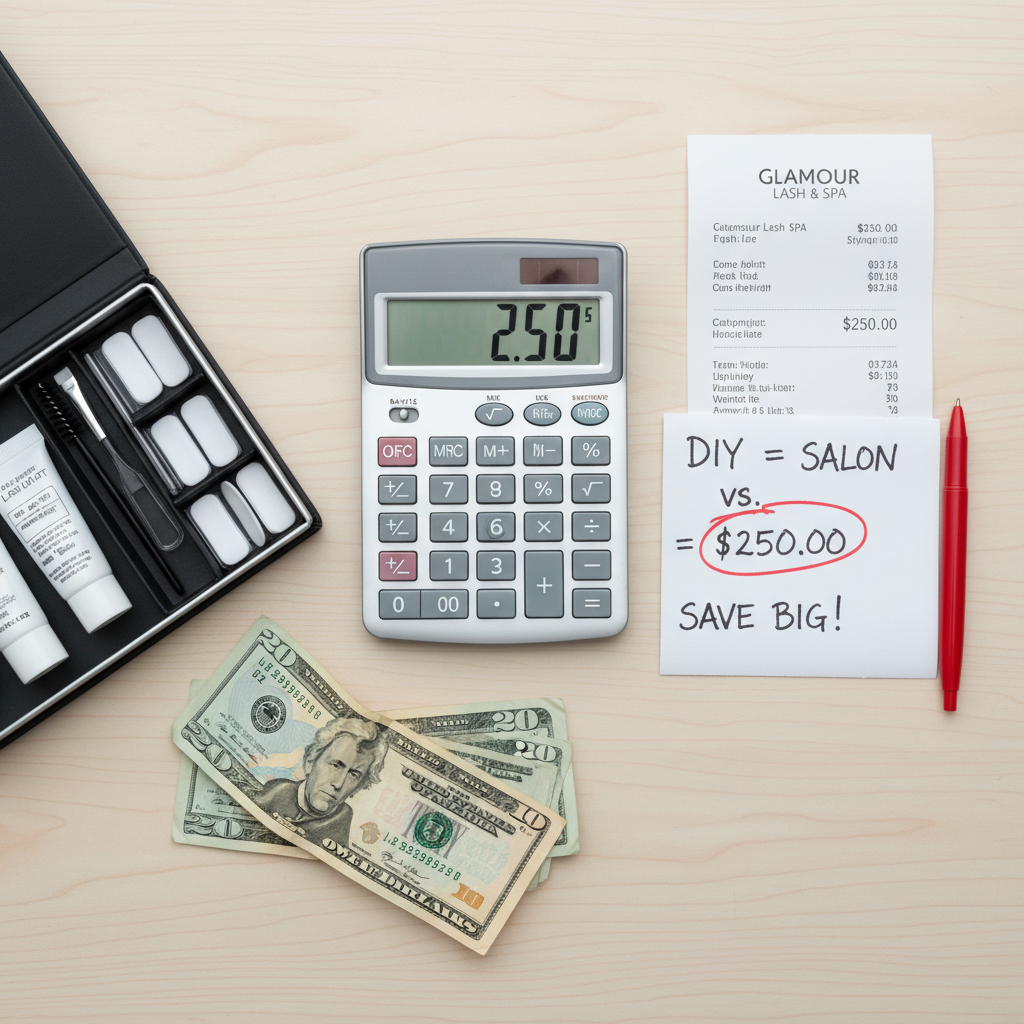
Let’s get straight to the point: the numbers. Fluffy promises don’t pay the bills, but cold, hard cash savings do. The difference between paying a professional and doing it yourself is staggering. A professional lash lift is a recurring expense that quietly siphons money from your account every other month. A DIY kit is a small, one-time investment that pays for itself after the very first use and keeps on giving.
Think about it. The average salon visit will set you back about $100 once you factor in the service and a tip. You do this every 8 weeks, which means about 6.5 times a year. That’s $650 annually, minimum. Many people go more often, pushing that cost closer to $1000. Now, look at the alternative. A quality DIY lash lift kit costs between $20 and $30 and contains enough product for 5 to 10 applications. The value isn’t just good; it’s practically a steal. You’re not just saving money; you’re making a strategic financial decision. Let’s break it down so you can see the power of this hack in black and white.
| Expense Category | Professional Salon Lash Lift | DIY Drugstore Lash Lift Kit |
|---|---|---|
| Cost Per Session | $85 – $150 (plus 20% tip) | $3 – $5 (per application from a $25 kit) |
| Frequency | Every 6-8 weeks | Every 6-8 weeks |
| Number of Sessions Per Year | ~6 sessions | ~6 sessions (from one kit) |
| Total Annual Cost | $600 – $1,200+ | $25 (for one kit) |
| Total Annual Savings | N/A | $575 – $1,175 |
Seeing it laid out like that changes the game, right? That’s over $1,000 a year you could be putting toward something that actually builds your wealth or brings you joy, not just temporary curled lashes. This isn’t about being cheap; it’s about being smart. It’s about resourcefulness. Every dollar you save here is a dollar you can allocate to your goals. That’s the hustler’s mindset.
The Gear: Your DIY Lash Lift Arsenal
Alright, you’re sold on the savings. Now it’s time to assemble your toolkit. Walking into the drugstore or scrolling online can be overwhelming, but grabbing the right gear is half the battle. You don’t need a professional license, just a good kit and a little bit of patience. Most all-in-one kits are designed for beginners and come with everything you need. Look for brands with thousands of positive reviews—social proof is your best friend here.
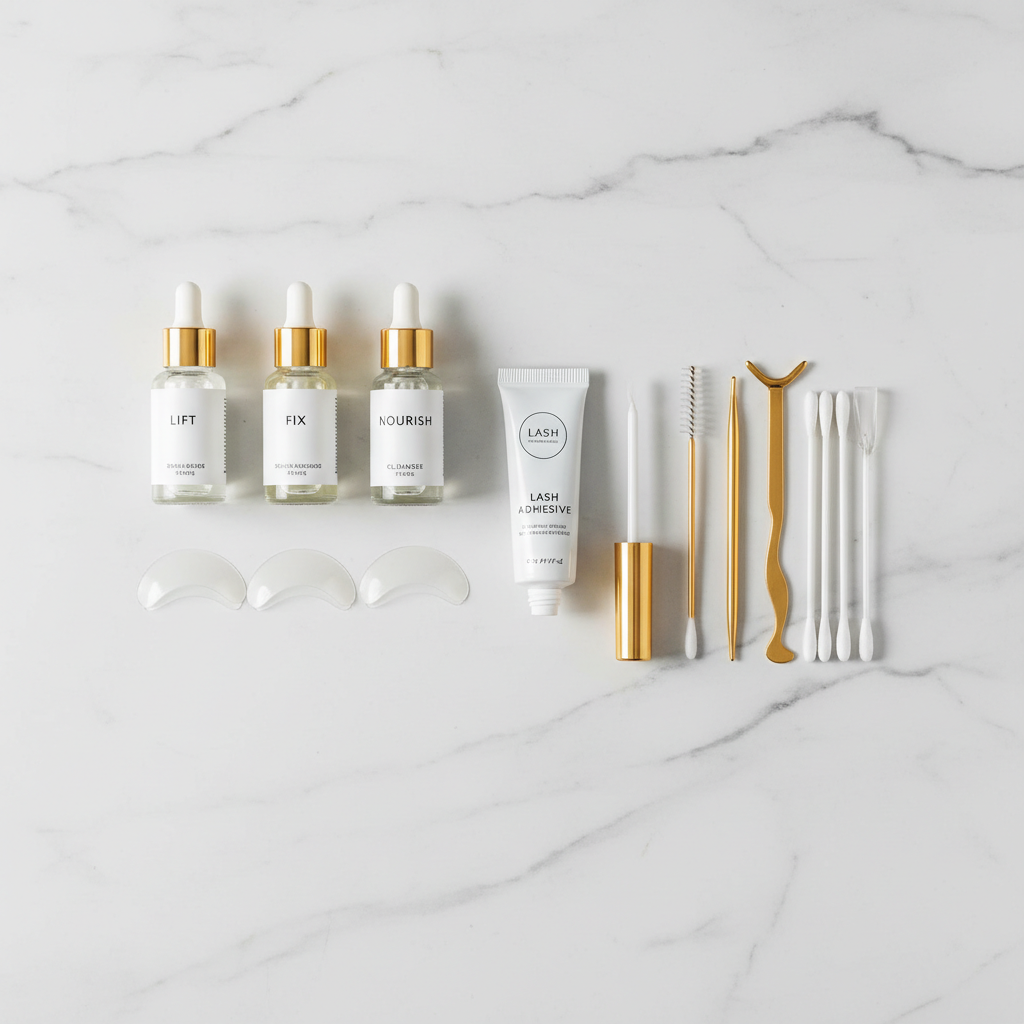
What’s Inside a Standard Kit:
- Lifting Cream (#1 Perm): This is the solution that softens your lashes and allows them to be reshaped.
- Neutralizing Lotion (#2 Fixation): This lotion sets the new curl in place, locking in the lift.
- Nourishing Oil (#3 Nutrition): A final conditioning step to keep your lashes healthy and hydrated after the chemical process.
- Lash Adhesive: A gentle, skin-safe glue used to hold the silicone pads to your eyelids and your lashes to the pads.
- Silicone Lifting Pads: These come in various sizes (S, M, L) to create different levels of curl. Choosing the right size is crucial for your desired look.
- Cleaning Tool & Brushes: Usually a Y-shaped comb and micro-brushes to help separate and position the lashes perfectly on the pad.
Where to Buy & What to Look For:
You can find these kits everywhere from Amazon and Walmart to your local CVS or Walgreens. When choosing, prioritize kits that have clear, easy-to-follow instructions. Read the one-star reviews to see what common problems people face—it’s the fastest way to spot a bad product. A good kit will cost you between $20 and $35. Anything cheaper might be cutting corners on ingredient quality, and you don’t want to mess around when it comes to your eyes.
Key Rule: Always, ALWAYS perform a patch test 24-48 hours before you do the full application. Dab a tiny amount of each solution on the skin behind your ear or on your inner elbow. If there’s no redness or irritation, you’re good to go. Skipping this is not a risk worth taking.
The Game Plan: Your Step-by-Step Guide to Flawless Lashes
This is where the magic happens. Set aside about an hour where you won’t be disturbed. Put on a podcast or some music, and get comfortable. The key here is to be patient and methodical. Don’t rush it. We’re going to do one eye at a time, which makes the process much more manageable for your first try.
- Step 1: The Prep. Start with a completely clean slate. Remove all eye makeup and wash your face. Your lashes must be bone-dry for the adhesive to work properly. Use the included cleanser or an oil-free makeup remover to wipe down your lashes and eyelids one last time.
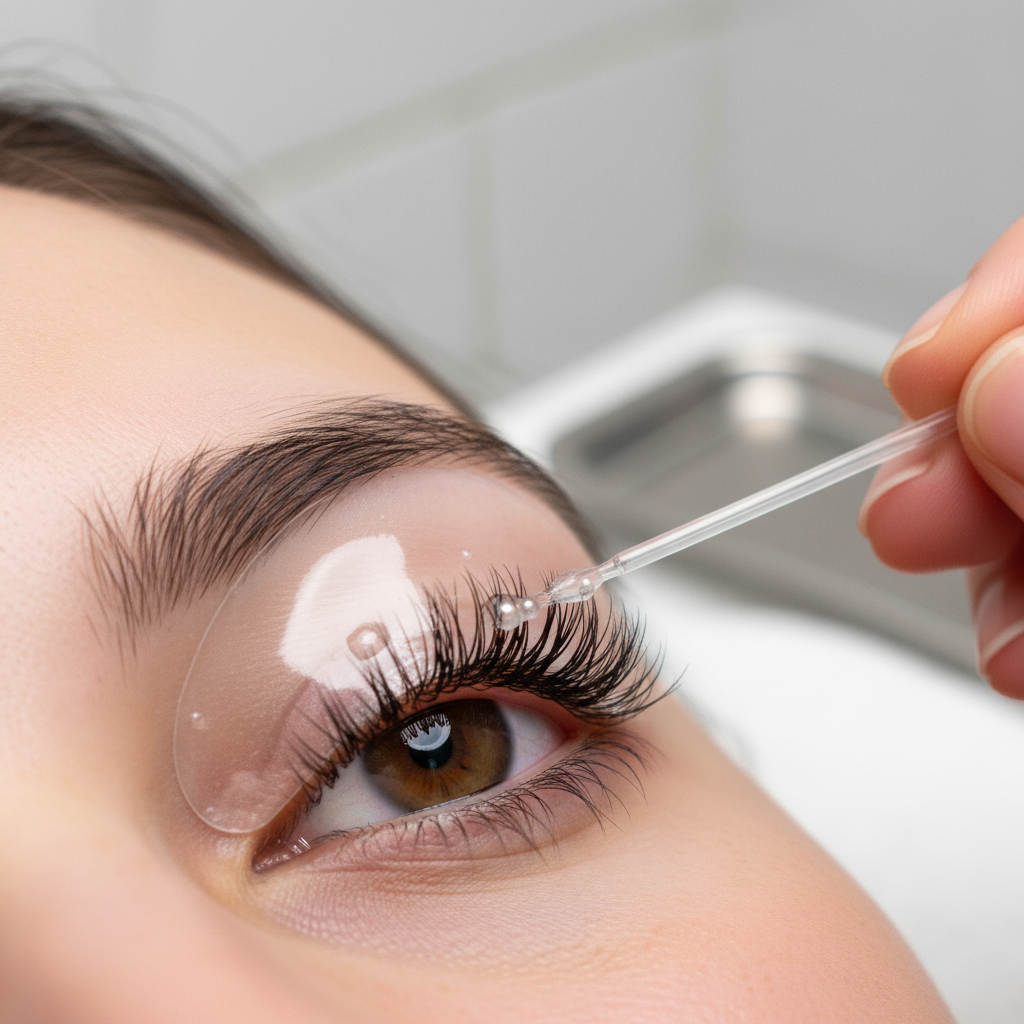
- Step 2: Place the Pad. This is the most important step for getting the right shape. Apply a thin line of the lash adhesive to the back of the silicone pad. Wait about 30 seconds for it to get tacky. Place the pad as close to your lash line as possible. The size of the pad determines the intensity of the curl: S for a dramatic lift, M for a classic curl, L for a gentle, natural lift.
- Step 3: Glue the Lashes. Now, apply adhesive to the front of the silicone pad. Using the Y-shaped tool, carefully lift your lashes from the root and press them up onto the pad. The goal is to get them straight, separated, and evenly spaced. Take your time with this! The way they are glued down is how they will be set.
- Step 4: Apply the Perm Solution (#1). Using a micro-brush, apply the lifting cream from the root to the midway point of your lashes. Avoid getting it on the tips, as this can cause them to look frizzy. Cover your eye with a small piece of plastic wrap to help the solution process. Set a timer for 10-12 minutes, depending on your lash thickness (check kit instructions).
- Step 5: Remove and Neutralize (#2). Once the time is up, gently remove the perm solution with a clean, dry cotton swab. Do not use water. Immediately apply the neutralizing lotion in the same manner as the first solution. Cover with plastic wrap again and set another timer for 10-12 minutes. This step locks the curl in place.
- Step 6: The Clean Up. After the second timer goes off, remove the setting solution with a dry swab. Then, use the cleanser solution to gently dissolve the adhesive, releasing your lashes from the pad. Slowly peel the pad off your eyelid. Clean away any remaining residue.
- Step 7: Nourish and Admire. The final step! Brush the nourishing oil over your newly lifted lashes to rehydrate them. Now, step back and look in the mirror. You did that. You just saved yourself $100 and gave yourself a flawless, long-lasting curl. Repeat the entire process on the other eye.
Street Smarts: Pro Tips & How to Avoid Common Fails
Mastering the DIY lash lift is a skill, and like any skill, there are insider tricks that separate a decent result from a spectacular one. More importantly, there are common pitfalls you need to sidestep. Here’s the street-smart guide to getting it right every time.
Pro-Tips for a Flawless Finish:
- Work in Sections: When gluing your lashes to the pad, don’t try to do them all at once. Apply glue to a small section of the pad, press the lashes up, and then move to the next section. This gives you more control.
- The Plastic Wrap Trick: Don’t skip the plastic wrap. It traps heat and helps the solutions process more effectively and evenly, giving you a stronger, more consistent curl.
- Trim the Pads: If the silicone pads feel too long for your eye shape, you can trim the ends for a more comfortable and customized fit.
- Avoid the Water Line: Be extremely careful not to get any of the solutions in your eyes. Always apply them slightly away from the root/water line. If you feel any stinging, stop and flush your eye with water immediately.
Common Fails and How to Dodge Them:
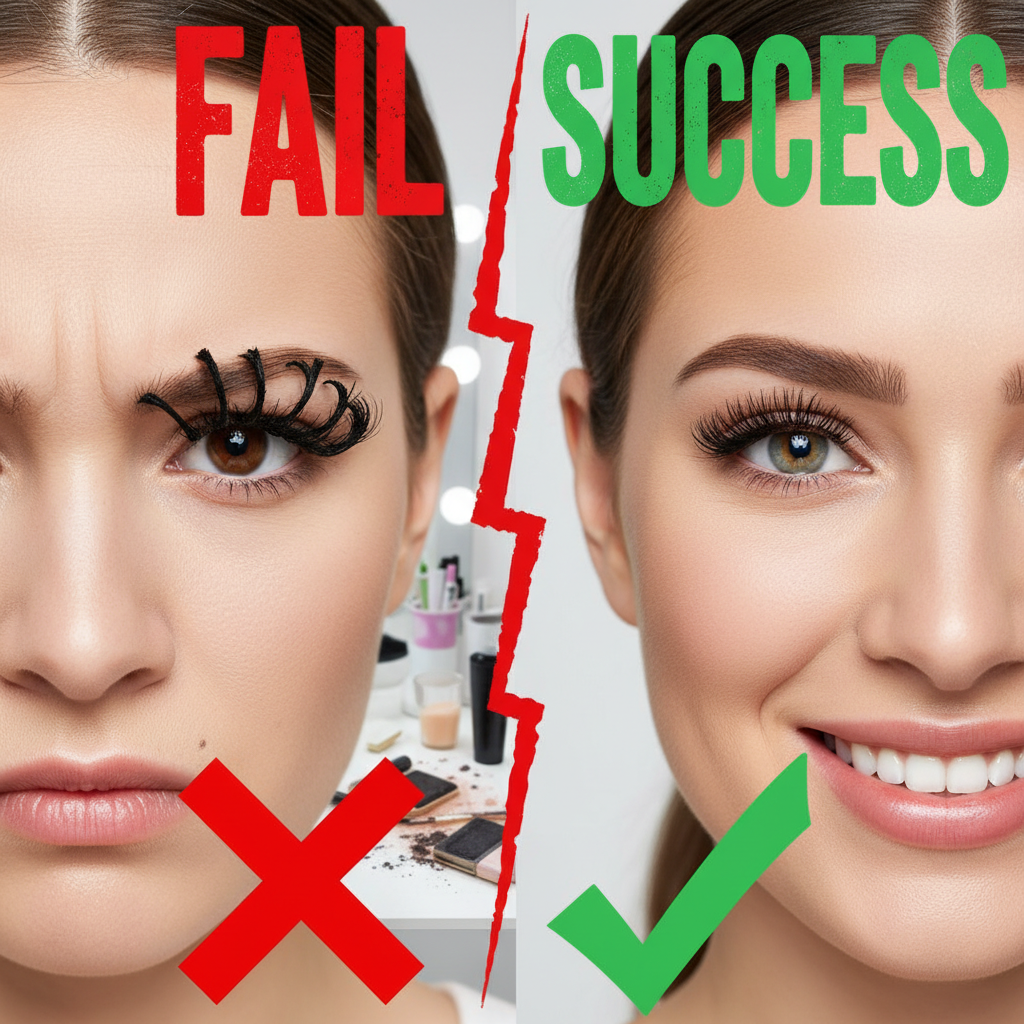
- The Fail: Criss-Crossed or Clumpy Lashes. This happens when you rush the gluing step. If your lashes aren’t perfectly straight and separated on the pad, they will be set that way. The fix is prevention: take your sweet time with the Y-comb to ensure every lash is where it should be before you apply any chemicals.
- The Fail: The Curl is Too Weak (or Non-Existent). This can be caused by a few things: your lashes weren’t fully clean and dry, you didn’t leave the solutions on long enough, or the solutions are old. Make sure your kit is fresh and always follow the recommended processing times for your lash type (thicker lashes often need the full time).
- The Fail: The Ends of Your Lashes Look Fried or Frizzy. This is a classic sign of over-processing. It happens when you apply the perm solution (#1) all the way to the tips of your lashes. The tips are more delicate and can’t handle the chemicals as well. Only apply the solution from the root to the midpoint of the lash.
Scam Warning: Be wary of super-cheap, no-name kits from overseas marketplaces. Many don’t undergo proper safety testing, and the chemicals can be harsh or ineffective. Stick to reputable brands with a strong review history. Your eyesight is not the place to be cutting corners for an extra $5 in savings.
The Aftermath: Making Your Lift Last
You’ve done the work, and your lashes look incredible. Now, you want to protect your investment of time and effort. A great lash lift can last up to eight weeks, but only if you follow the aftercare rules. Neglecting this part is like buying a great new asset and not maintaining it—it just won’t perform as well for as long. The first 24 hours are the most critical, as the lashes are still settling into their new shape.
The First 24 Hours: The Golden Rules
- Keep Them Dry: This is the most important rule. Do not get your lashes wet for a full 24 hours. This means no showering (or be very careful), no swimming, no saunas, and no crying during a sad movie. Water can deactivate the setting lotion and cause your lift to drop.
- No Mascara: Let them breathe. Avoid mascara and any other eye makeup for the first day.
- Hands Off: Avoid rubbing your eyes or touching your lashes. You want to let them set without any interference.
- Sleep on Your Back: If you can, try to sleep on your back for the first night to avoid squishing your newly lifted lashes into a weird position on your pillow.
Long-Term Care for Lasting Results:
- Avoid Oil-Based Products: Oil is the enemy of a lash lift. It can break down the bonds created by the perming solution and cause the curl to relax prematurely. Check the ingredients on your makeup removers, cleansers, and eye creams.
- Be Gentle: When you do wash your face or remove makeup, be gentle around the eye area. Don’t scrub or pull at your lashes.
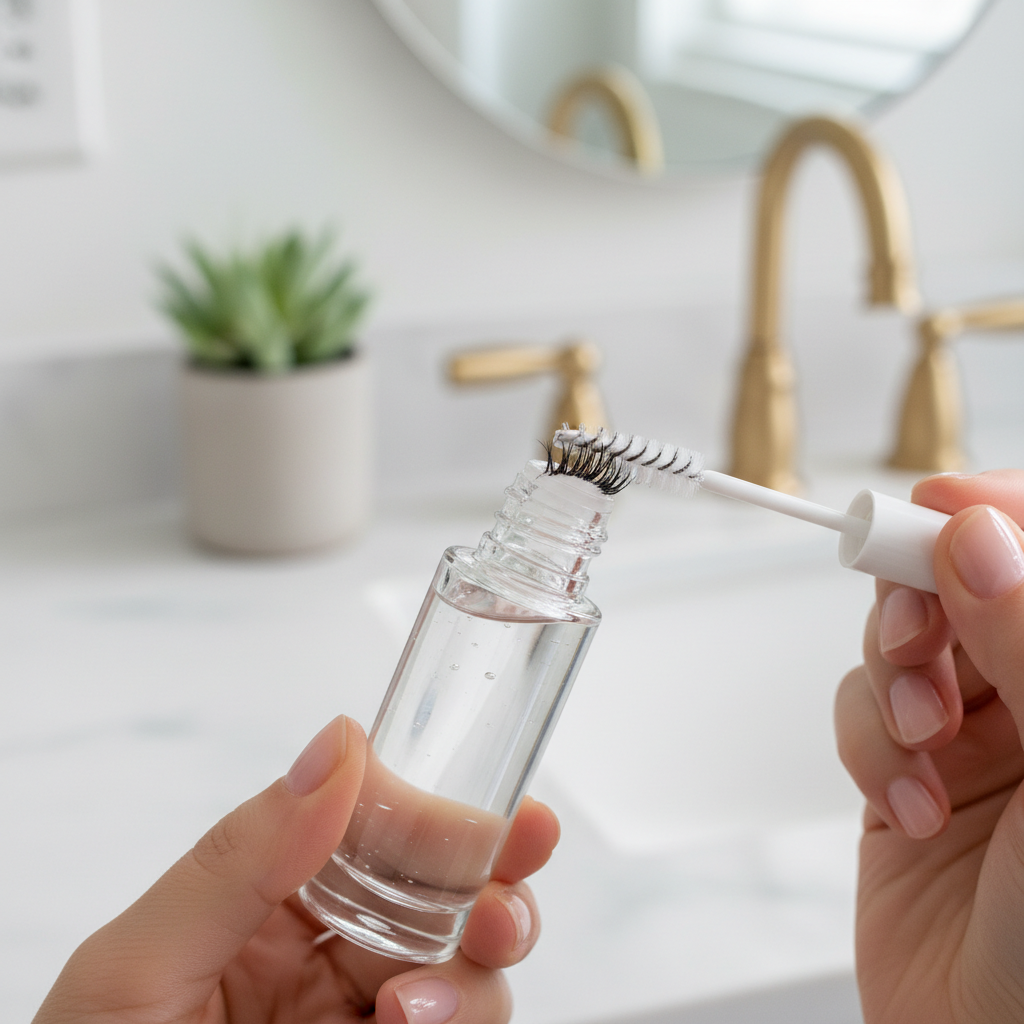
- Brush Them Daily: Use a clean spoolie brush to gently brush your lashes upwards each morning. This helps keep them separated, defined, and looking their best.
- Condition Them: Just like the hair on your head, your lashes can benefit from conditioning. You can use the nourishing oil that came with your kit every few days, or invest in a dedicated lash serum to keep them strong and healthy. This is especially important if you plan to do lifts regularly.
By following these simple rules, you’ll maximize the life of your lift, ensuring you get the most bang for your buck and effort. You’ll keep your lashes looking fantastic for weeks on end, making this frugal hack one of the most effective in your beauty routine.
Conclusion
You’re now officially equipped with the knowledge to fire your lash technician and take control of your beauty budget. This isn’t just about having great lashes; it’s a mindset shift. It’s proof that you don’t have to sacrifice feeling good to be financially savvy. By investing one hour and about $25, you’ve unlocked a skill that will save you over $1,000 a year. Think about what that money can do for you—it’s a powerful motivator.
So, grab a kit, put on your favorite playlist, and give it a shot. You’re not just curling your lashes; you’re building confidence, learning a new skill, and making a seriously smart money move. Welcome to the world of frugal hacking. Your wallet will thank you.