Stop Wasting Heat! 5 Minute DIY Draft Stopper to Slash Energy Bills
Listen up. Every time your heater kicks on, you’re in a fight to keep that precious, expensive heat inside your home. But there’s a silent thief robbing you blind: the draft. That little gap under your door is a superhighway for cold air, forcing your system to work overtime and inflating your energy bill. You’re literally paying to heat the neighborhood.
Forget expensive, flimsy solutions from the big box stores. You’re smarter than that. You’ve got the power to plug that leak right now, for practically $0, in less time than it takes to brew a pot of coffee. This isn’t just a craft project; it’s a financial power move. We’re going to build a heavy-duty, custom draft stopper that works better than the store-bought junk, and we’re going to do it with materials you probably have stashed in a closet right now. It’s time to stop wasting heat and start stacking the cash you save.
The Gear You Already Own: Your No-Cost Toolkit

Before you even think about running to the store, let’s raid your own supply stash. The best frugal hacks use what you’ve got. You don’t need fancy materials; you need function. Here’s your shopping list, which you can probably fill without leaving your house.
The Body (Pick One):
- Old Jeans or Pants: The leg of a pair of old jeans is the gold standard. Denim is tough, durable, and the perfect size.
- A Funky Sock: Have a long, lonely sock whose partner was eaten by the dryer? A knee-high or tube sock is a perfect no-sew option.
- Old Shirt Sleeves: The sleeve of a flannel shirt or a thick long-sleeved tee works great and can add a bit of style.
- Scrap Fabric: If you have any leftover fabric that’s at least 36-40 inches long and about 8 inches wide, you’re in business.
The Guts (The Heavier, The Better):
- Uncooked Rice: Cheap, dense, and easy to pour. A big bag from a discount grocer is your best friend.
- Dried Beans or Lentils: Just like rice, they provide excellent weight to keep the draft stopper in place.
- Kitty Litter: Clean, of course! It’s surprisingly heavy and great at blocking air.
- Sand: If you have some leftover from a summer project, it’s the perfect heavy-duty filler.
- Fabric Scraps or Poly-Fil: You can also use stuffing from an old pillow or cut-up fabric scraps. For best results, mix these lighter materials with something heavy like rice to give it some heft.
The Tools:
- Scissors: Any pair that can cut fabric.
- Measuring Tape: To get the right length for your door.
- Needle and Thread (Optional): For the sew-it-shut method. Don’t worry, your stitches don’t need to be pretty, just strong.
- Fabric Glue or Safety Pins (Optional): For the no-sew crew. A strong fabric glue can seal the deal, and safety pins are a quick and dirty solution that works just fine.
That’s it. You’re armed and ready. The goal here is resourcefulness. By using what’s already available, you’re starting this project with a 100% profit margin.
The 5-Minute Build: Your Step-by-Step Takedown of Drafts

Alright, let’s get to work. This process is so fast you’ll wonder why you ever paid for a commercial version. We’re building a fortress against cold air, one simple step at a time.
- Measure Your Battlefield: Take your measuring tape and measure the width of your door from one side of the frame to the other. Add an extra inch. This ensures a snug fit with no gaps for drafts to sneak through. Write that number down.
- Cut Your Fabric: Lay out your chosen fabric (jean leg, shirt sleeve, etc.). Cut it to the length you just measured. If you’re using a flat piece of fabric, cut it to your length and about 8-10 inches wide. Fold it in half lengthwise, inside-out, to create a long tube.
- Seal One End: Time to close up one side.
Sewing Method:
If you’re using a needle and thread, quickly stitch one of the open ends of your fabric tube shut. Use a simple running stitch. Double it up to make it strong. Remember, this is about function, not fashion. No one is grading your sewing skills.
No-Sew Method:
Fold the fabric end over by about an inch, then fold it again. Secure it tightly with several safety pins. Or, if you’re using fabric glue, apply a generous line of glue, press it shut, and let it dry for a few minutes according to the instructions. Clamp it with clothespins if you have them.
- Fill ‘Er Up: This is the fun part. Turn your fabric tube right-side out. Stand it up and start pouring in your filling (rice, beans, etc.). A funnel makes this easier, but you can just roll up a piece of paper to make a makeshift one. Fill it until it’s about three-quarters full. You want it to be heavy and substantial, but still flexible enough to press snugly against the door.
- Seal It for Good: Now, close the remaining open end. Tuck the raw edges of the fabric inward to create a clean seam, and then stitch it shut just like you did the other side. For the no-sew version, use your safety pins or fabric glue to create a permanent seal.
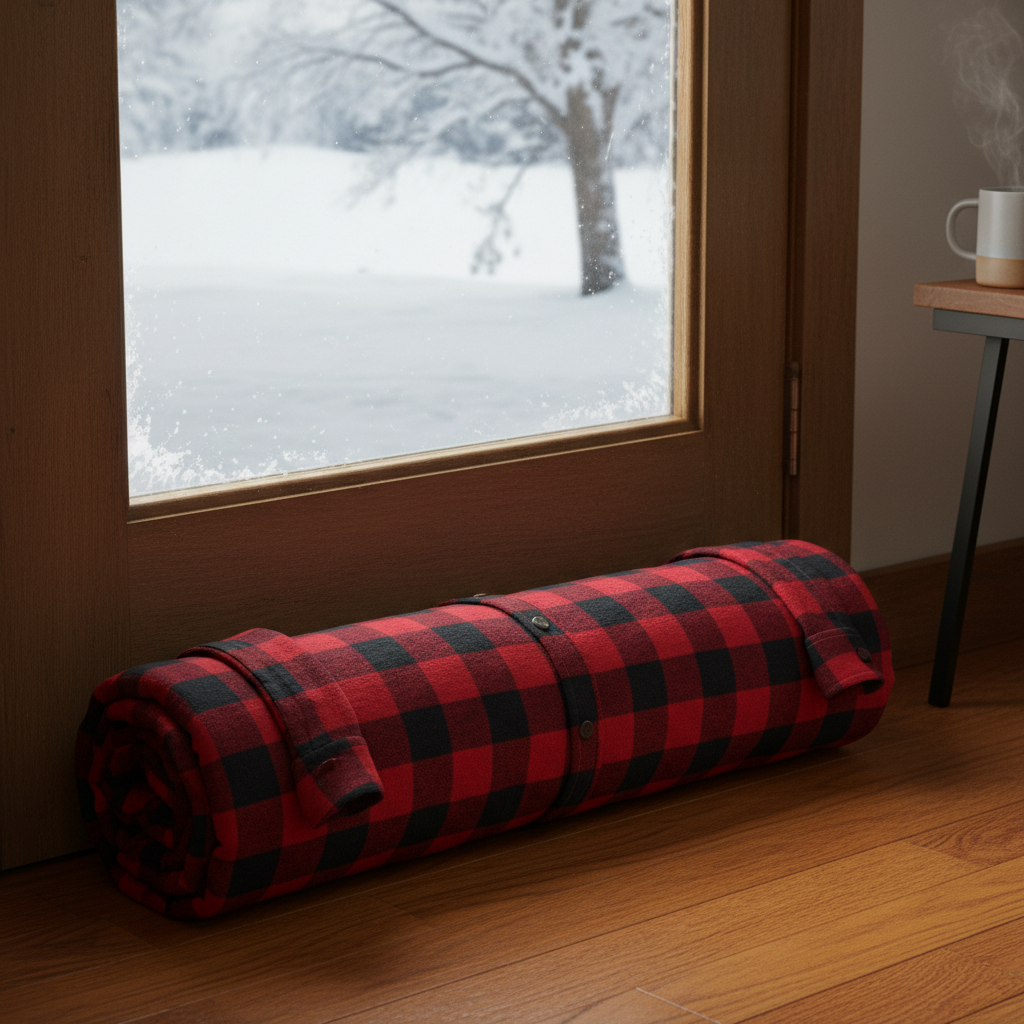
- Deploy Your Weapon: Your custom, money-saving draft stopper is complete. Place it firmly at the base of your door. Feel that? That’s the feeling of cold air being blocked and your money staying in your pocket. Mission accomplished.
The Breakdown: Why DIY Crushes Store-Bought
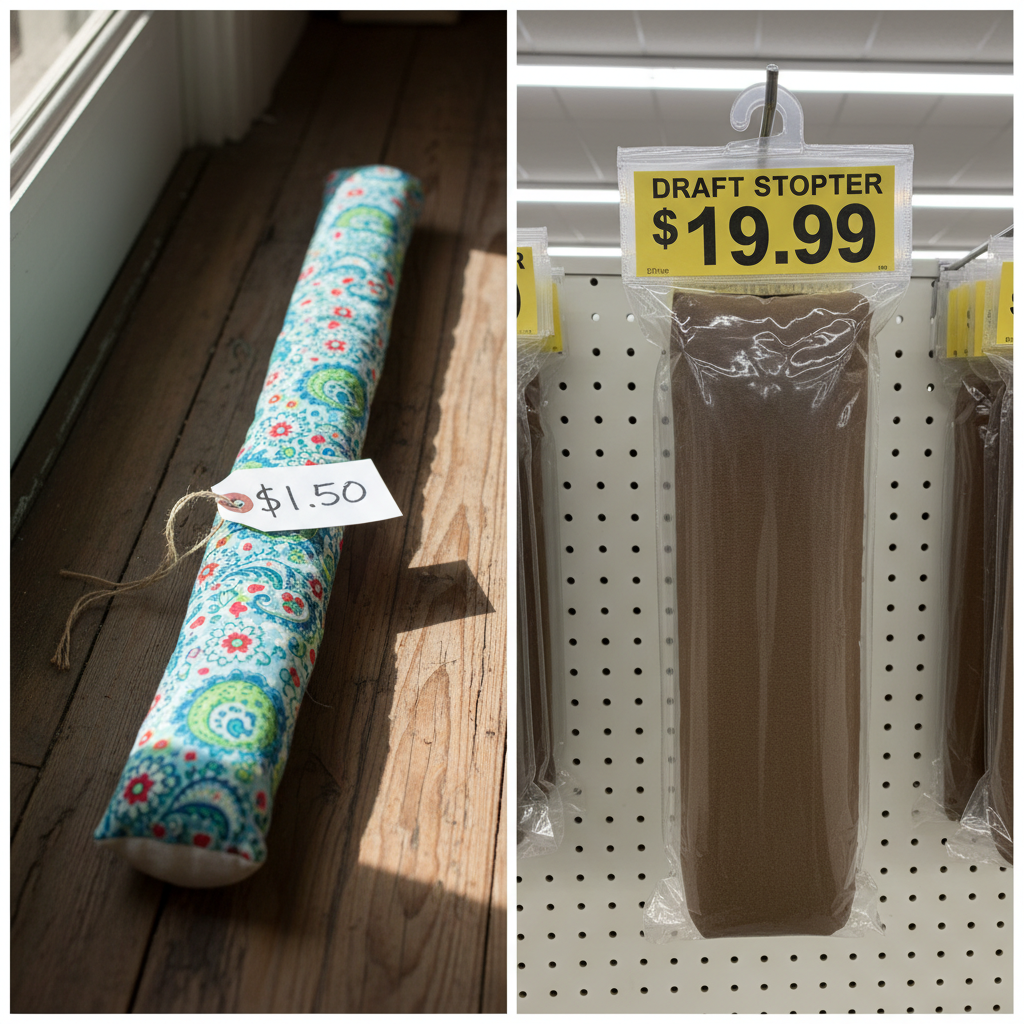
Still thinking about just buying one? Let’s run the numbers. The evidence is overwhelming. Building your own isn’t just a little cheaper; it’s a total financial knockout. You’re not just saving money on the product; you’re investing in a skill and avoiding retail markup, packaging waste, and shipping costs. The choice is obvious.
| Item/Component | Your DIY Cost | Average Store-Bought Cost |
|---|---|---|
| Draft Stopper Body (Fabric) | $0 (Old Jeans/Sock) | Part of Final Product |
| Filling (Rice/Beans) | $0 – $2 (From pantry or small bag) | Part of Final Product |
| Labor | 5 Minutes of Your Time | Built into Price |
| Retail Markup & Branding | $0 | $8 – $15 |
| TOTAL COST | $0 – $2 | $15 – $25+ |
The Bottom Line: You’re looking at a savings of $13 to $25 *per door*. If you have three drafty exterior doors, you could save over $75 instantly, all for about 15 minutes of work. That’s an hourly rate you can’t beat.
The Real-World Payoff: How Much Cash Are You Saving?
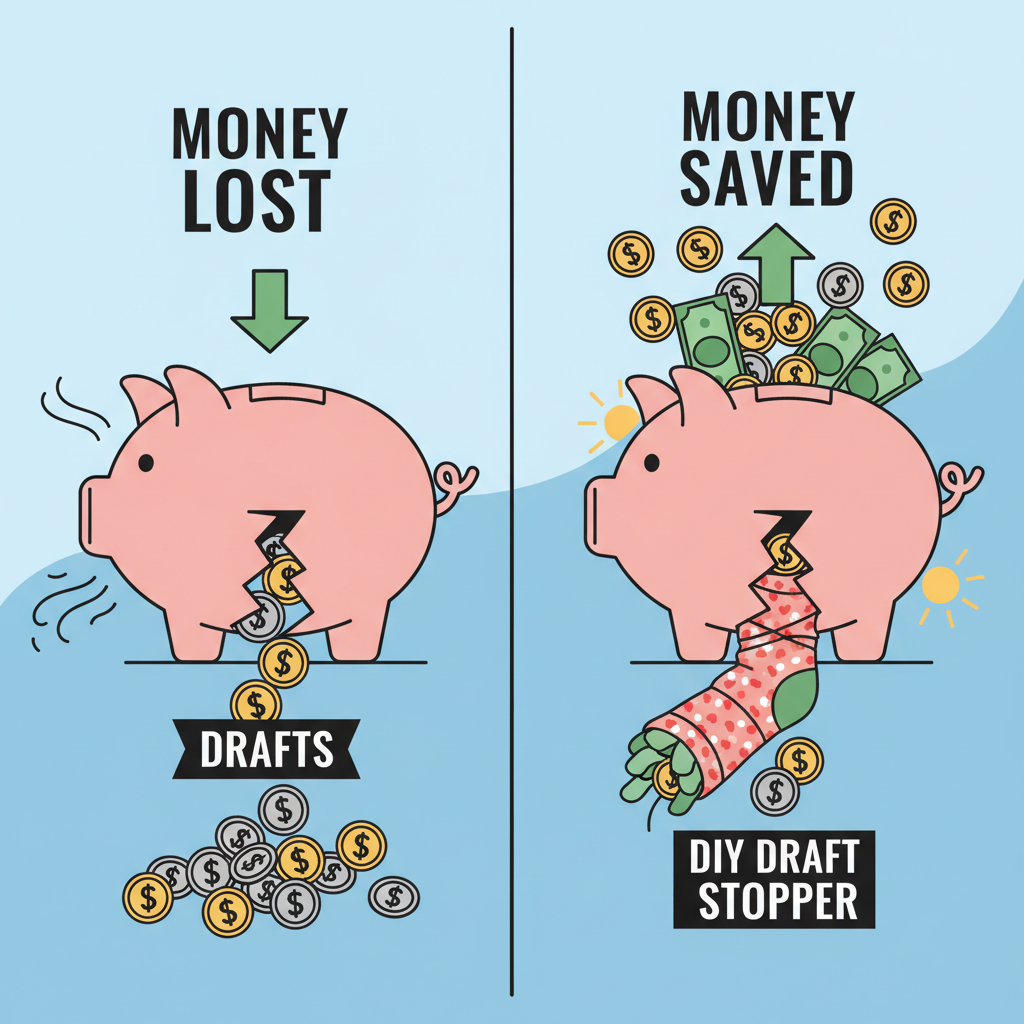
Okay, so you spent a few bucks—or nothing at all—on the stopper itself. But what’s the real return on your investment? This is where it gets exciting. This little fabric tube is a money-making machine that works 24/7.
According to the U.S. Department of Energy, drafts can waste 5% to 30% of your energy use. Let’s be conservative and use a lower number, say 10%. Now, let’s do some real-world math.
Example Savings Breakdown:
- Let’s say your average monthly heating bill during the 4 coldest months is $250.
- Total winter heating cost: 4 x $250 = $1,000.
- A conservative 10% savings from sealing drafts: $1,000 x 0.10 = $100.
That’s $100 back in your wallet from one winter, just by stopping the most obvious drafts under your doors. What if your bills are higher, or your home is older and leakier? The savings only go up.
Think about what that $100 could do:
- Cover a month of your favorite streaming services.
- Pay for a nice dinner out.
- Go straight into your savings account or toward paying down debt.
This isn’t chump change. This is real, tangible money you’re clawing back from the utility company. And the best part? Your draft stopper works year after year. In the summer, it does the reverse, keeping hot air out and your expensive air-conditioned air in. It’s a one-time, 5-minute project with a perpetual payoff.
Level Up: Hunt Down Other Energy Vampires

Your door is handled. You’re feeling the power. Now it’s time to take that momentum and go on the offensive. Your home is full of other hidden spots where your money is escaping. Grab a flashlight and become a draft detective. Here are your prime suspects:
The Window Ledge Ambush
Windows, especially older ones, are notorious for leaks. You can make smaller, thinner versions of your door draft stopper for window sills. They’re especially great for windows you don’t open often during the winter.
The Electrical Outlet Escape Route
Feel that? Place your hand near an electrical outlet on an exterior wall. Often, you’ll feel a slight draft. The fix is dirt cheap. You can buy foam outlet sealers for pennies at any hardware store. You just unscrew the plate, pop the foam gasket in, and screw the plate back on. It’s a 30-second job.
The Attic Hatch Heist
Hot air rises, and if your attic hatch isn’t sealed, it’s like an open chimney for your heating dollars. The solution is simple: apply weatherstripping around the perimeter of the hatch. This foam tape creates an airtight seal when the hatch is closed, trapping the heat where it belongs.
The Plumbing Penetration Problem
Check under your sinks where pipes come through the wall. These gaps are often far larger than they need to be. A can of expanding foam sealant is your best weapon here. A quick spray fills the gap permanently, stopping a major source of air leakage.
Key Rule: If there’s a gap that leads from the inside of your house to the outside, it’s costing you money. Seal it. Your bank account will thank you.
Conclusion
You did it. In just five minutes, you’ve outsmarted the energy companies and fortified your home against the cold. You didn’t just make a draft stopper; you made a statement. A statement that you’re in control of your finances and too smart to let your hard-earned money just float out the door. This simple project is proof that frugal living isn’t about sacrifice; it’s about being resourceful and taking decisive action.
Now, every time you walk past that door and see your handmade draft stopper, let it be a reminder of your power. The power to solve problems, save money, and build a more secure financial future, one clever hack at a time. Don’t stop here. What other energy leaks can you plug? Go get ’em.