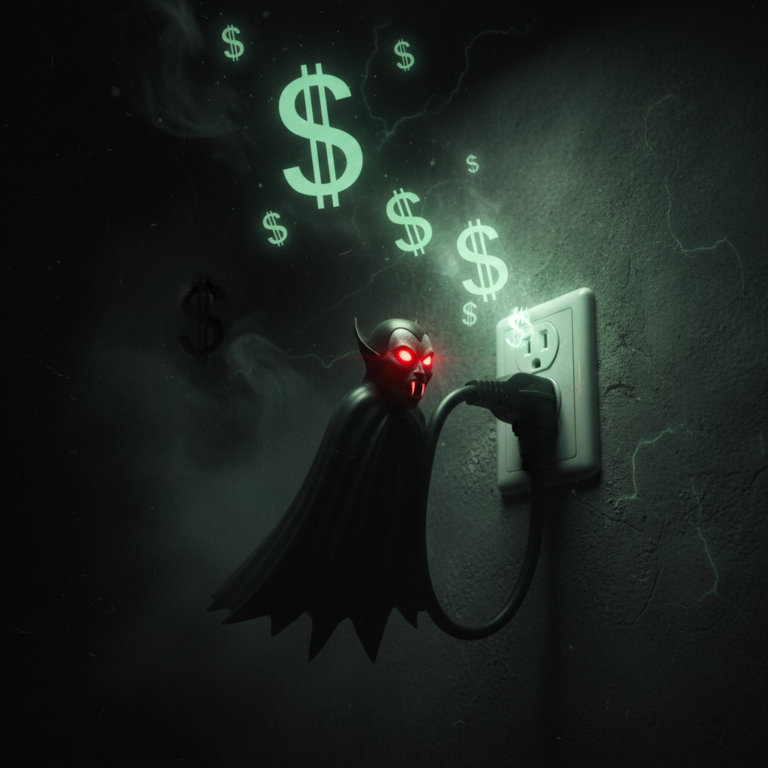
Don’t Call a Pro: 7 Home Repairs You Can Fix Yourself for Under $20
That sinking feeling when you hear a *drip… drip… drip* in the middle of the night. You know what it means. A plumber’s bill that’s going to hit your wallet like a sledgehammer. Most pros charge a $100-$200 minimum just to walk through your door. But here’s the street-smart secret they don’t want you to know: for a huge number of common household problems, you don’t need them. You just need a little know-how and a twenty-dollar bill.
Forget paying a premium for a 15-minute job. We’re talking about taking back control of your space and your budget. This isn’t about complicated renovations; it’s about tackling those annoying, money-draining issues that pop up in every home. We’re going to walk you through 7 essential repairs you can absolutely nail yourself, saving you hundreds, if not thousands, over the year. Ready to get your hands dirty and your bank account happy? Let’s do this.
Repair #1: Silence That Leaky Faucet
The Problem
That constant *drip, drip, drip* isn’t just annoying; it’s liquid money going down the drain. A single leaky faucet can waste over 3,000 gallons of water a year. A plumber will charge you a hefty service fee to fix what is often a simple, five-cent part.
The Fix-It Plan
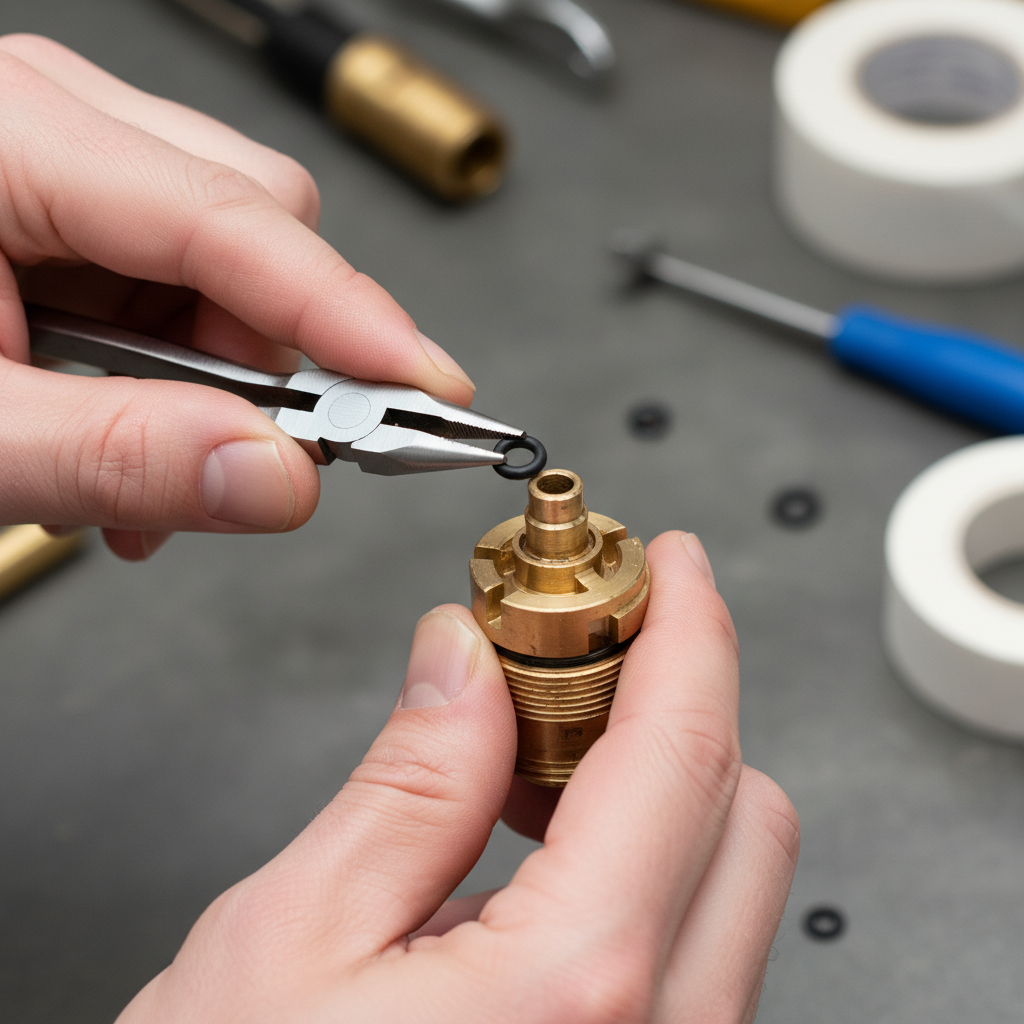
The usual suspect is a worn-out O-ring or rubber washer inside the faucet handle. It’s a tiny piece of rubber that creates a seal, and over time, it degrades. Replacing it is a straightforward job that requires more patience than skill.
Tools & Materials:
- Adjustable wrench or channel-lock pliers
- Flathead screwdriver
- Replacement washers/O-rings kit (usually under $10 for a multi-pack)
Step-by-Step Guide:
- Kill the Water: This is non-negotiable. Find the shut-off valves under the sink (usually two small knobs) and turn them clockwise until they stop. Turn the faucet on to drain any remaining water.
- Disassemble the Handle: Look for a small cap on the top or side of the faucet handle. Pop it off with the flathead screwdriver to reveal a screw. Unscrew it and gently pull the handle off.
- Access the Guts: You’ll now see the faucet’s inner mechanism (the cartridge or stem). Use your wrench to carefully loosen and remove the packing nut holding it in place.
- Find the Culprit: Pull the cartridge straight up and out. You’ll see several rubber O-rings and washers. Inspect them for cracks, tears, or signs of wear. Replace the damaged ones with matching new parts from your kit.
- Reassemble: Put everything back together in the reverse order you took it apart. Don’t overtighten the screws or nuts.
- Test Your Work: Slowly turn the water back on at the shut-off valves. Check for leaks around the base of the faucet, then turn the faucet on and off. Enjoy the sweet sound of silence.
| Cost Breakdown | DIY Cost | Professional Cost |
|---|---|---|
| Parts (Washer/O-Ring Kit) | $5 – $10 | Included in Bill |
| Labor | $0 (Your awesome time) | $125 – $250 (Includes service call fee) |
| Total Savings | Up to $240 | |
Repair #2: Conquer the Clogged Drain (No Harsh Chemicals)
The Problem
A slow-draining sink or shower is a guarantee of future headaches. The temptation is to pour a bottle of corrosive chemicals down there, but that’s a bad move. Those chemicals can damage your pipes (especially older ones) and are terrible for the environment. Plus, they often don’t even fix the core issue: a physical blockage of hair and gunk.
The Fix-It Plan
We’re going to attack this with two cheap, effective, and pipe-safe methods. First, a natural chemical reaction to break down grime. Second, a physical tool to pull out the monster clog.
Tools & Materials:
- Baking soda & white vinegar
- A pot of boiling water
- Plastic drain snake (a game-changer, costs about $5-$8)
Step-by-Step Guide:
- The Fizz Attack: Pour about half a cup of baking soda down the drain. Follow it with half a cup of white vinegar. It will fizz and bubble like a science project. Let it sit for 15-30 minutes to work its magic on soap scum and grime.
- The Hot Water Flush: Carefully pour a pot of boiling water down the drain to flush everything out. For many minor clogs, this is all you need.
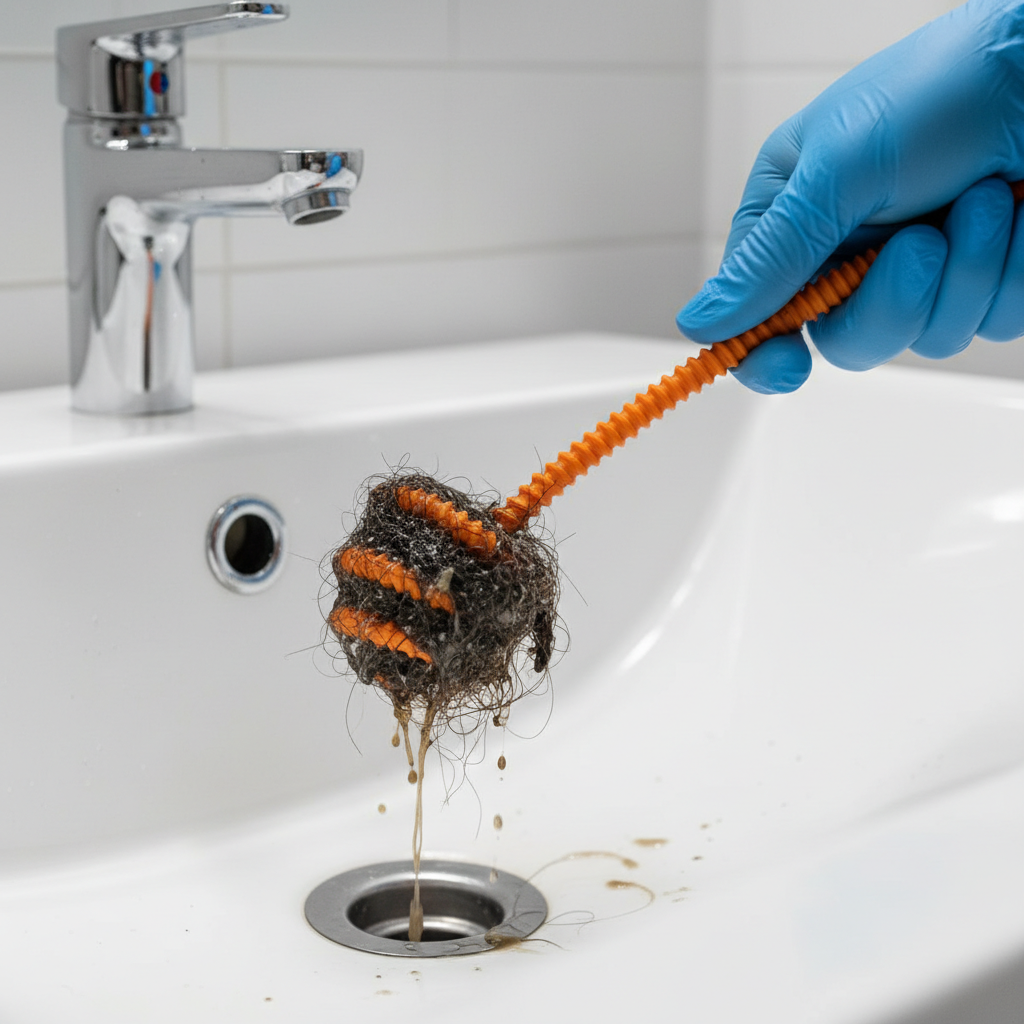
- Bring in the Snake: If the drain is still slow, it’s time for the drain snake. Remove the drain stopper first. Push the plastic snake down the drain as far as it will go. The barbs on it are designed to grab onto hair.
- The Gross Part: Slowly pull the snake back up. Be prepared for what you’ll find. It’s usually a disgusting but incredibly satisfying clump of hair and gunk. Repeat a couple of times.
- Final Flush: Run hot water for a few minutes to clear any remaining debris. Your drain should be running like new.
| Cost Breakdown | DIY Cost | Professional Cost |
|---|---|---|
| Parts (Drain Snake, Vinegar) | $8 – $15 | Included in Bill |
| Labor | $0 (The satisfaction is your payment) | $150 – $300 |
| Total Savings | Up to $285 | |
Repair #3: Make Drywall Dings & Holes Disappear
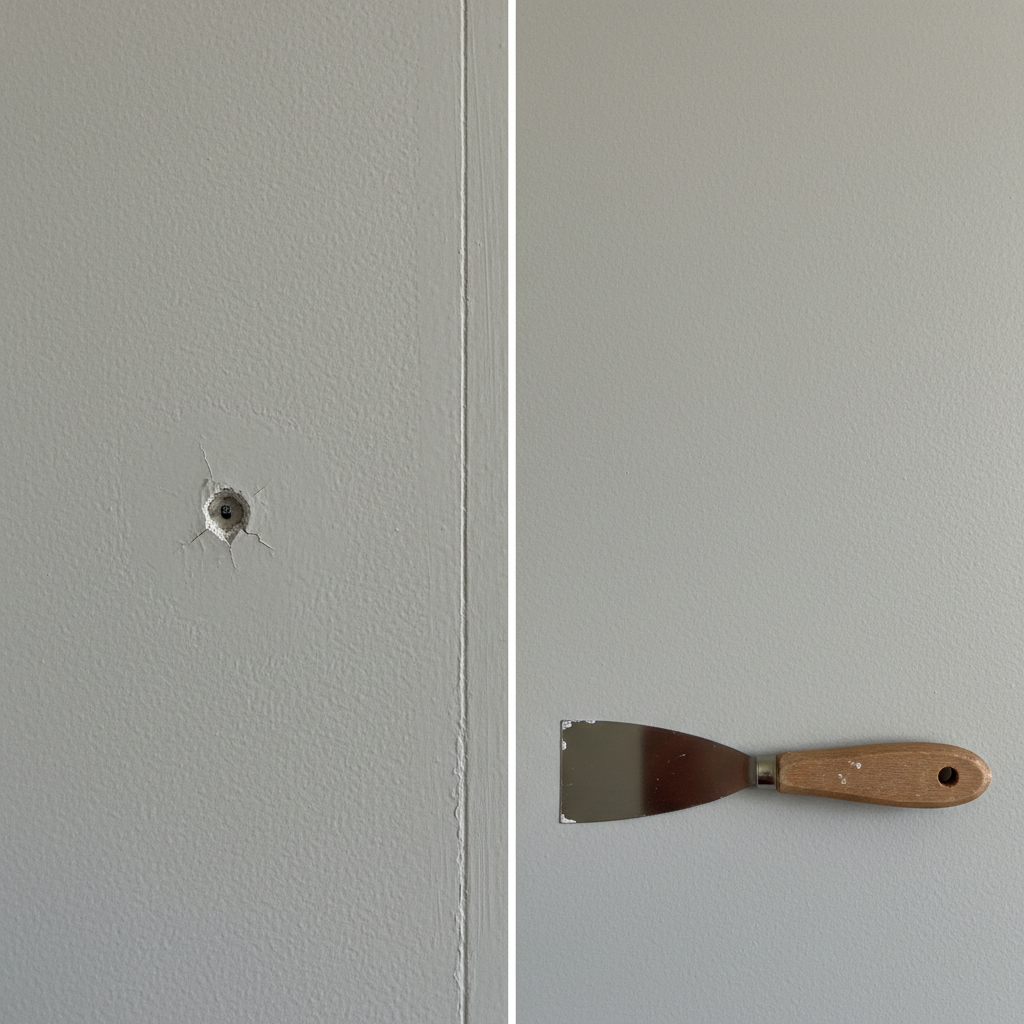
The Problem
You moved a picture, a doorknob hit the wall too hard, or a piece of furniture left its mark. Now you have an ugly hole or ding in your otherwise perfect wall. A handyman might charge $100 or more to patch a few small holes, which is outrageous for such a simple task.
The Fix-It Plan
For any hole smaller than a quarter, the fix is incredibly easy. All you need is a little spackle, a putty knife, and a moment of your time. It’s like putting frosting on a tiny, ugly cake.
Tools & Materials:
- Spackling paste (a small tub is under $10)
- Flexible putty knife (about $5)
- Fine-grit sandpaper (a small piece)
- Primer and matching paint (you should have some leftover)
Step-by-Step Guide:
- Prep the Area: Use the edge of your putty knife to gently scrape away any loose paint or drywall paper from around the hole. Wipe it clean with a dry cloth.
- Apply the Spackle: Scoop a small amount of spackle onto the tip of your putty knife. Apply it over the hole, pressing firmly to fill the void. Swipe the knife over the patch at a 45-degree angle to smooth it out. The goal is a thin, smooth layer that’s slightly raised, as it will shrink a bit as it dries.
- Let It Dry: Patience is key. Check the spackle container for drying times, usually a few hours. Don’t rush this step.
- Sand It Smooth: Once completely dry, lightly sand the patched area until it’s perfectly flush with the wall. You shouldn’t be able to feel a bump. Wipe away the dust with a cloth.
- Prime and Paint: Apply a small amount of primer over the patch. Once that’s dry, dab on your matching wall paint. Feather the edges to blend it in. Step back and admire your invisible repair.
| Cost Breakdown | DIY Cost | Professional Cost |
|---|---|---|
| Parts (Spackle, Putty Knife) | $10 – $15 | Included in Bill |
| Labor | $0 (Your artistic touch) | $75 – $150 (per hour) |
| Total Savings | Up to $135 | |
Repair #4: Banish Annoying Squeaky Doors & Hinges
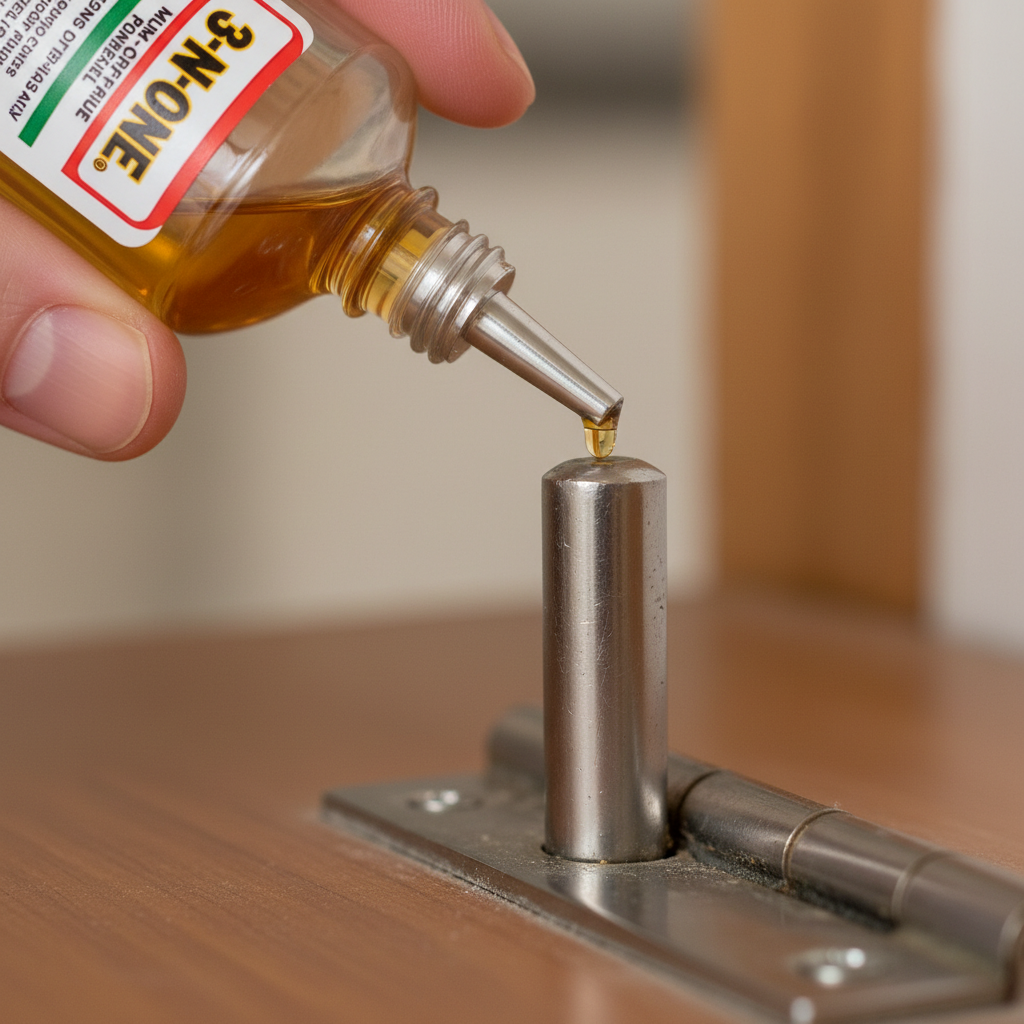
The Problem
A door that groans and squeaks every time it’s opened is more than just an annoyance; it’s a cry for help. The sound is caused by friction between the metal parts of the hinge, which just need a little lubrication.
The Fix-It Plan
Forget messy sprays that drip everywhere. The pro move is to use a targeted lubricant that stays put and works like a charm. This is a one-minute fix that brings instant peace and quiet.
Tools & Materials:
- Graphite lubricant (a small tube is about $5) or a household oil like 3-in-1.
- A hammer and a large nail or nail set
- Paper towels
Step-by-Step Guide:
- Lift the Hinge Pin: Open the door to give you good access to the hinges. Place the tip of the nail on the bottom of the hinge pin and gently tap the nail upward with the hammer. You don’t need to remove the pin completely, just raise it about half an inch.
- Apply Lubricant: Squeeze a small amount of graphite lubricant or a few drops of oil onto the exposed hinge pin.
- Work It In: Open and close the door a few times. This will distribute the lubricant throughout the inside of the hinge. You should hear the squeak disappear almost immediately.
- Seat the Pin and Clean Up: Tap the hinge pin back down into place. Use a paper towel to wipe away any excess lubricant. Repeat for any other squeaky hinges on the door.
Street-Smart Tip: Avoid using cooking oil. It can get gummy over time and attract dirt, making the problem worse in the long run. Stick to a proper lubricant.
| Cost Breakdown | DIY Cost | Professional Cost |
|---|---|---|
| Parts (Lubricant) | $5 | N/A (Usually part of a larger job) |
| Labor | $0 (Literally 5 minutes) | $75+ (Minimum handyman charge) |
| Total Savings | At least $70 | |
Repair #5: Get a Pro-Looking Seal: Re-caulking Your Tub & Sink
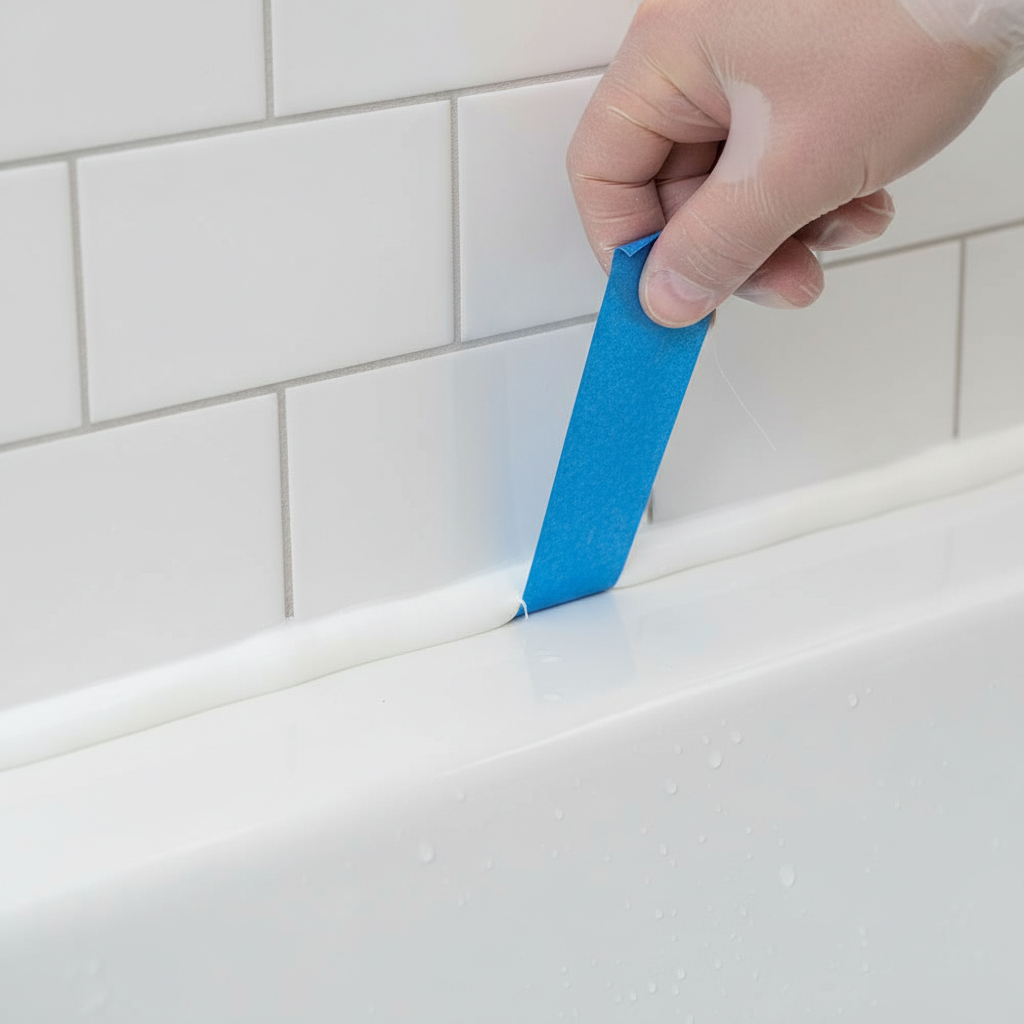
The Problem
The caulk around your bathtub, shower, or sink is cracked, peeling, or has black spots of mildew. This isn’t just an eyesore; it’s a breach in your defense against water damage. Water can seep into the wall, leading to mold and costly structural repairs down the line.
The Fix-It Plan
Ripping out the old stuff and laying down a new, clean bead of caulk is one of the most satisfying DIY jobs. It instantly makes a bathroom or kitchen look cleaner and newer.
Tools & Materials:
- Tube of 100% Silicone Kitchen & Bath Caulk ($8-$12)
- Caulk removal tool or utility knife
- Painter’s tape
- Rubbing alcohol and paper towels
Step-by-Step Guide:
- Remove the Old Caulk: This is the most important step. Use a caulk removal tool or a utility knife to carefully cut and scrape away all the old caulk. Get every last bit.
- Deep Clean the Surface: Once the old caulk is gone, scrub the area with a rag and rubbing alcohol. This removes any soap scum and kills any mildew, ensuring the new caulk will stick properly. Let it dry completely.
- Tape for Perfect Lines: Apply two parallel strips of painter’s tape, one on the wall/deck and one on the tub/sink, leaving a clean gap of about 1/8 to 1/4 inch where the new caulk will go. This is the secret to razor-sharp, professional-looking lines.
- Apply the New Caulk: Cut the tip of the caulk tube at a 45-degree angle. Apply a steady, continuous bead of caulk into the gap. Don’t worry if it’s not perfect yet.
- Smooth the Bead: Dip your finger in water and run it smoothly along the caulk line, pressing gently to tool the bead into the gap.
- The Big Reveal: Immediately and carefully pull off the painter’s tape, pulling it away from the new caulk line at a 45-degree angle. You’ll be left with a perfect, straight caulk line. Let it cure for at least 24 hours before it gets wet.
| Cost Breakdown | DIY Cost | Professional Cost |
|---|---|---|
| Parts (Caulk, Tape) | $15 – $20 | Included in Bill |
| Labor | $0 (Pure satisfaction) | $150 – $300 |
| Total Savings | Up to $280 | |
Repair #6: Stop the Ghost Flush: The 10-Minute Running Toilet Fix
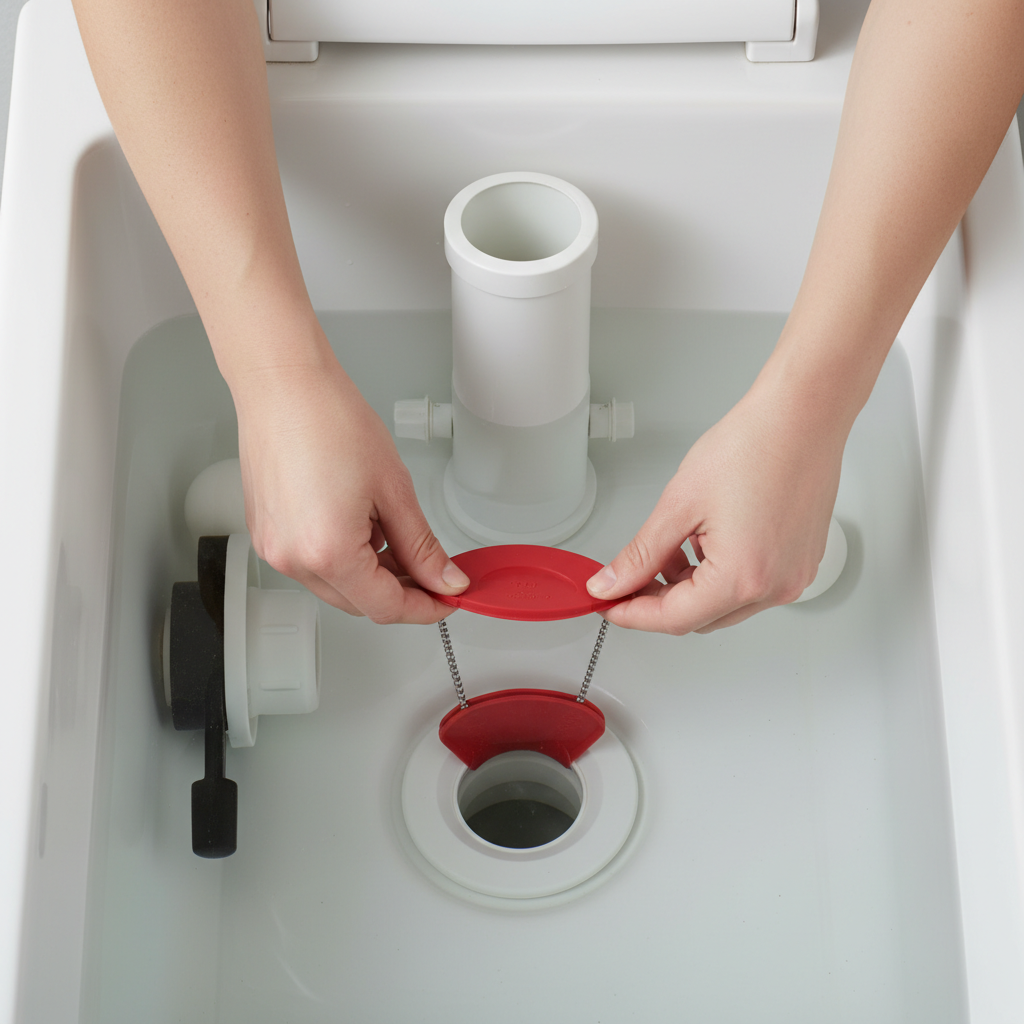
The Problem
You hear your toilet refilling for a few seconds, long after it was flushed. This ‘ghost flushing’ is caused by a slow leak from the tank into the bowl, and it’s a massive water waster. A running toilet can waste up to 200 gallons of water *per day*. That’s a huge hit to your water bill for no reason.
The Fix-It Plan
Nine times out of ten, the culprit is a degraded, warped rubber flapper in the bottom of the tank. This is the part that lifts when you flush. When it no longer creates a perfect seal, water trickles out, and the tank has to keep refilling. Replacing it is one of the easiest and highest-impact home repairs you can do.
Tools & Materials:
- A new toilet flapper ($5 – $10 at any hardware store)
Step-by-Step Guide:
- Turn Off the Water: The shut-off valve is usually on the wall behind the toilet. Turn it clockwise.
- Empty the Tank: Flush the toilet to drain nearly all the water out of the tank. Use a sponge to mop up the last little bit if you want.
- Remove the Old Flapper: The flapper is connected in two places: a chain clipped to the flush lever arm, and two ‘ears’ that hook onto the overflow pipe. Unclip the chain and unhook the ears. The old flapper is now free.
- Install the New Flapper: Hook the ears of the new flapper onto the same spots on the overflow pipe. Clip the new chain onto the flush lever arm.
- Adjust the Chain: This is the key step. You want about half an inch of slack in the chain. Too tight, and the flapper won’t seal. Too loose, and it won’t lift properly when you flush.
- Turn On the Water and Test: Turn the water supply back on and let the tank fill. Flush the toilet and watch. It should be a strong flush, and the flapper should drop and create a perfect seal with no more trickling water.
| Cost Breakdown | DIY Cost | Professional Cost |
|---|---|---|
| Parts (Flapper) | $5 – $10 | $50 – $75 (Marked-up part) |
| Labor | $0 (10 minutes of your time) | $100 – $150 (Service call) |
| Total Savings | Up to $215 on the repair, plus ongoing savings on your water bill! | |
Repair #7: Patch Up a Torn Window Screen in Minutes

The Problem
A small rip or hole in a window or door screen is an open invitation for mosquitoes, flies, and other pests to invade your home. You might think you need to go through the hassle of completely re-screening the frame, but for small tears, there’s a much faster, cheaper way.
The Fix-It Plan
Say hello to the screen patch kit. These are small sections of screen with an adhesive backing that you simply stick over the hole. It’s like a band-aid for your window, and it’s surprisingly durable and effective.
Tools & Materials:
- Screen patch kit (about $5 – $8 for multiple patches)
- Rubbing alcohol or a cleaner
- A cloth
Step-by-Step Guide:
- Clean the Area: The patch needs a clean surface to stick to. Thoroughly clean the area around the hole on both sides of the screen with a cloth and some all-purpose cleaner or rubbing alcohol. Let it dry completely.
- Trim the Patch: Cut a piece from the patch kit that is about half an inch larger than the hole on all sides. It’s better to go a little bigger than too small.
- Apply the Patch: Carefully peel the backing off the adhesive patch. Press it firmly over the hole from the inside of the screen.
- Secure It: Some kits are heat-activated. If so, the instructions will tell you to briefly apply gentle heat from a hairdryer to set the adhesive. This creates a much stronger bond.
- Check Your Work: The patch should be securely attached and cover the hole completely. Now you can enjoy the breeze without the bugs.
| Cost Breakdown | DIY Cost | Professional Cost |
|---|---|---|
| Parts (Patch Kit) | $5 – $8 | N/A |
| Labor | $0 (2 minutes) | $50 – $100 (To re-screen the whole frame) |
| Total Savings | Up to $90 | |
Conclusion
Look at you. Seven problems, seven solutions, and your wallet is barely any lighter. You just tackled some of the most common money-draining issues a home can throw at you, and you did it for less than the cost of a pizza delivery. The total savings across all these jobs? Potentially over $1,000 compared to calling in the pros.
This is about more than just saving money. It’s about empowerment. It’s knowing that you have the skills and the confidence to handle things yourself. You’re no longer at the mercy of a leaky faucet or a handyman’s schedule. Start building your ‘DIY First-Aid Kit’—a simple wrench, a putty knife, a tube of caulk. The next time a small problem pops up, you won’t feel panic; you’ll feel prepared. You’ve got this.