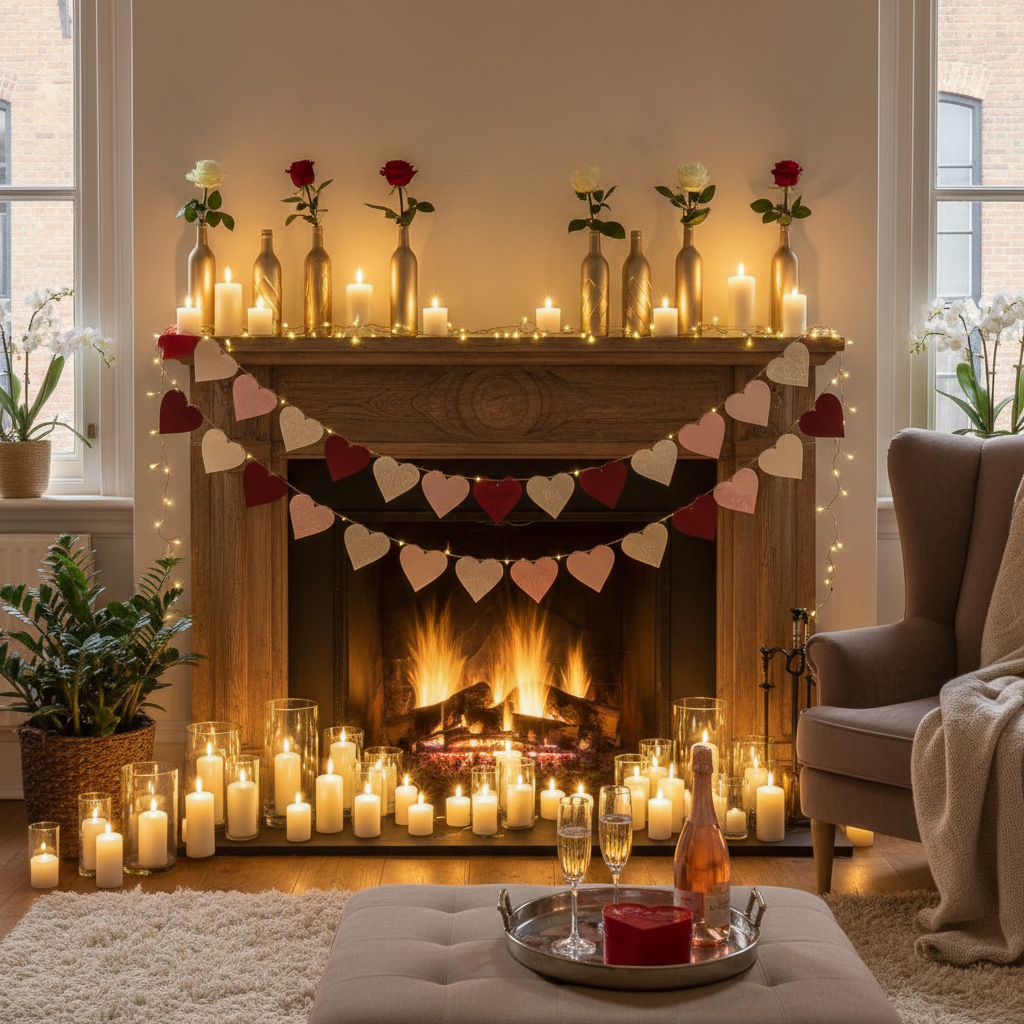
Romantic DIY Valentine’s Decor That Looks Totally High-End
Let’s get real for a second. Walking into a retail store before Valentine’s Day feels like a direct assault on your wallet. They slap a heart on a basic vase, call it ‘romantic,’ and jack up the price by 300%. You want that dreamy, high-end, magazine-worthy vibe, but you’re not about to drop $150 on decorations you’ll use for two weeks. That’s not smart, and you’re smarter than that.
This isn’t just another cutesy craft guide. This is your playbook for hacking the system. We’re going to transform dirt-cheap materials into decor that looks so expensive, your friends will think you secretly won the lottery. It’s time to take control, flex your creative muscles, and create a romantic setting that’s rich in style, not in cost. You’ve got this.
The Game Plan: Where to Score High-End Supplies for Dirt Cheap
Before you can build your masterpiece, you need the right materials. But we’re not heading to the fancy craft superstore—that’s where budgets go to die. We’re hitting the streets with a strategy. Think of yourself as a resource hunter, seeking treasure where others only see junk.
Your Frugal Hunting Grounds:
- The Dollar Store: This is your mothership. Glassware (vases, candle holders), plain candles, craft supplies (twine, glue sticks, ribbon), and faux florals are your primary targets. Look past the cheesy designs and see the potential of the raw materials.
- Thrift Stores (Goodwill, Salvation Army): Unearth unique treasures here. Look for old books with beautiful aged paper for garlands, ornate picture frames you can repurpose, and unique glass bottles or vases that just need a coat of paint to look like a million bucks.
- Craft Store Clearance Aisle: Never pay full price. Head straight to the back of stores like Michael’s or Jo-Ann. You’ll find off-season ribbon, discounted spray paint, and scrapbooking paper that’s perfect for our projects.
- Your Own Backyard: Don’t underestimate free materials. Slender branches, pinecones, or pressed leaves can add an incredible, rustic-chic touch to your decor for $0.
Key Rule: Always look at the shape and texture of an item, not its current color or purpose. A can of spray paint is the ultimate equalizer and can make almost anything look expensive.
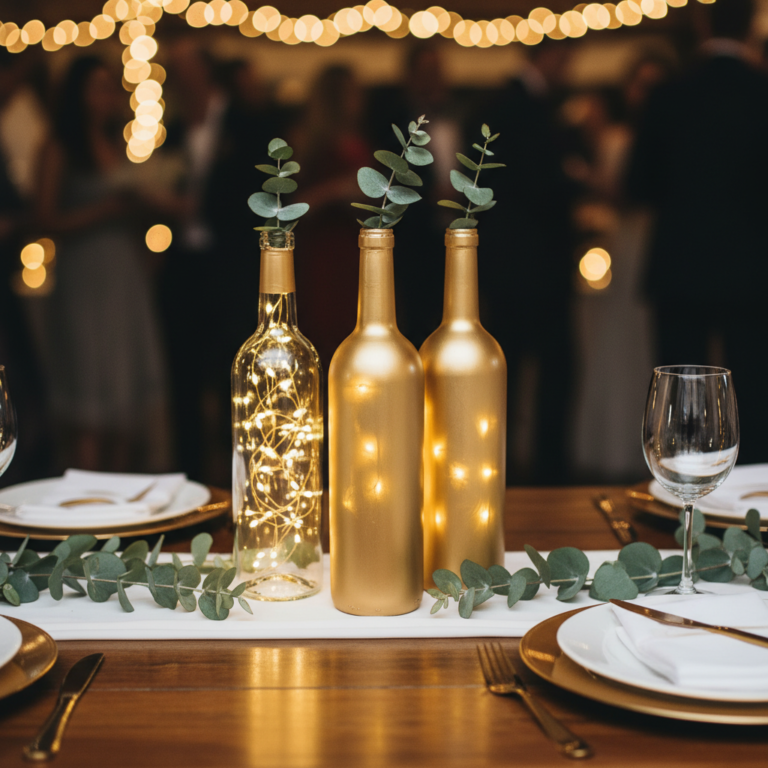
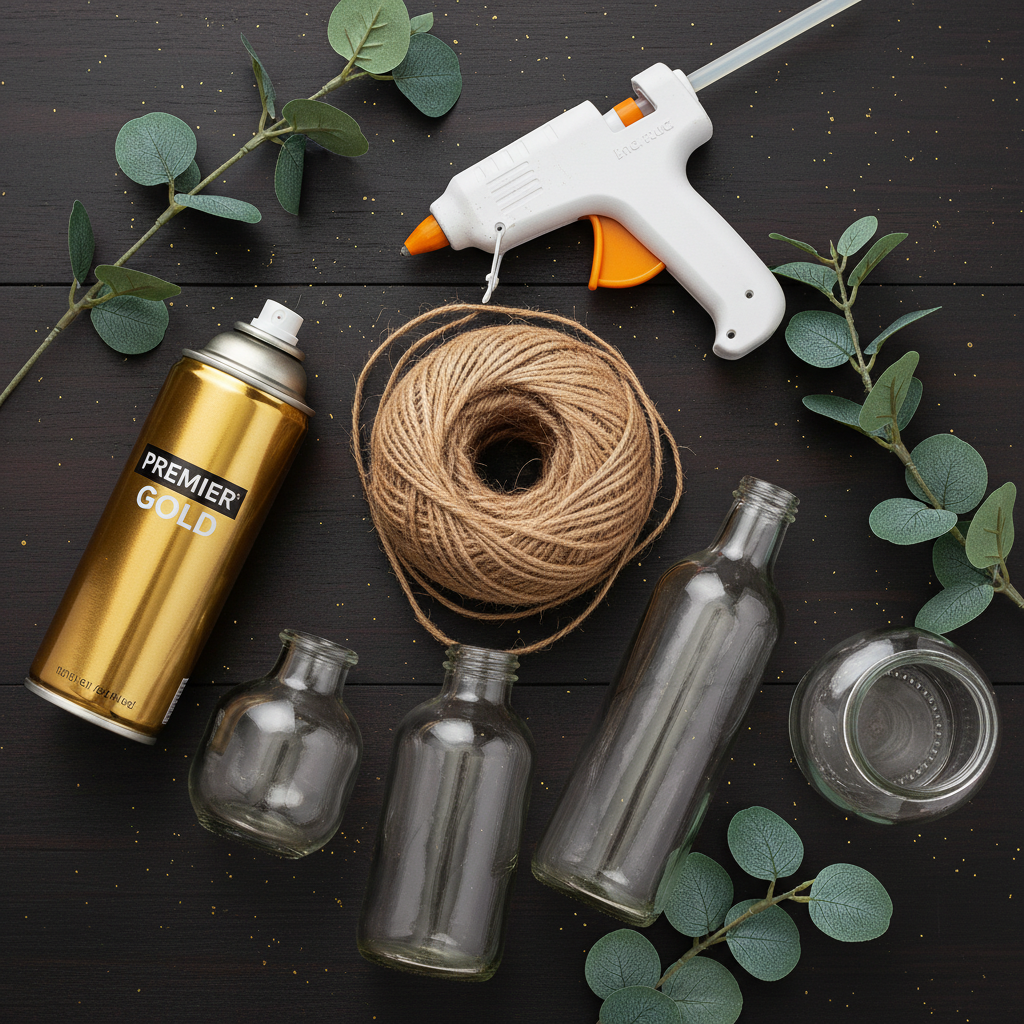
Project 1: The ‘Gilded Romance’ Bottle Vases
This project is the MVP of frugal decorating. We’re turning cheap glass bottles—the kind you get at the dollar store or from your recycling bin—into a stunning, cohesive centerpiece or mantel decoration that screams ’boutique hotel’.
What You’ll Need:
- An assortment of glass bottles or jars (3-5 of varying heights works best)
- One can of metallic spray paint (Gold, Copper, or Rose Gold look the most high-end)
- Newspaper or a drop cloth
- Optional: Faux flower stems or slender twigs
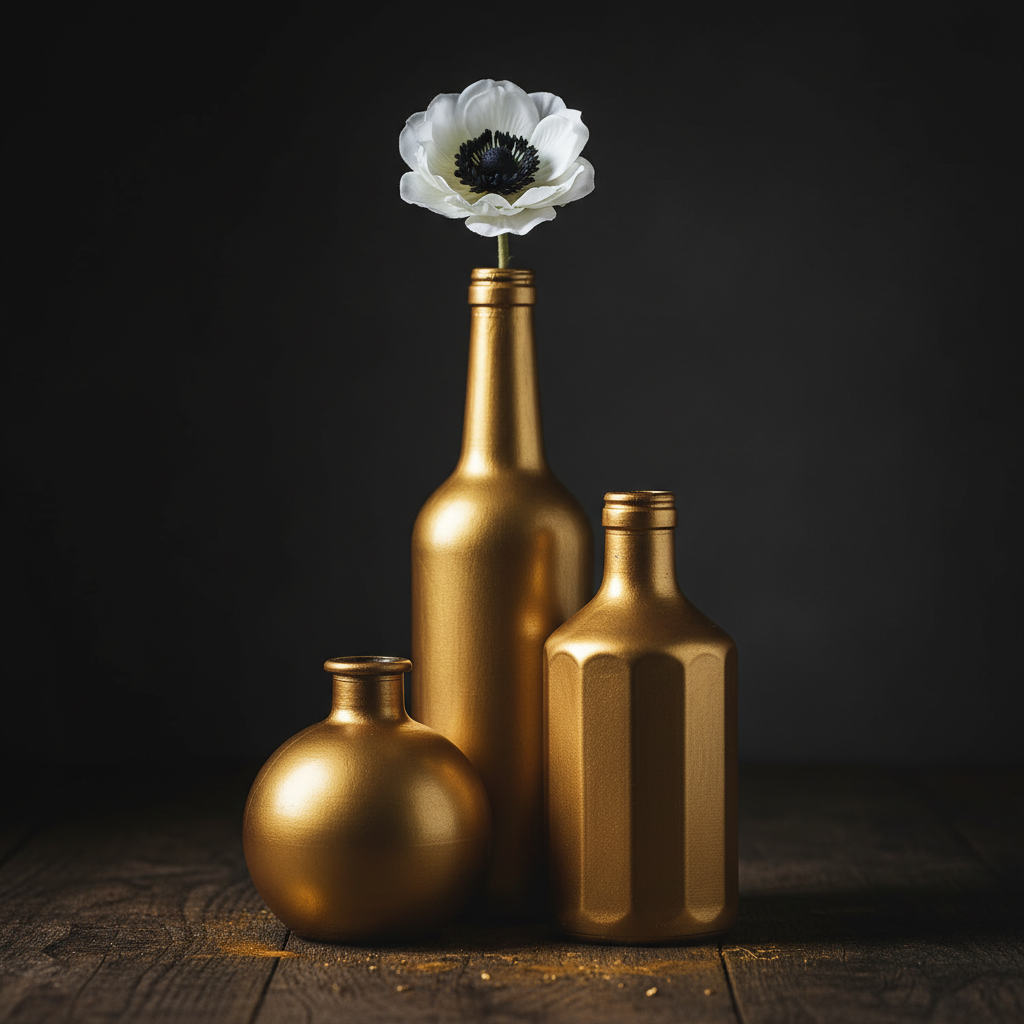
The Step-by-Step Hustle:
- Prep Your Station: This is a job for the outdoors or a well-ventilated garage. Lay down your newspaper or drop cloth. Clean your bottles thoroughly and make sure they are completely dry. Any lingering dust or moisture will ruin the finish.
- First Coat is Key: Shake your spray paint can vigorously for at least a minute. Hold the can about 8-10 inches away from the bottle and apply a light, even coat. Don’t try to get full coverage on the first pass! That’s how you get drips and an amateur finish.
- Patience is a Virtue (and a Money-Saver): Let the first coat dry for at least 20-30 minutes. It should be tacky, not wet.
- The Perfect Finish: Apply a second, slightly heavier coat, ensuring you cover all the glass. The two light coats will create a much smoother, more professional look than one thick, drippy coat. Let them dry completely, preferably for a few hours.
- Style Like a Pro: Arrange your new, luxe-looking vases in a cluster. You can leave them empty for a minimalist, sculptural look, or add a single faux stem (eucalyptus or a white rose works well) to each one.
The Math: Why DIY Crushes Retail Every Time
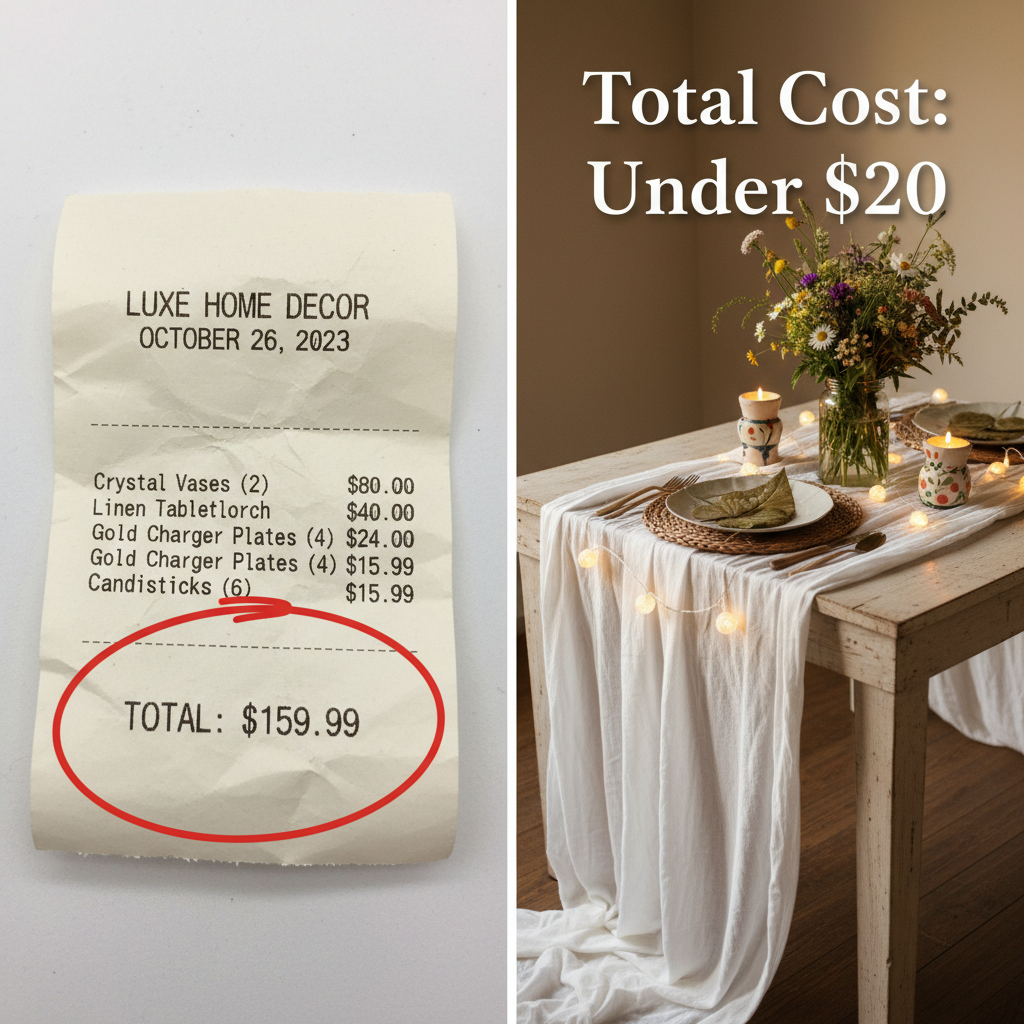
Still on the fence? Let’s break down the numbers. Seeing the raw data is what separates savvy savers from the rest. The retail world banks on you not doing this math. We’re about to expose their game.
Look at the cost of creating a simple, elegant centerpiece like our Gilded Romance Vases compared to buying a similar set from a high-end home decor store. The difference is staggering, and that’s money that stays in your pocket for debt payoff, savings, or your next side hustle investment.
| Item/Component | DIY Project Cost | High-End Retail Price |
|---|---|---|
| Set of 3 Decorative Vases | $3.00 (Thrifted/Dollar Store Bottles) + $7.00 (Can of Spray Paint, with plenty left over) = $10.00 | $79.99 |
| High-Quality Paper Garland (10 ft) | $2.00 (Old Book/Scrapbook Paper) + $1.00 (Twine) = $3.00 | $45.00 |
| Set of 3 Themed Votive Holders | $3.00 (Dollar Store Holders) + $1.00 (Vellum Paper) = $4.00 | $35.00 |
| TOTALS | A measly $17.00 | A whopping $159.99 |
By investing a little time, you’re not just saving money—you’re getting an ROI of over 800%. You’ve saved over $140. That’s a nice dinner out, a big chunk of a utility bill, or seed money for your next project. That’s the power of frugal hacking.
Project 2: The ‘Moody Ambiance’ Vellum Candle Wraps
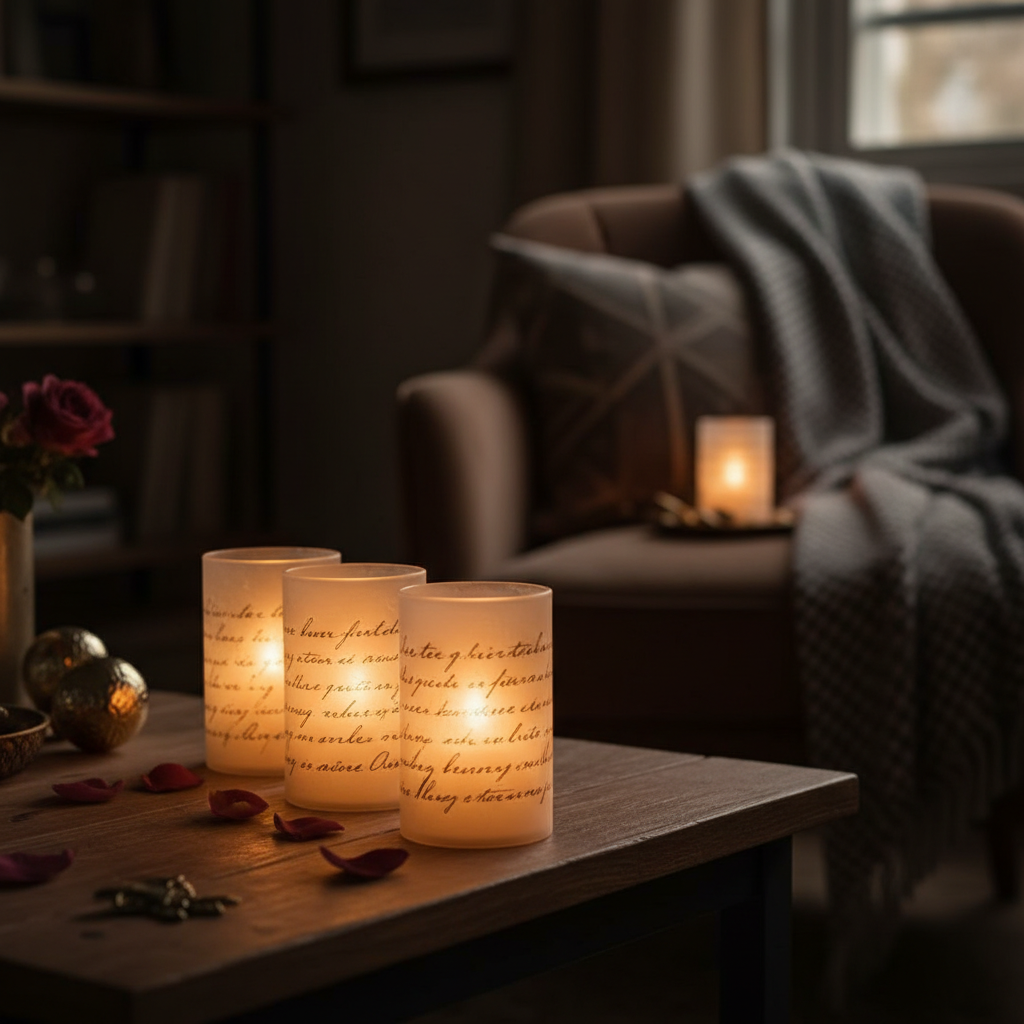
Nothing says romance like candlelight, but plain glass votives are a little… boring. This five-minute hack elevates cheap dollar store candle holders into elegant, moody lighting that looks like it came from a chic Parisian apartment.
What You’ll Need:
- Plain glass candle holders or votives (the straight-sided ones work best)
- Vellum paper (available at any craft store)
- A printer (optional, but awesome)
- Scissors or a paper trimmer
- Double-sided tape
- Tea lights or small pillar candles
The Step-by-Step Hustle:
- Measure Up: Measure the height and circumference of your glass candle holder. Cut a strip of vellum paper to those dimensions. A paper trimmer will give you the cleanest, most professional-looking edges.
- Add a Touch of Class (Optional Step): Before you wrap, this is where you can get creative. Find a romantic poem, a line from your favorite song, or just a beautiful script font online. Print it onto the vellum paper. The translucent paper will make the text glow beautifully when the candle is lit.
- The Wrap: Wrap the vellum strip snugly around the glass holder. Secure the seam at the back with a small piece of double-sided tape. Make sure the top of the paper is flush with or slightly below the rim of the glass for safety.
- Light It Up: Place your candle inside and light it. The vellum diffuses the light, creating a soft, romantic glow that’s a massive upgrade from a naked flame in a jar.
Scam Warning: Beware of ‘craft kits’ for these types of projects. They’ll charge you $20 for three glass holders and some pre-cut paper. You’re a hacker—you can source these materials yourself for under $5 and get way more for your money.
Conclusion
You did it. You just bypassed the entire retail markup machine and created a home environment that’s not only romantic and beautiful but also a testament to your own resourcefulness. Every piece of decor tells a story—not of a shopping trip, but of your creativity and financial savvy. That’s something you can’t buy off a shelf.
Remember, living frugally isn’t about deprivation; it’s about empowerment. It’s about having the high-end life you want on a budget you control. So light those candles, admire your handiwork, and enjoy a beautiful Valentine’s Day knowing you’re the boss of your money and your style. Now go enjoy the romance—you’ve earned it.