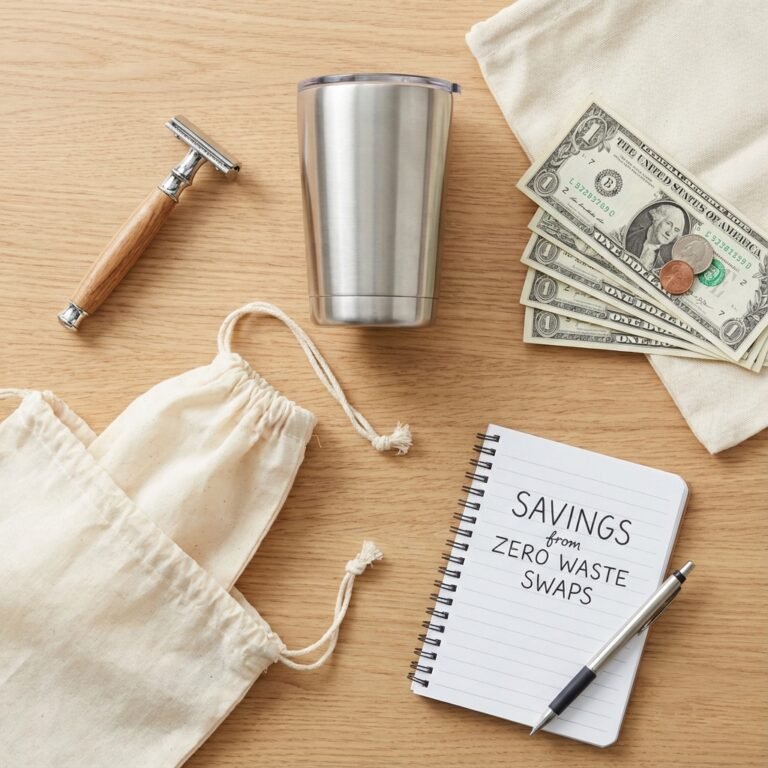
Stop Throwing Money Away: 10 Zero Waste Kitchen Swaps That Save Cash
Listen up. Every time you toss a paper towel, a plastic bag, or a used coffee pod, you’re not just creating trash—you’re literally throwing money into a landfill. Your kitchen is ground zero for a daily money bonfire, fueled by single-use products designed to keep you spending. But what if you could put out that fire and redirect that cash straight into your savings account, your debt payoff plan, or your next side hustle investment?
This isn’t about being a perfect environmentalist. This is about being smart with your money. It’s about recognizing that convenience culture has played you for a fool, convincing you to buy things you use for five seconds and then pay to have hauled away. We’re going to break that cycle. This guide is your cheat sheet to 10 dead-simple, zero-waste kitchen swaps that will immediately cut your spending. Get ready to plug the money leaks you didn’t even know you had.
Swap #1: Ditch Paper Towels for Reusable Cloths

The Money Pit
Paper towels are the ultimate symbol of disposable income—literally. You pay for a roll, use it to wipe up a spill, and toss it. The average family can easily burn through two rolls a week. It feels cheap roll by roll, but that’s how they get you. It’s a slow, steady drain on your wallet for something that has a lifespan of about 10 seconds.
The Smart Swap: ‘Unpaper’ Towels or Microfiber Cloths
The fix is a one-time investment in a stack of reusable cloths. You can go with microfiber cloths, which are workhorses for cleaning, or get specific ‘unpaper’ towels made of cotton or bamboo that can even be rolled onto your existing paper towel holder. You use them, toss them in the laundry with your regular load, and they’re ready to go again. No more last-minute trips to the store because you’re out.
The Math: See the Savings Stack Up
Let’s not play around. The numbers tell the whole story. We’ll compare a moderate paper towel habit to a one-time purchase of quality reusable cloths.
| Item | Cost Per Year | Long-Term Cost (5 Years) |
|---|---|---|
| Brand-Name Paper Towels (2 rolls/week @ $2/roll) | $208 | $1,040 |
| Reusable Cloths (One-time purchase of 24-pack) | $25 (plus minimal laundry cost) | $25 |
| Your 5-Year Savings | $1,015 |
How to Make the Switch
- Buy Your Arsenal: Invest in a solid 24-pack of reusable cloths. This gives you plenty to use while others are in the wash.
- Set Up a System: Keep a small, designated bin or wet bag under your sink for the dirty cloths. This keeps them separate and makes it easy to grab them on laundry day.
- Go Cold Turkey: The easiest way to break the habit is to not have paper towels in the house. Once you make the switch, you’ll be amazed you ever paid for them.
Swap #2: Break Up with Plastic Wrap for Beeswax Wraps & Silicone Lids
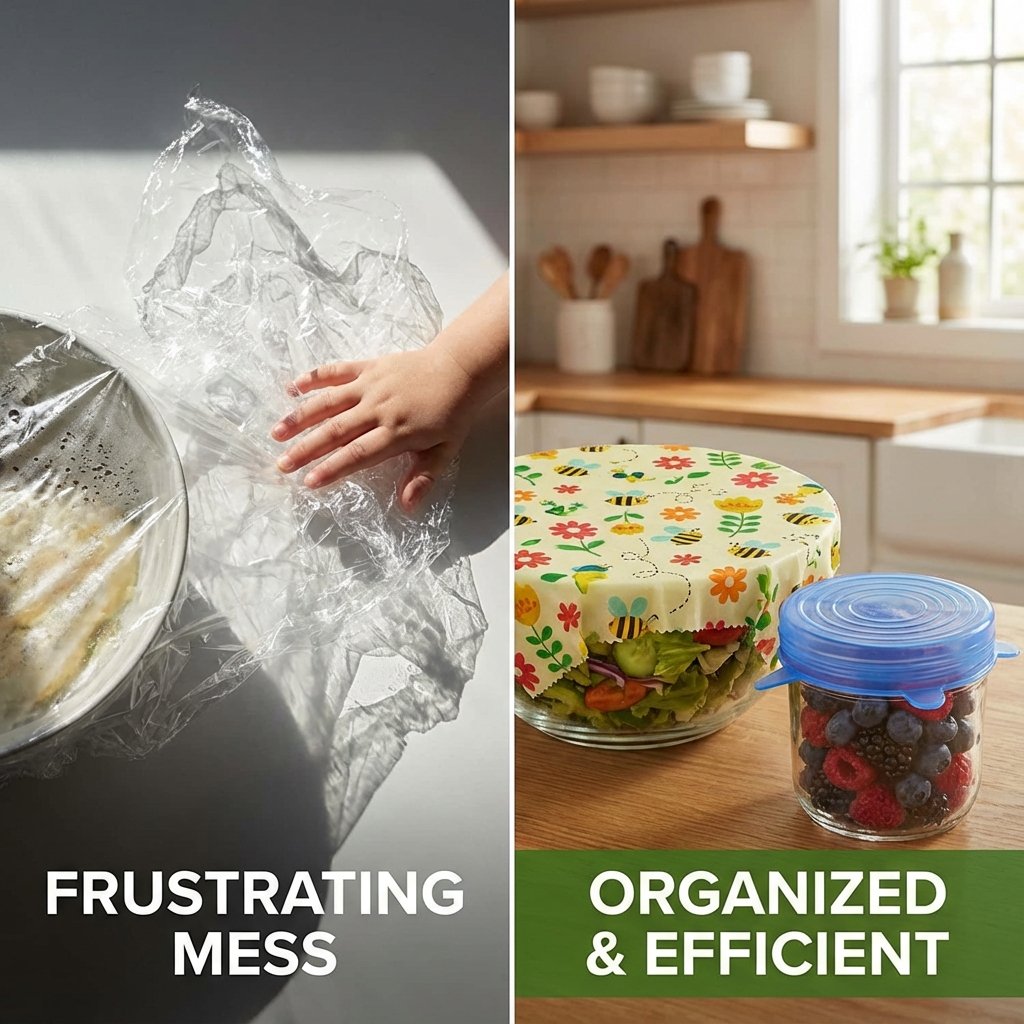
The Money Pit
Plastic wrap is flimsy, frustrating, and a pure waste of money. You wrestle it off the roll, it sticks to itself, and after a single use covering a bowl of leftovers, it goes straight to the landfill. You’re paying for petroleum-based plastic just to cover your food for a few hours. It’s a classic case of a disposable product creating a permanent spending habit.
The Smart Swap: Beeswax Wraps & Reusable Silicone Lids
This is a two-part solution. Beeswax wraps are pliable cloths coated in beeswax that you warm with your hands to mold over bowls, wrap sandwiches, or cover cut produce. They’re washable and last for about a year. For everything else, a set of stretchy silicone lids creates an airtight seal on any round bowl, can, or jar. They’re dishwasher-safe and last for years.
The Math: The Real Cost of Covering Up
The cost of a box of plastic wrap is small, but the lifetime cost is a joke compared to the reusable alternatives.
| Item | Cost Per Year | Long-Term Cost (5 Years) |
|---|---|---|
| Plastic Wrap (4 boxes/year @ $4/box) | $16 | $80 |
| Beeswax Wraps & Silicone Lids (One-time purchase) | $30 (for a combo set) | $30 |
| Your 5-Year Savings | $50 |
How to Make the Switch
- Assess Your Needs: Look at what you use plastic wrap for most. Leftover bowls? Sandwiches? Covering half an onion? This will help you decide if you need more wraps or more lids.
- Invest in a Starter Kit: Buy a variety pack of both beeswax wraps and silicone lids. This will cover most of your bases.
- Care for Your Gear: Wash beeswax wraps in cool, soapy water (hot water melts the wax) and let them air dry. Silicone lids can go right in the dishwasher. Proper care makes them last.
Swap #3: Ditch Disposable Coffee Pods for a Reusable Filter

The Money Pit
Single-serve coffee pods are one of the biggest financial scams in the modern kitchen. You pay a massive premium for the ‘convenience’ of a pre-measured plastic cup of coffee grounds. The cost per pound for coffee in pods can be $40-$50, while a bag of quality ground coffee is closer to $10-$15 per pound. You’re paying 3-4 times more for the same caffeine hit.
The Smart Swap: Reusable K-Cup or a French Press
If you love your Keurig, the no-brainer swap is a reusable K-Cup filter. It’s a small mesh basket that you fill with your own, much cheaper, ground coffee. If you’re ready to level up your coffee game and your savings, switch to a French press. The initial investment is small, and it makes incredible coffee with zero paper or plastic waste.
The Math: Your Daily Caffeine Tax
Let’s look at the staggering difference for a one-cup-a-day habit. The savings are massive.
| Item | Cost Per Year (1 cup/day) | Long-Term Cost (3 Years) |
|---|---|---|
| Disposable Coffee Pods (~$0.75/pod) | $274 | $822 |
| Bagged Coffee with Reusable Filter (~$0.20/cup) | $73 (plus $10 one-time filter cost) | $229 |
| Your 3-Year Savings | $593 |
How to Make the Switch
- Buy the Hardware: A reusable K-Cup costs less than $15. A good French press is around $20-$30.
- Buy Better Coffee, For Less: Take the money you’re saving and buy a bag of high-quality, pre-ground coffee (or whole beans if you have a grinder). You’ll get a better-tasting cup for a fraction of the price.
- Dial in Your Routine: It takes an extra 30 seconds to fill a reusable pod or prep a French press. That’s a tiny price to pay for saving hundreds of dollars a year.
Swap #4: Drop Single-Use Plastic Bags for Reusable Bags

The Money Pit
This covers two areas: the flimsy plastic produce bags at the grocery store and the Ziploc-style bags you use for storage. The produce bags are ‘free,’ but they contribute to a mindset of disposability. The real money drain is the storage bags. A box of 50 freezer bags can cost $5-$7. You use them to store snacks, marinate meat, or pack a sandwich, and then they’re gone. It’s a constant repurchase cycle.
The Smart Swap: Reusable Produce Bags & Silicone Storage Bags
For the grocery store, get a set of reusable mesh produce bags. They’re lightweight, so they won’t add to the cost of your produce, and they let your fruits and veggies breathe. For home storage, invest in a set of reusable silicone bags. They are absolute game-changers. They’re freezer-safe, dishwasher-safe, and some are even microwave and oven-safe. They seal tight and will last you for years.
The Math: Bagging Your Savings
Let’s focus on the storage bags, as that’s where the direct cost lies. The savings are clear and they start from year one.
| Item | Cost Per Year | Long-Term Cost (5 Years) |
|---|---|---|
| Disposable Storage Bags (6 boxes/year @ $6/box) | $36 | $180 |
| Reusable Silicone Bags (One-time purchase of a starter set) | $40 | $40 |
| Your 5-Year Savings | $140 |
How to Make the Switch
- Build Your Kit: Buy a set of mesh produce bags and keep them inside your reusable grocery totes so you never forget them.
- Start with a Silicone Bag Starter Set: Get a variety pack with a few different sizes of silicone bags. Use them for everything you’d use a Ziploc for.
- Clean Them Immediately: The trick to loving silicone bags is to wash them right after use. Turn them inside out and pop them in the dishwasher or wash by hand. Prop them open over a glass or a bottle drying rack to air dry completely.
Swap #5: Can Bottled Water for a Reusable Bottle & Filter

The Money Pit
Buying bottled water is like setting your money on fire. You are paying an insane markup for filtered tap water packaged in a plastic bottle that pollutes the planet. The cost isn’t just the water itself; it’s the plastic, the bottling process, the shipping, and the marketing. It is one of the single most wasteful and expensive habits you can have.
The Smart Swap: A Reusable Bottle & a Water Filter
This is the easiest financial win on the list. Get a quality reusable water bottle (stainless steel or glass) that you enjoy using. If you’re concerned about the taste or quality of your tap water, buy a simple pitcher-style water filter for your fridge or a filter that attaches directly to your faucet. The upfront cost is minimal compared to the endless expense of bottled water.
The Math: Hydration Without the Heist
The numbers here are not just compelling; they are shocking. This is a must-do for anyone serious about saving money.
| Item | Cost Per Year (1 bottle/day) | Long-Term Cost (3 Years) |
|---|---|---|
| Bottled Water (~$1.50/bottle) | $547 | $1,641 |
| Reusable Bottle & Filter (One-time bottle + 3 filters/year) | $65 in Year 1, then $45/year | $155 |
| Your 3-Year Savings | $1,486 |
How to Make the Switch
- Pick Your Bottle: Find a reusable bottle you’ll actually carry. Insulated? Infuser? Choose one that fits your lifestyle.
- Get a Filter: A basic Brita or Pur pitcher is a great start. Keep it full in the fridge so you always have cold, filtered water ready to go.
- Make it a Habit: Never leave the house without your bottle. Keep one at your desk at work, one in your car, and one in your gym bag. Make it automatic.
Swap #6: Stop Buying Broth and Start Making Scrap Broth
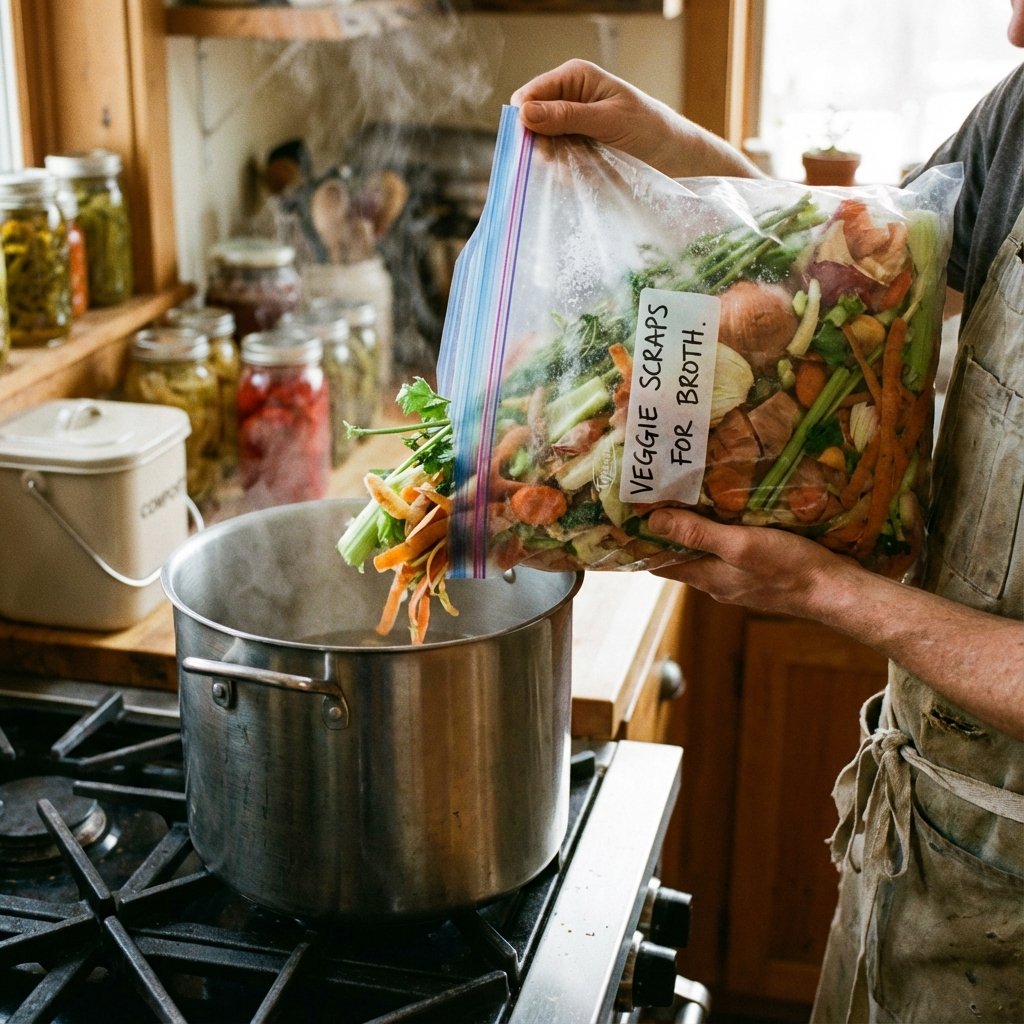
The Money Pit
Those cartons of chicken, beef, or vegetable broth seem like a kitchen staple, but they’re mostly water and salt that you’re paying a premium for. At $3-$5 a carton, it adds up quickly if you make soups, stews, or sauces regularly. What’s worse is that you’re throwing away the very ingredients you could be using to make a superior product for free.
The Smart Swap: The ‘Scrap Bag’ Method
This is the ultimate frugal hack. Keep a large freezer bag or container labeled ‘Scraps’. Throughout the week, toss in your vegetable peels (onions, carrots, celery ends), herb stems, and even chicken bones if you eat meat. When the bag is full, dump it all in a pot, cover with water, add some salt, and simmer for a few hours. Strain it, and you have a rich, flavorful broth that’s a thousand times better than the store-bought stuff—for literally $0.
The Math: From Trash to Treasure
This isn’t about small savings; it’s about turning a recurring expense into a zero-cost item.
| Item | Cost Per Year (1 carton/week) | Long-Term Cost (3 Years) |
|---|---|---|
| Store-Bought Broth (~$4/carton) | $208 | $624 |
| Homemade Scrap Broth (Made from scraps you already have) | $0 | $0 |
| Your 3-Year Savings | $624 |
How to Make the Switch
- Start Your Scrap Bag: Get a gallon-sized freezer bag and put it in your freezer today. Start adding scraps: onion skins (great for color!), carrot peels, celery butts, parsley stems, mushroom stems, garlic skins. Avoid cruciferous veggies like broccoli or cabbage, as they can make the broth bitter.
- Simmer and Strain: Once the bag is full, empty it into a large stockpot. Cover with water by about an inch. Bring to a boil, then reduce to a simmer for at least 1-2 hours (longer for bones). Strain out the solids and you’re done.
- Store for Free: Let the broth cool and store it in mason jars in the fridge for a week or freeze it in ice cube trays or silicone pouches for months.
Conclusion
Look at that. We just identified over $3,000 in potential savings over the next few years, and we’ve barely scratched the surface. This isn’t about deprivation; it’s about empowerment. It’s about taking a hard look at where your money is going and realizing you have total control to change its direction. Every single one of these swaps is a small act of rebellion against a system designed to keep you spending on disposable junk.
Don’t try to do it all at once. Pick one. Just one. Master it this week. Maybe it’s finally buying that reusable coffee pod or starting a scrap bag in your freezer. Feel that small win. See the extra cash in your account at the end of the month. Then, pick another. Before you know it, you’ll have transformed your kitchen from a money pit into a money-saving machine. You’re smarter than their marketing. Now go prove it.