Save Your Sweaters: How to Remove Pilling Like a Pro (For Free)
Look in your closet. I bet you’ve got one—that favorite sweater that used to make you feel like a million bucks, but now it’s covered in those annoying little fuzzballs. It looks old, tired, and cheap. The gut reaction? Toss it or donate it and buy a new one. That’s what stores want you to do. But that’s a sucker’s move. Those little balls, called ‘pills,’ are robbing you of your money and your style. You’re not just losing a sweater; you’re losing the cash you spent on it. Today, that stops. We’re going to war with pilling, and you’re going to win. Forget those fancy, overpriced gadgets or ‘special’ solutions. I’m going to show you how to make your sweaters look brand new using tools you absolutely have in your house right now. This is the ultimate frugal hack to reclaim your wardrobe and keep your money where it belongs: in your pocket.
Why Your Sweaters Are Betraying You: The Pilling Problem Explained
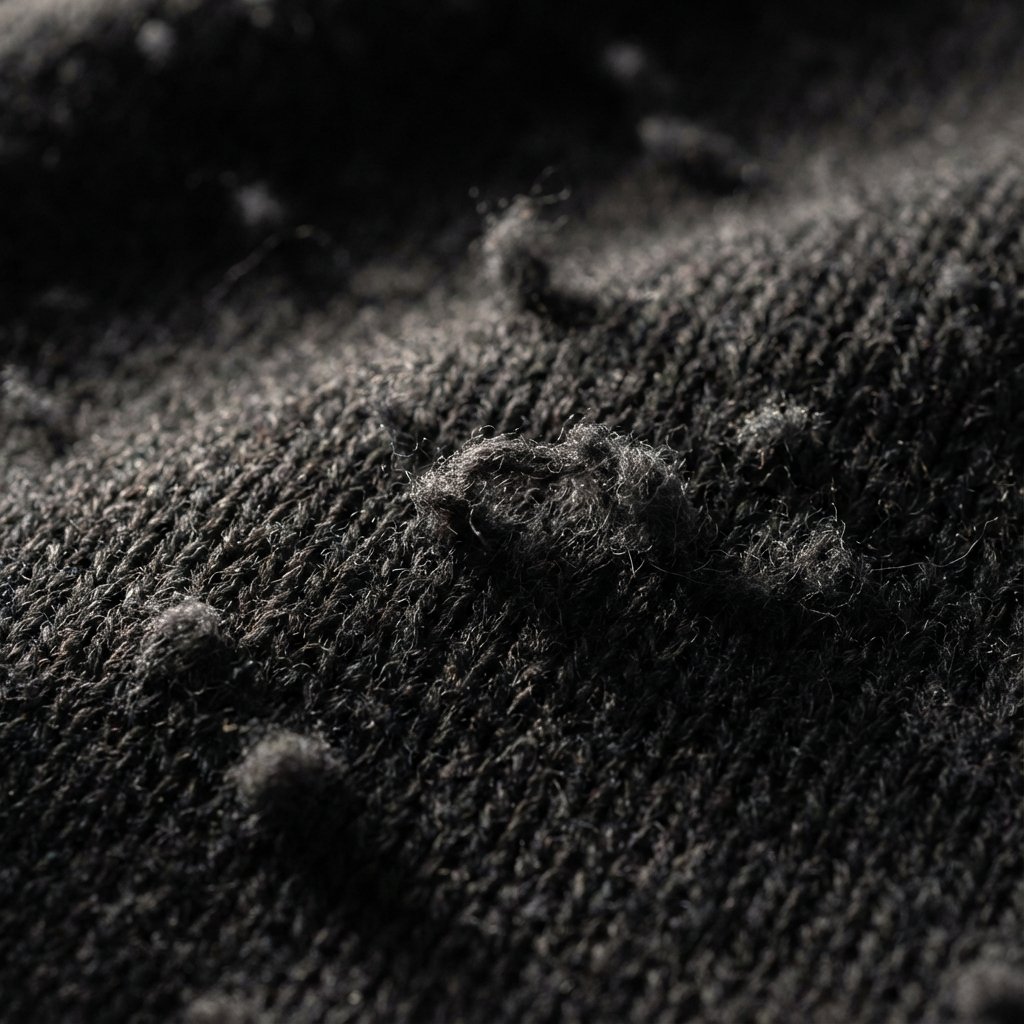
Before you fix a problem, you gotta understand the enemy. Pilling happens when fibers in the fabric rub against each other (or other surfaces), break, and get tangled up into tiny knots. It’s pure friction. It doesn’t always mean your sweater is cheap—even expensive cashmere and wool can pill. It just means the fabric is living its life. But here’s the deal: these pills make your clothes look worn out and poorly maintained. It screams ‘I don’t take care of my stuff.’ In the world of frugal living and making every dollar count, the appearance of your clothes matters. A sharp outfit can give you the confidence to nail a job interview or a side hustle pitch. A pilled, fuzzy sweater does the opposite. It devalues your investment. Think of every sweater as an asset. Pilling is the depreciation. We’re here to stop it, reverse it, and protect your assets without spending a dime.
The Frugal Hacker’s Toolkit: Gear You Already Own
You don’t need to go to Amazon and buy a $20 ‘fabric shaver.’ That’s just more clutter and another expense. The industry that sells you clothes also loves to sell you the expensive stuff to ‘care’ for them. We’re smarter than that. Your armory is already in your bathroom and kitchen. Here’s what you can use:
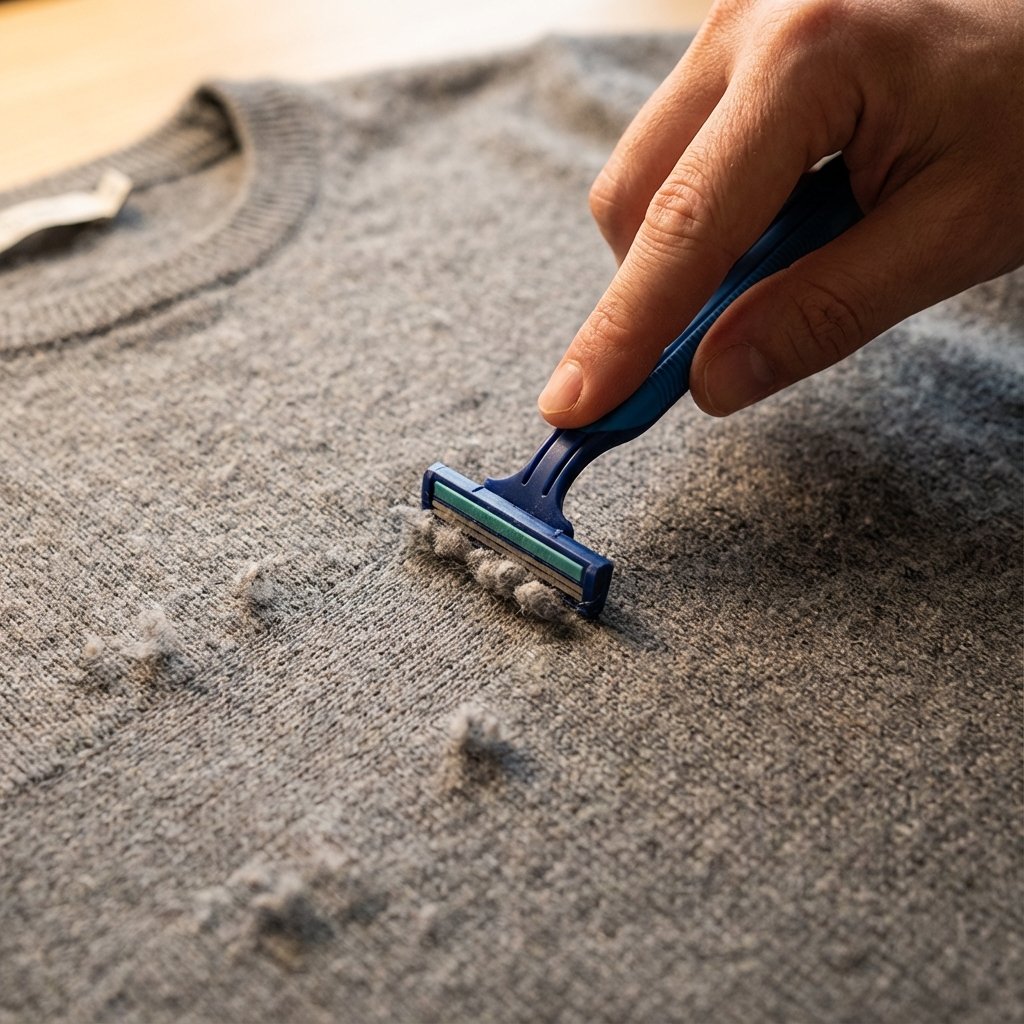
- A cheap disposable razor: The kind you get in a 10-pack for a few bucks. This is the MVP. It literally shaves the pills off. Just make sure it’s a new, sharp one without any moisturizing strips, which can get gunky.
- A pumice stone: Got one for your feet? It works on tougher, heavier knits like wool coats. The abrasive surface grabs and pulls the pills away. Use a light touch here.
- A fine-tooth comb: A simple plastic comb can work wonders on more delicate knits. You gently comb the pills out of the fabric.
- Velcro hair roller or a strip of rough-side Velcro: The hook side of Velcro is perfect for grabbing pills. Just press it on and peel it off. Easy.
- Scissors: For those big, stubborn pills that won’t budge, a pair of small, sharp scissors (like nail scissors) lets you play surgeon and snip them off one by one. Slow, but effective.
The point is to use what you have. Don’t fall for the marketing hype. The best tool is the one that’s already paid for.
The Main Event: Step-by-Step Pilling Removal Like a Pro
Alright, it’s go time. Grab your sweater and your weapon of choice from the toolkit. Let’s restore this thing to its former glory. Don’t rush this; put on some music or a podcast. This is a five-minute job that saves you $50. That’s a killer hourly rate.
- Prep Your Workspace: Lay the sweater on a flat, hard surface like a clean table or an ironing board. A bed is too soft. You need a taut surface to work on. Smooth out the area you’re about to de-pill.
- Pull the Fabric Taut: Use one hand to hold the fabric firm and flat. This is the most important step. If the fabric is loose, you risk snagging or cutting it. Keep it taut.
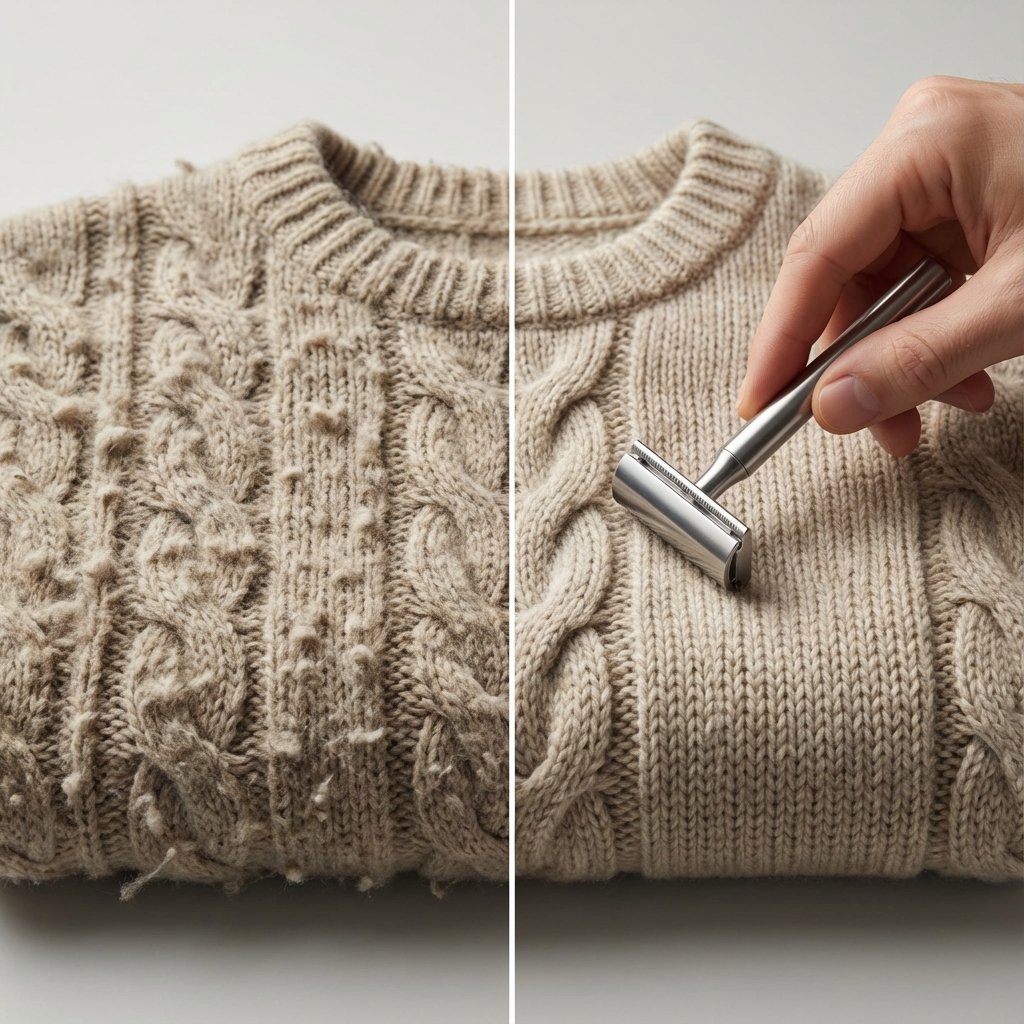
- Shave/Scrape Gently: With your other hand, use your tool (let’s say a disposable razor) and make short, gentle, downward strokes. Don’t press hard. You’re not shaving a beard; you’re gliding over the surface to catch the pills. You’ll see the fuzz start to collect on the blade.
- Work in Sections: Be methodical. Work in small, 6-inch sections. Finish one area completely before moving to the next. Pay extra attention to high-friction areas like under the arms, the sides, and the sleeves.
- Clean Up the Mess: As you work, you’ll accumulate a pile of sweater fluff. Use a lint roller or some packing tape to pick up all the shaved-off bits. This gives you a clean surface to see what you’re doing and reveals the final, smooth result.
Pro-Tips for Different Fabrics
Not all sweaters are created equal. Adjust your technique based on the material:
- Tight Knits (e.g., Cotton, Synthetics): These are tough. You can be a bit more aggressive here. The disposable razor is your best friend.
- Fluffy Knits (e.g., Angora, Mohair): Be extremely careful. A razor can ruin these. A fine-tooth comb or a gentle pass with a Velcro roller is a safer bet.
- Delicate Knits (e.g., Cashmere, Fine Merino Wool): Use the lightest touch possible. A comb is often best. If you use a razor, make sure there is zero pressure. You are just skimming the very top.
The Golden Rule: Always test a small, hidden area first. Try the inside hem or a cuff. Don’t go all-in on the front of your favorite sweater until you know your tool and your technique won’t snag the fabric.
The Math: Cost Breakdown DIY vs. Store-Bought Solutions
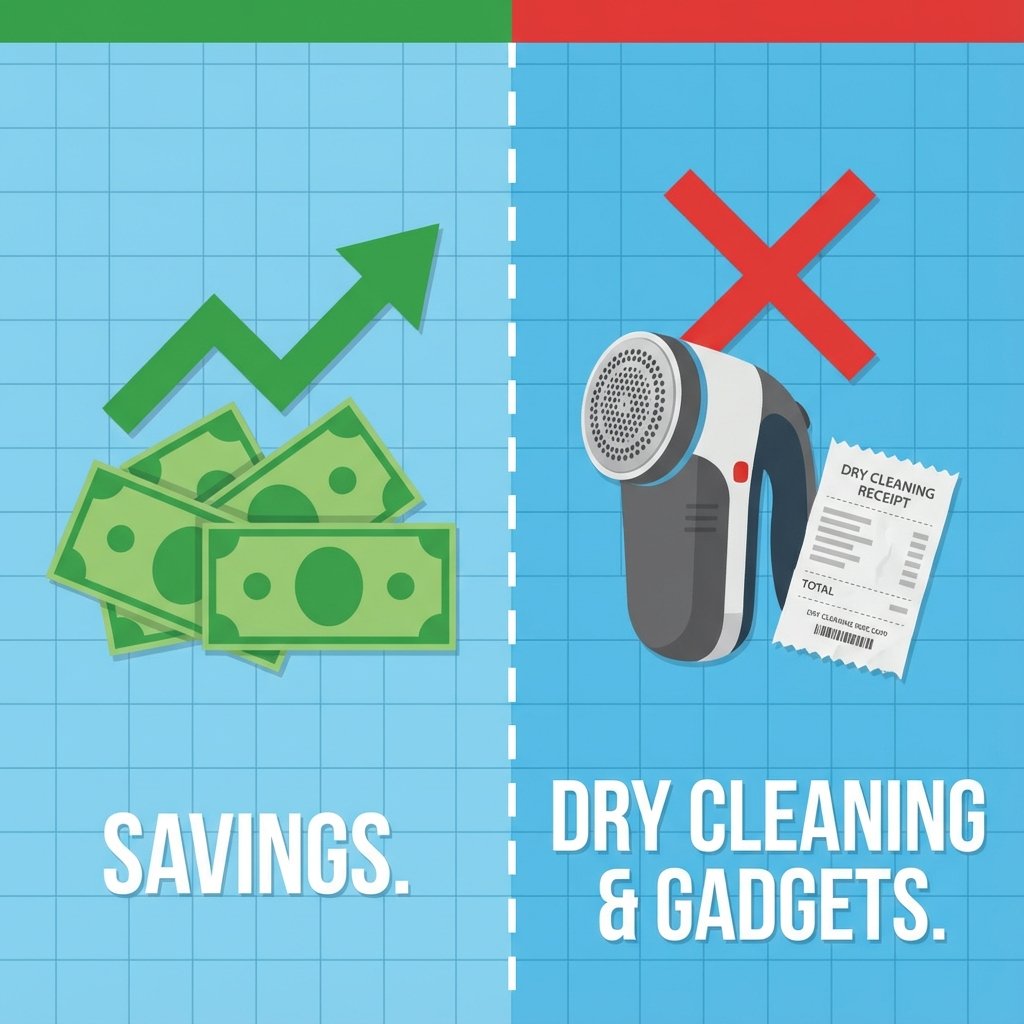
Still thinking about buying one of those electric de-pillers? Let’s run the numbers. This is where frugal living becomes a real, measurable win. We’re not just saving a sweater; we’re saving cold, hard cash that can go toward debt, savings, or your next side hustle investment.
| Solution | Upfront Cost | Long-Term Cost (per year) | Effectiveness |
|---|---|---|---|
| DIY Method (Razor/Comb) | $0 (You already own it) | $0 | High (with a little patience) |
| Electric Fabric Shaver | $15 – $30 | Batteries, potential replacement | High (but it’s another gadget to store/break) |
| Sweater Stone | $10 – $20 | Can wear down over time | Medium (can be harsh on some fabrics) |
| Professional Dry Cleaning | $10 – $25 per sweater | Cost adds up fast ($100+ for a few items) | Variable (they often just use a shaver anyway) |
| Replacing the Sweater | $40 – $150+ | The most expensive option! | N/A |
The math is undeniable. By using a disposable razor you were going to throw out anyway, you are getting professional-level results for literally $0. If you save just three sweaters from the donation pile this year, you’ve easily saved over $150. That’s not chump change. That’s a utility bill, a load of groceries, or seed money for a new project.
Prevention is Power: How to Stop Pilling Before It Starts

Winning the battle is great, but winning the war is better. You can drastically reduce how much pilling happens in the first place with a few smart moves. This is about working smarter, not harder.
- Wash Less, and Wash Smart: Your clothes don’t need to be washed after every single wear, especially sweaters. When you do wash them, turn them inside out. This means the outside of the garment—the part everyone sees—gets less friction in the machine.
- Go Gentle or Go Home: Use the gentle cycle on your washing machine. The intense agitation of a normal or heavy-duty cycle is a pilling factory. Cold water is also less harsh on fibers.
- Bag It Up: Invest in a few mesh laundry bags. They cost next to nothing and are a game-changer. Popping your sweaters in a bag before washing reduces the amount they rub against abrasive items like zippers and buttons on your jeans.
- Skip the Dryer: High heat is the enemy of most fabrics. It weakens fibers, making them more likely to break and pill. Lay your sweaters flat to air dry. It takes longer, but it will double the life of your garment.
- Shop Smarter: When you are buying new clothes, look at the fabric blend. Tightly woven, natural fibers like 100% cotton or high-quality wool tend to pill less than loose knits and synthetic blends (especially those with acrylic and polyester).
By making these small changes, you’ll spend less time shaving your sweaters and more time enjoying them. It’s about building sustainable, money-saving habits into your daily routine.
Conclusion
You are now officially a pro. You have the knowledge and the (free) tools to rescue any sweater from the brink of the donation bin. This isn’t just about removing some fuzz; it’s a mindset shift. It’s about seeing the value in what you already own and refusing to waste money unnecessarily. Every sweater you save is a victory. It’s $50, $80, or even $100 that stays in your bank account. Go look through your closet right now. Find a victim. In less than 10 minutes, you can bring it back to life and feel the satisfaction of being a true frugal hacker—resourceful, smart, and in complete control of your money.