Don’t Toss It, Dye It! Trendy Tie-Dye Techniques To Save Your Old Clothes
Look in your closet. Go on, I’ll wait. How many perfectly good shirts, hoodies, or tote bags are shoved in the back because of a tiny stain or because they’re just plain boring? Every one of those is money you’re letting die a slow, colorless death. We’re talking about tossing $20, $30, even $50 garments because of a minor flaw. It’s time to stop the bleeding.
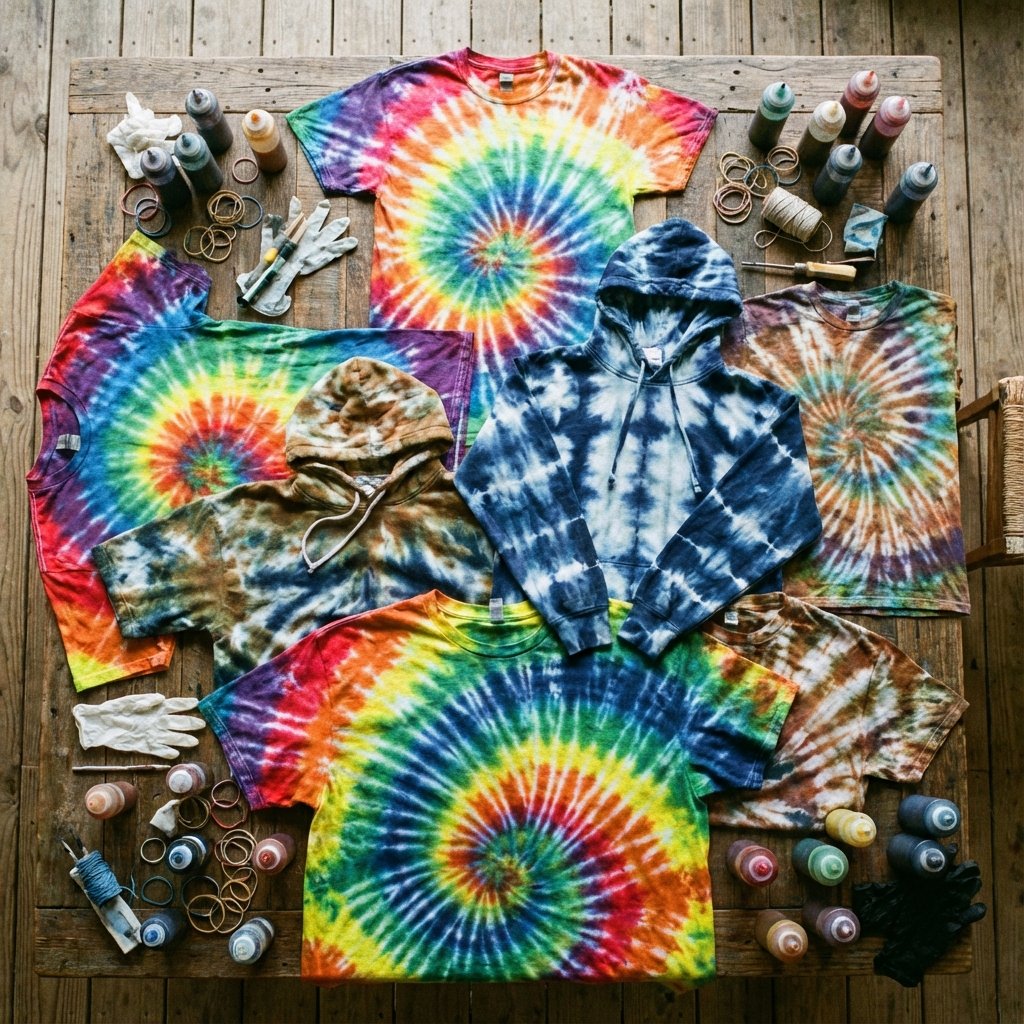
Forget the cheesy, rainbow-swirled shirts from summer camp. We’re diving into the street-smart world of modern tie-dye—a powerful tool for not just salvaging your clothes, but transforming them into custom, high-end-looking pieces that people actually want to wear. This isn’t just a craft; it’s a financial power move. In this no-nonsense guide, you’ll learn how to rescue your wardrobe from the landfill, create killer designs that turn heads, and even flip your new skills into a legitimate side hustle. Your wallet, and your style, are about to get a major upgrade.
The Frugal Hacker’s Arsenal: Gear Up Without Going Broke
Before you can turn trash into treasure, you need the right tools. But don’t think you need to drop a ton of cash at some fancy craft store. A true frugal hacker knows how to assemble an arsenal on a dime. Here’s the real-deal breakdown of what you need versus what they try to sell you.
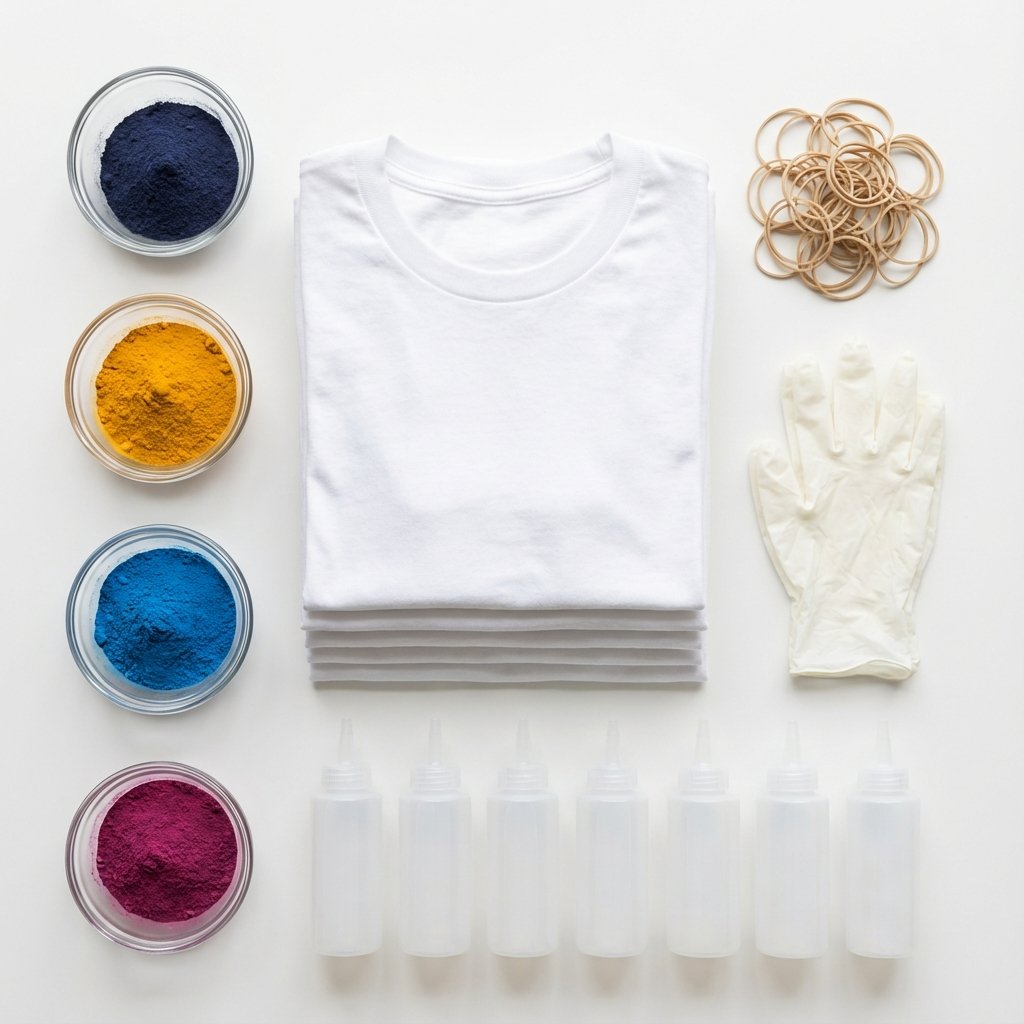
The Non-Negotiables
- Fiber Reactive Procion Dyes: This is the most important part. Forget those all-in-one kits from big-box stores that fade after two washes. Procion dyes are what the pros use. They chemically bond to the fabric, meaning your colors stay vibrant and don’t bleed. You can buy them as powders online from places like Dharma Trading Co. or Jacquard for way cheaper per project than a kit. A small $5 jar of powder can dye more shirts than a $20 kit.
- 100% Natural Fiber Garments: Scour your own closet first! Look for 100% cotton, rayon, bamboo, or linen. That stained white t-shirt, the old cotton sheets, the baby onesies—they’re all fair game. Procion dyes don’t work on synthetics like polyester, so check your tags.
- Soda Ash (Sodium Carbonate): This is the magic ingredient that preps the fabric to accept the dye, making the colors permanent. You can buy it as ‘soda ash’ from a dye supplier or simply get ‘washing soda’ from the laundry aisle at the grocery store. It’s the same stuff, but the laundry version is often cheaper.
- Rubber Bands or Strong String: Your basic office supply rubber bands will do the trick for most projects. For more intricate Shibori techniques, a sturdy cotton string is your best friend.
- Squeeze Bottles: You can buy these, but you can also just thoroughly wash out old dish soap or condiment bottles. Just make sure they’re squeaky clean.
- Gloves and a Dust Mask: Don’t play games with this. The dye powders are very fine and you don’t want to inhale them or stain your hands for a week. A cheap pack of disposable gloves and a basic dust mask are mandatory.
Where to Source Your Gear Cheap
- Thrift Stores: Your number one spot for practice garments. Grab 100% cotton white t-shirts for a couple of bucks each. You can experiment without risking your favorite clothes.
- Online Dye Suppliers: Buying powdered dye and soda ash in small bulk online is infinitely cheaper in the long run than buying pre-packaged kits.
- Hardware & Grocery Stores: Pick up buckets, washing soda, and plastic drop cloths for a fraction of the cost you’d pay at a craft store.
The Golden Rule of Dyeing: Always use 100% natural fibers like cotton, rayon, or linen for the most vibrant results. Polyester is the enemy of dye! It won’t absorb the color, and you’ll be left with a faded, disappointing mess. Check the tag, save the tears.
The Cost Breakdown: DIY vs. Buying New
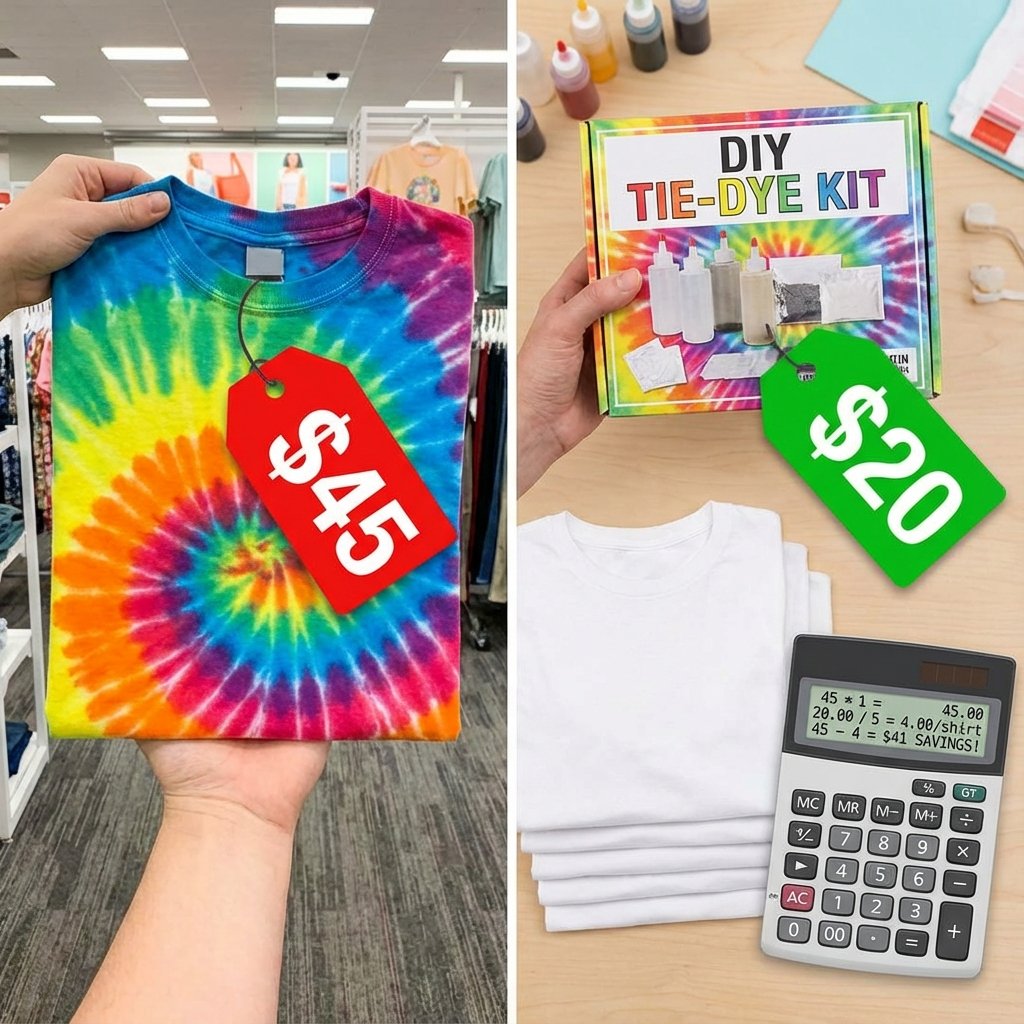
Let’s run the numbers. You might see a cool tie-dye hoodie at a boutique for $60 and think, “That’s just the price.” Wrong. That’s the price for people who don’t know the hack. You’re about to learn the hack. The difference in cost is staggering, and it’s pure profit back in your pocket.
Look at this table. It’s not an estimate; it’s a reality check. We’re comparing the cost of outfitting yourself with ONE store-bought shirt versus creating a whole new collection of FIVE custom pieces yourself.
| Item | Cost of Buying ONE New Item | Cost of DIY-ing FIVE Items |
|---|---|---|
| Trendy Tie-Dye T-Shirt | $35.00 | Included in kit/supplies |
| Pro-Grade Tie-Dye Kit (dyes up to 15 shirts) | N/A | $25.00 |
| Five 100% Cotton T-Shirts (from your closet or thrifted) | N/A | $10.00 (avg. $2 each) |
| Soda Ash, Gloves, Bands, Bottles | Included in Store Price | Included in Kit |
| TOTAL COST | $35.00 | $35.00 |
| COST PER SHIRT | $35.00 | $7.00 |
The math doesn’t lie. For the exact same price as one shirt off the rack, you can make five custom pieces. You’re not just saving money on one item; you’re multiplying your wardrobe. If you revive five shirts from your closet that you would have otherwise thrown out or replaced, you’ve effectively saved yourself $175 (5 shirts x $35). This is how you build a stylish wardrobe on a shoestring budget. It’s not about being cheap; it’s about being smart.
The Playbook: 4 Modern Tie-Dye Techniques That Actually Look Cool
Alright, it’s time to get your hands dirty. These aren’t your average techniques. These are the modern, stylish methods that produce boutique-worthy results. We’ll go step-by-step. Remember to pre-wash your garments and soak them in a soda ash solution (1 cup per gallon of water) for about 20 minutes before dyeing. Squeeze out the excess liquid until the fabric is damp, not dripping.
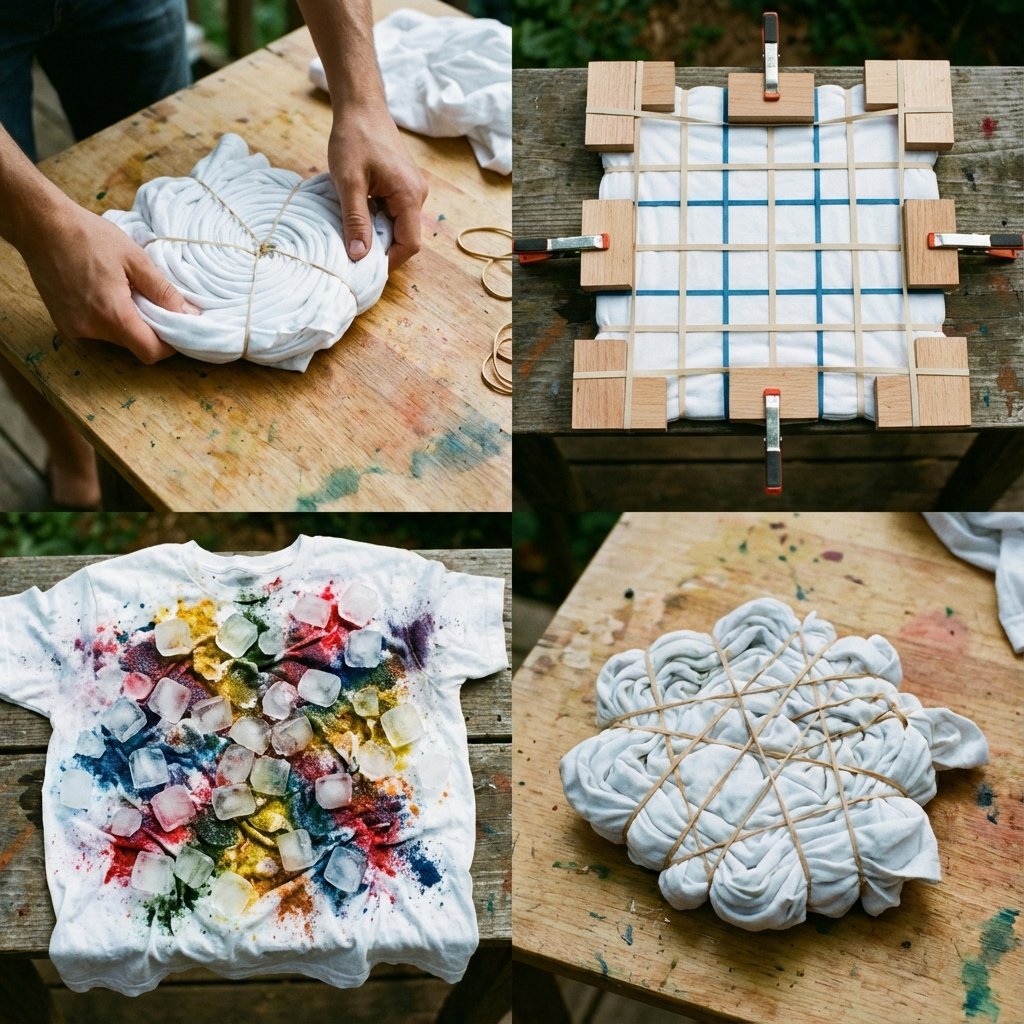
Technique 1: The Ice Dye Method (For Watercolor Effects)
This is the ultimate low-effort, high-reward technique. It creates beautiful, organic patterns that look like watercolor paintings.
- Lay your damp, soda-ash-soaked garment on a wire rack over a bucket or tub. A cookie cooling rack works perfectly.
- Scrunch and crumple the fabric into a tight, messy mound on top of the rack. The more random, the better.
- Cover the entire fabric mound with a thick layer of ice cubes. Don’t be shy; pile them on.
- Sprinkle your powdered Procion dyes directly onto the ice. You can use multiple colors. As the ice melts, it will slowly dissolve the dye and carry it through the fabric, splitting the colors into their unique pigments and creating incredible patterns.
- Let it sit and melt completely, which can take anywhere from 12 to 24 hours. Don’t rush it.
- Once the ice is gone, rinse the garment in cold water until the water runs clear, then wash it in a hot cycle by itself.
Technique 2: The Shibori Fold (Itajime)
Shibori is a Japanese dyeing technique that uses folding and binding to create clean, geometric patterns. It looks incredibly sophisticated.
- Lay your damp garment flat. Fold it like an accordion, making 2-3 inch wide pleats, until you have one long strip.
- Now, fold that strip like an accordion in the other direction, creating a neat square or rectangle.
- Sandwich the fabric square between two flat, sturdy objects like pieces of wood, plexiglass, or even old CDs.
- Secure the whole package tightly with several strong rubber bands or clamps. The tighter you bind it, the more white space will be preserved.
- Apply your liquid dye to the exposed edges of the fabric square. You can use one color or apply different colors to different edges.
- Let it sit in a plastic bag for 12-24 hours to let the dye fully penetrate.
- Rinse, wash, and be amazed by the sharp, repeating pattern.
Technique 3: The Classic Spiral
The spiral is a classic for a reason, but the key to making it look modern is using a sophisticated color palette—think two or three complementary colors instead of a full rainbow.
- Lay the damp shirt flat. Pinch the center (or wherever you want the spiral to start) and begin twisting.
- Keep twisting your hand, allowing the fabric to wrap around the center point. Use your other hand to guide the pleats into a flat, circular, cinnamon-bun shape.
- Once it’s a tight disk, secure it with at least three rubber bands, crisscrossing them over the center to create 6 ‘pizza slices’.
- Apply your chosen dye colors to each wedge. You can alternate colors for a classic look or get creative.
- Bag it, let it sit for 12-24 hours, then rinse and wash.
Technique 4: The Low-Effort Scrunch/Crumple
This is the most forgiving technique and it’s perfect for beginners or for hiding stains. It produces a mottled, cloud-like effect.
- Simply scrunch your damp garment into a tight, random shape on a flat surface.
- Use rubber bands to hold the scrunched shape together. Don’t think too hard about it; just wrap them around to keep it compressed.
- Randomly squirt your dye colors all over the fabric bundle. Be sure to flip it over and get the other side.
- The usual routine: let it sit for 12-24 hours in a bag, then rinse and wash. The result is a perfectly imperfect design every time.
From Hobby to Hustle: Turning Tie-Dye into Cash
Once you’ve mastered the craft, you’ll start seeing dollar signs. People pay good money for unique, hand-dyed clothing. What started as a way to save money can quickly become a way to make money. Here’s how to flip your skill into a profitable side hustle.
Finding Your Market
- Etsy: The go-to platform for handmade goods. The competition is high, but so is the customer base. High-quality photos and unique designs are key.
- Instagram/TikTok: Use social media as your storefront. Create satisfying process videos (ice dye reveals are huge!) to attract followers and sell directly through DMs or a linked Shopify store.
- Local Craft Markets: A great way to sell in person, get direct feedback, and build a local following. People love to see and feel the products before buying.
- Facebook Marketplace: Perfect for selling locally without fees. You can offer custom work on items people already own for a service fee.
Pricing Your Work for Profit
Don’t just guess. You need to pay yourself for your time and skill. A simple formula is: (Cost of Supplies) + (Your Time x Hourly Rate) = Wholesale Price. Then, Wholesale Price x 2 = Retail Price. Even if your ‘hourly rate’ is just $15/hour, it ensures you’re actually making a profit.
| Item | Base Cost (Shirt + Dye) | Time Spent | Your Price (Example) | Potential Profit |
|---|---|---|---|---|
| Custom T-Shirt | $7.00 | 30 minutes | $25.00 – $35.00 | $18.00 – $28.00 |
| Custom Hoodie | $15.00 | 45 minutes | $50.00 – $70.00 | $35.00 – $55.00 |
| Baby Onesie Set (3-pack) | $10.00 | 1 hour | $40.00 | $30.00 |
Scam Warning: Watch out for ‘gurus’ selling expensive courses on how to start a tie-dye business. All the info you need is free online. Also, be wary of drop-shipping requests that ask you to pay upfront for large quantities of shirts for a ‘guaranteed’ buyer. If it sounds too good to be true, it is. Trust your gut and build your business organically.
Conclusion
You now have the complete playbook. You see that pile of ‘old clothes’ not as trash, but as a stack of blank canvases and uncashed checks. You’ve learned how to source materials like a pro, how to execute modern designs that kill, and how to turn this skill into a real-deal side hustle. The power to transform your wardrobe and your bank account is literally in your hands.
So, what are you waiting for? That boring white shirt isn’t going to dye itself. Stop letting good clothes and good money go to waste. Grab your gear, get creative, and start turning your closet into a cash-saving, style-making machine. You got this.