Transform Your Tiny Balcony: 10 Budget Friendly Hacks You Need To See
Look outside at that tiny slab of concrete attached to your apartment. Most people see a dead zone—a place for a sad, forgotten chair or a rusty bike. We see prime real estate. That’s your private outdoor escape, your morning coffee spot, your after-hustle chill zone. You don’t need a fat wallet to claim it; you just need a little grit and some killer ideas. Forget dropping hundreds on overpriced patio sets and designer planters. We’re about to show you how to flip that space with 10 high-impact, low-cost hacks. This isn’t about just making it ‘nice’; it’s about making it yours. Get ready to level up your living space without emptying your bank account.
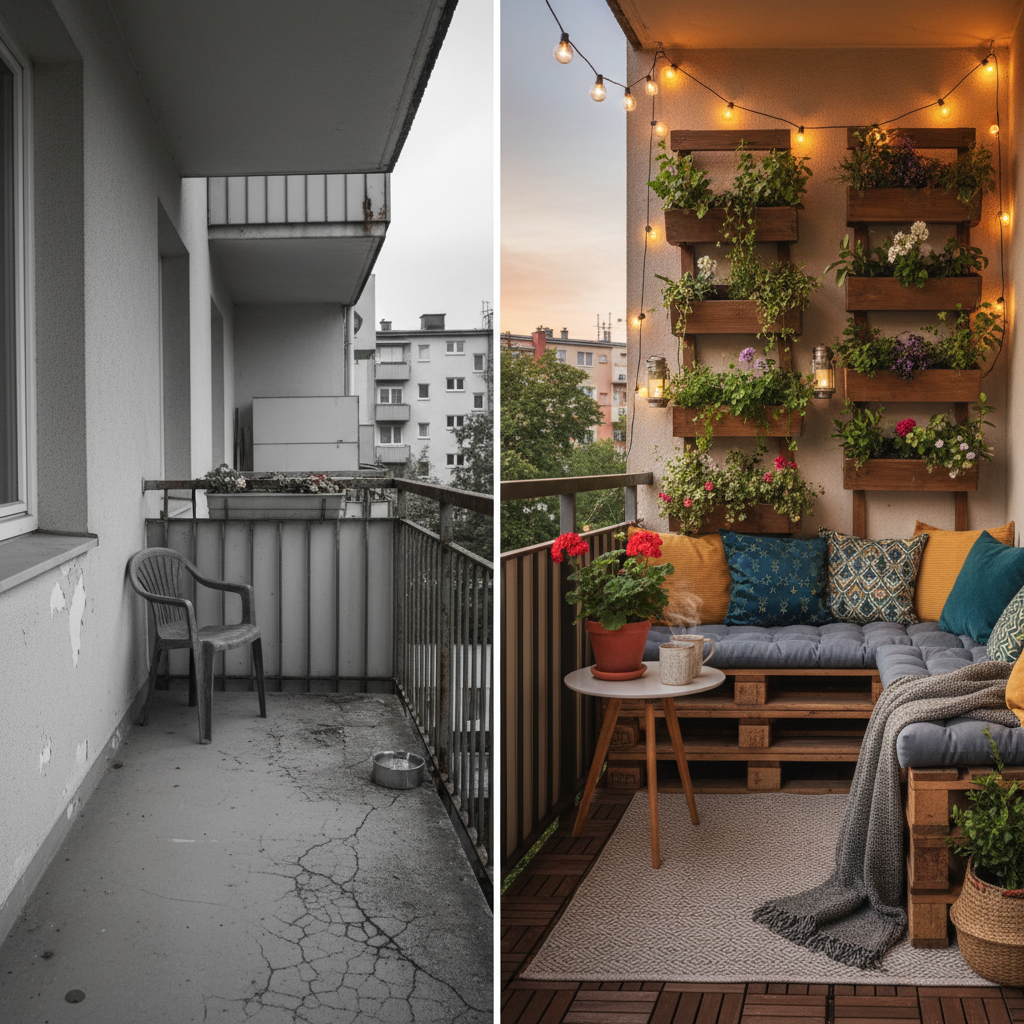
Hack #1: The Vertical Garden Revolution
Go Up, Not Out
Floor space on a tiny balcony is like gold. Don’t waste it on bulky pots. The smartest move you can make is to go vertical. A vertical garden not only saves precious square footage but also creates a lush, living wall that adds privacy and a serious ‘wow’ factor. It looks expensive, but it’s one of the cheapest high-impact projects you can tackle.
The Game Plan: Pallet Power
Wooden pallets are the frugal hacker’s best friend. Businesses often give them away for free. Look behind supermarkets or on local marketplace sites. Make sure you grab one stamped with ‘HT’—that means it’s heat-treated, not chemically treated, making it safe for planting.
- Prep Your Pallet: Give it a good scrub with soap and water. Once dry, sand down any rough spots to avoid splinters. You can paint or seal it for a more polished look and weather protection, but the rustic vibe is cool, too.
- Create Your Pockets: Lay the pallet flat. You’ll need some landscape fabric. Staple it along the back, bottom, and front of the inside of each slat, creating pouch-like openings on one side. This is where your soil and plants will live. Leave the top opening clear.
- Fill ‘er Up: Stand the pallet upright. Fill each fabric pocket with good-quality potting soil. Pack it in, but not too tightly.
- Plant Your Garden: Now for the fun part. Fill your pockets with flowers, trailing vines, or even herbs and lettuces. Think about a mix of textures and colors for the best look.
Cost Breakdown: DIY vs. Store-Bought
| Item | DIY Pallet Garden Cost | Store-Bought Vertical Planter Cost |
|---|---|---|
| Vertical Structure | Pallet (often $0) | Plastic/Metal Tower ($75 – $200) |
| Landscape Fabric | One roll (~$10) | Included |
| Staple Gun/Staples | (Assume you have one, or borrow) $0 – $20 | N/A |
| Soil & Plants | ~$30 | ~$30 |
| Total Investment | ~$40 | $105 – $230+ |
Hack #2: Upcycled Crate Seating
The Throne You Build Yourself
Outdoor furniture costs a fortune and rarely fits the weird dimensions of a tiny balcony. The solution? Build your own. Don’t worry, you don’t need a workshop. With a few wooden crates, you can create a custom bench or seating area that fits your space perfectly and has hidden storage to boot. It’s a weekend project that pays off every single time you sit down to enjoy your new oasis.
The Game Plan: The Crate Bench
You can find wooden crates at craft stores, home improvement stores, or sometimes for cheap/free on local online marketplaces.
- Get Your Crates: You’ll need at least four sturdy wooden crates. Ensure they’re strong enough to hold an adult’s weight.
- Design Your Layout: Arrange the crates to create your bench. A simple layout is two on the bottom, side-by-side, and two on top, creating a rectangular bench with cubbies for storage.
- Secure Everything: This step is non-negotiable. Use wood glue and screws to fasten the crates to each other securely. You want this thing to be rock solid. For extra stability, you can attach a flat piece of plywood to the top.
- Sand and Seal: Sand everything down to a smooth finish. Apply a few coats of outdoor-grade paint or sealant to protect it from the elements. Go for a bold color or a classic wood stain.
- Add Comfort: Get a piece of foam cut to size at a craft store and cover it with weather-resistant fabric for a no-sew cushion. Or, just toss on some cheap outdoor pillows.
Pro Tip: Arrange the crates with the openings facing out. Boom. You’ve got built-in storage for gardening tools, outdoor blankets, or citronella candles.
Hack #3: Floor Flip with Deck Tiles
Kill the Ugly Concrete
Nothing kills the vibe of an outdoor space faster than a stained, grey concrete floor. It’s cold, ugly, and uninviting. You might think you’re stuck with it, but you’re not. The fastest, easiest, and rental-friendly way to upgrade your floor is with interlocking deck tiles. They snap together like LEGOs, require zero tools, and instantly make the space feel like a high-end deck.
The Game Plan: Snap and Go
Interlocking tiles come in wood, composite, and even artificial grass styles. Measure your balcony’s square footage before you shop to know how many you need.
- Clean the Surface: Sweep your balcony floor thoroughly. Get rid of all dirt, leaves, and debris.
- Start in a Corner: Begin in one corner and lay your first tile.
- Snap Them Together: Take your next tile and align the interlocking tabs. Press down firmly until you hear a ‘click’. That’s it. You’ve connected them.
- Continue the Pattern: Keep adding tiles until you’ve covered the entire floor.
- Cut to Fit (If Needed): If you have an oddly shaped space, you may need to cut the last row of tiles. A simple handsaw is usually all you need for wood or composite tiles.
The best part? When you move, you can just unsnap them and take them with you. It’s an investment in your comfort that isn’t tied to one apartment. For a super-budget option, a large, colorful outdoor rug can also do the trick for a fraction of the cost.
Hack #4: Solar-Powered Mood Lighting
Set the Mood for Free
Good lighting is a total game-changer. It turns a functional space into a magical one. But who wants to deal with extension cords and higher electricity bills? Nobody. The answer is solar power. Solar-powered string lights, lanterns, and pathway lights soak up the sun during the day and automatically turn on at dusk, giving you beautiful ambiance for absolutely zero running cost.
The Game Plan: Let There Be (Solar) Light
This is less of a ‘how-to’ and more of a ‘what-to-get’.
- String Lights: These are a classic for a reason. Drape them along the railing, weave them through your vertical garden, or string them overhead. Look for ‘Edison bulb’ styles for a warm, vintage glow.
- Solar Lanterns: Place a few solar lanterns on a side table or on the floor in the corners to create pools of light.
- Fairy Lights: For a more delicate look, wrap solar-powered fairy lights (the ones on a thin copper wire) around planters or railings.
Key Rule: Placement of the solar panel is everything. Make sure the small solar panel attached to your lights is positioned where it will get at least 6-8 hours of direct sunlight per day. No sun, no power.
You can get a great set of solar string lights for $15-$30. That’s a one-time purchase for nightly ambiance. No electrician, no hassle, just pure, free mood lighting.
Hack #5: Instant Privacy Screen
Create Your Private Oasis
It’s hard to relax when you feel like you’re on display for the entire apartment complex. Privacy is essential for making your balcony feel like a true extension of your home. Forget expensive construction. You can create an effective and stylish privacy screen in an afternoon with a few simple materials.
The Game Plan: Bamboo Barricade
One of the cheapest and most effective materials is a roll of bamboo or reed fencing, available at most garden and home improvement stores.
- Measure Your Railing: Use a tape measure to determine the length and height of the area you want to cover.
- Buy Your Roll: Purchase a roll of bamboo fencing that matches your measurements. They typically come in 6 to 8-foot lengths.
- Attach Securely: Starting at one end, unroll the fencing along your balcony railing. Use heavy-duty zip ties or galvanized wire to attach the fencing to the railing posts every 12 inches or so. Make sure it’s pulled taut and secured at the top, middle, and bottom for stability against wind.
A roll of bamboo fencing can cost as little as $25-$40 and takes less than 30 minutes to install. Other options include outdoor fabric stretched and secured with grommets, or installing a couple of wooden lattice panels.
Hack #6: Personality-Packed Upcycled Planters
Trash to Treasure Planters
Don’t spend $20 a pop on boring terracotta pots. Your next favorite planter might be sitting in your recycling bin. Upcycling old containers is not only ridiculously cheap (as in, free), but it also injects a ton of personality and unique style into your space. It’s sustainable, it’s creative, and it’s a conversation starter.
The Game Plan: Anything is a Planter
Before you toss something, ask yourself: ‘Can I put a plant in this?’
- Tin Cans: Old coffee cans or large soup cans are perfect. Peel off the label, punch a few holes in the bottom for drainage with a hammer and nail, and give them a coat of spray paint in a vibrant color.
- Old Boots: A worn-out rain boot or hiking boot makes a quirky and surprisingly durable planter for a single plant. Just drill drainage holes in the sole.
- Colanders: Metal or plastic colanders already have drainage holes! They are perfect for plants that like well-drained soil. Hang them up for a unique hanging basket.
- Tea Kettles & Mugs: Cracked a favorite mug? Don’t toss it. Use a special drill bit for ceramic to add a drainage hole and give it a new life as a tiny succulent planter.
Critical Step: No matter what you use, you MUST add drainage holes to the bottom. Without them, water will pool and cause root rot, killing your plants. No exceptions.
This hack is all about creativity. The cost is practically zero if you use what you have, plus a few bucks for a can of spray paint. It’s the ultimate frugal flex.
Hack #7: The Fold-Down Bar Top
The Multi-Purpose Perch
A table is great, but on a tiny balcony, it’s a space hog. What you need is a surface that’s there when you need it and gone when you don’t. A simple fold-down bar or table mounted to the railing or wall is a genius solution. It’s your morning coffee spot, your work-from-home standing desk, and your evening drink perch, all without permanently eating up your floor space.
The Game Plan: DIY Folding Shelf
This requires a little bit of DIY, but it’s a straightforward project.
- Get Your Materials: You’ll need a piece of wood for the tabletop (a 1×10 or 1×12 board cut to your desired length works well), two sturdy folding shelf brackets, screws, and a drill.
- Prep the Wood: Sand the wood smooth and apply several coats of outdoor sealant or paint to protect it from weather. Let it dry completely.
- Mount the Brackets: Attach the folding brackets to the wall or a solid part of your railing structure, ensuring they are level. Follow the instructions that come with the brackets; they’re designed to be easy to install.
- Attach the Tabletop: Place your wooden board on top of the extended brackets. Secure it by drilling screws up from the bottom of the bracket into the wood.
Now you have a sturdy surface that folds down flat and out of the way when not in use. The brackets might cost you $20-$30, and a piece of wood another $10. For under $50, you’ve added massive functionality to your space.
Hack #8: The Thrift Store Decor Hunt
Find Gold in the Old
Decor is what makes a space feel finished, but it can also be a money pit. The secret weapon of frugal decorators everywhere is the thrift store. People get rid of amazing, high-quality stuff all the time. With a bit of patience and a creative eye, you can find unique, weather-resistant pieces for your balcony for just a few dollars.
Your Thrift Store Hit List:
- Watering Cans: Look for vintage metal watering cans. They are functional and look incredible as decor, developing a beautiful patina over time.
- Ceramic Pots & Vases: The prices are a fraction of what you’d pay new. Look for interesting shapes and colors. Don’t worry about small chips; they add character.
- Metal Lanterns or Candle Holders: Wrought iron or other metals hold up well outside. Pop in a battery-operated candle for safe, easy ambiance.
- Small Side Tables: A small metal or solid wood plant stand can be easily weatherproofed with a can of spray sealant and used as a tiny side table.
- Wall Art: Look for metal wall sculptures or decorative tiles that can withstand the elements.
A successful thrift store haul is about seeing potential. That ugly brass lantern? A can of black spray paint makes it modern and chic. That dated plant stand? A bright color makes it a statement piece. For less than $25, you can often walk out with a carload of unique decor that makes your balcony look curated and personal.
Hack #9: A Practical & Pretty Herb Garden
Grow Your Groceries
An herb garden is the ultimate frugal hack because it literally pays you back. Why spend $3 on a plastic packet of basil from the grocery store when you can have an endless supply right outside your door? Fresh herbs elevate your cooking, smell amazing, and are surprisingly easy to grow, even in a small space. It’s a project that’s both beautiful and practical.
The Game Plan: Easy-Grow Herbs
Start with a few simple railing planters or a window box. Fill with good potting mix and choose herbs that are known for being low-maintenance.
Top 5 Balcony-Friendly Herbs:
- Mint: Almost impossible to kill. Keep it in its own pot, as it spreads aggressively. Perfect for teas and cocktails.
- Basil: Loves sun. The more you harvest the leaves, the more it grows. A must-have for pasta and pizza nights.
- Rosemary: A hardy, woody herb that loves sun and tolerates a bit of neglect. Great for roasting meats and vegetables.
- Chives: A mild onion flavor that’s perfect for eggs, potatoes, and salads. They’ll come back year after year.
- Thyme: A low-growing, drought-tolerant herb that’s perfect for a variety of dishes. Lemon thyme is especially fragrant.
You can buy starter plants for a few dollars each. For an initial investment of around $20 for a planter, soil, and a few plants, you could save over $100 in a single growing season on fresh herbs. That’s a return on investment you can taste.
Hack #10: The No-Sew Comfort Zone
Cushion Your Chill Spot
Comfort is key. A hard bench or chair isn’t inviting, no matter how good it looks. Custom outdoor cushions are ridiculously expensive, but you can create your own for cheap, even if you can’t sew a straight line. The secret is using the right fabric and a clever, no-sew technique.
The Game Plan: DIY Envelope Cushions
This method creates a removable, washable cover for your cushions.
- Source Your Insides: Don’t buy new foam if you don’t have to. Use old pillows, folded-up blankets, or even buy cheap pillows from a discount store.
- Get the Right Fabric: This is crucial. Buy outdoor fabric. It’s water-resistant, fade-resistant, and mildew-resistant. It costs more per yard than regular cotton, but it will last.
- Measure and Cut: Lay your fabric flat. Place your cushion insert in the middle. You want enough fabric to wrap all the way around the cushion, plus an extra 6-8 inches of overlap (like you’re wrapping a present). Trim the excess.
- Fold and Secure: Fold the fabric tightly around the cushion insert, creating a neat envelope-like fold on the back. Use heavy-duty, iron-on hem tape or fabric glue to secure the overlapping seams. For extra security, you can add a few strips of Velcro.
You now have a durable, custom-fit cushion that looks professional. It’s the final touch that transforms your DIY seating from a ‘project’ into a plush, comfortable spot you’ll never want to leave. This project saves you a ton compared to retail.
Cost Breakdown: DIY vs. Store-Bought Cushion
| Item | DIY No-Sew Cushion Cost | Store-Bought Outdoor Cushion Cost |
|---|---|---|
| Cushion Insert | Old Pillow ($0) or Discount Pillow ($5) | Included |
| Outdoor Fabric | 1 Yard (~$15) | Included |
| Hem Tape/Velcro | ~$5 | N/A |
| Total Investment | ~$20-$25 | $40 – $75+ (for a similar size) |
Conclusion
There you have it—10 real-world, no-fluff hacks to take your balcony from zero to hero without a trust fund. That small outdoor space isn’t a liability; it’s an asset waiting for you to cash in. You don’t need to be a master carpenter or a design guru. You just need to be willing to get a little creative and put in a little work. By upcycling, choosing smart materials like solar lights and deck tiles, and thrifting like a pro, you can build a legit outdoor oasis for less than the cost of a few fancy dinners out. So pick a hack, put on some music, and go reclaim your space. You’ve earned it.