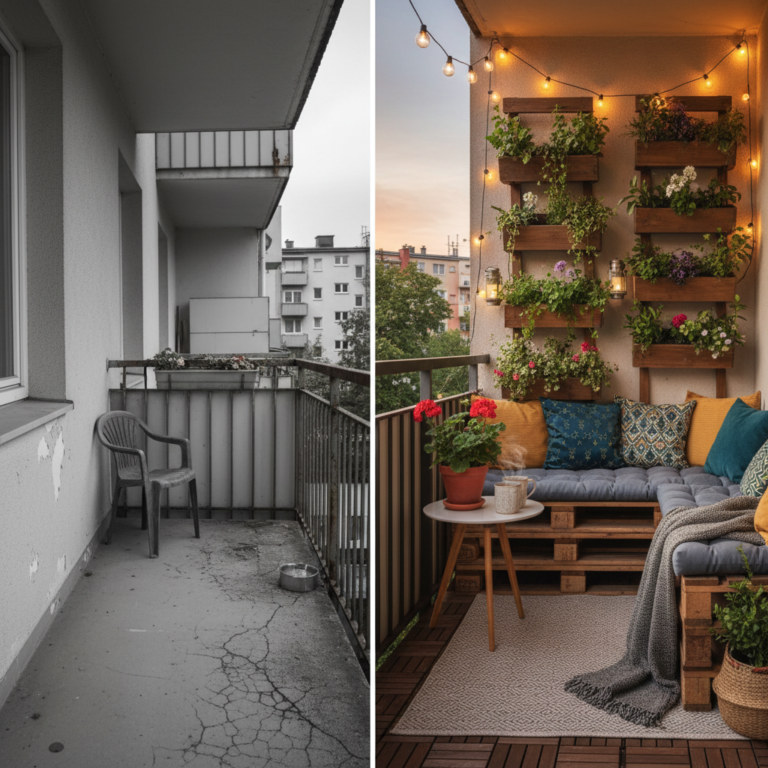
7 Dollar Store Porch Makeover Ideas Your Neighbors Will Envy
Let’s get real. You scroll through Pinterest, see those magazine-worthy porches, and then you see the price tags on the decor and want to cry. A single high-end planter can cost more than your weekly grocery budget. But here’s the secret the big-box stores don’t want you to know: you can get that same jaw-dropping, neighbor-envying curb appeal for less than the cost of a few fancy coffees. The game plan? Your local dollar store.
Forget flimsy party supplies and questionable snacks. The dollar store is a goldmine of raw materials just waiting for a glow-up. It’s not about what the items are; it’s about what they can become with a little hustle and creativity. This isn’t about settling for cheap-looking decor. This is about being smarter than the system. It’s about transforming $1.25 finds into decor that looks like it came from a high-end boutique. Ready to turn your porch into the talk of the town without wrecking your budget? Let’s dive into the seven hacks that will get it done.
Hack #1: The ‘Looks-Like-a-Million-Bucks’ Planter Hack
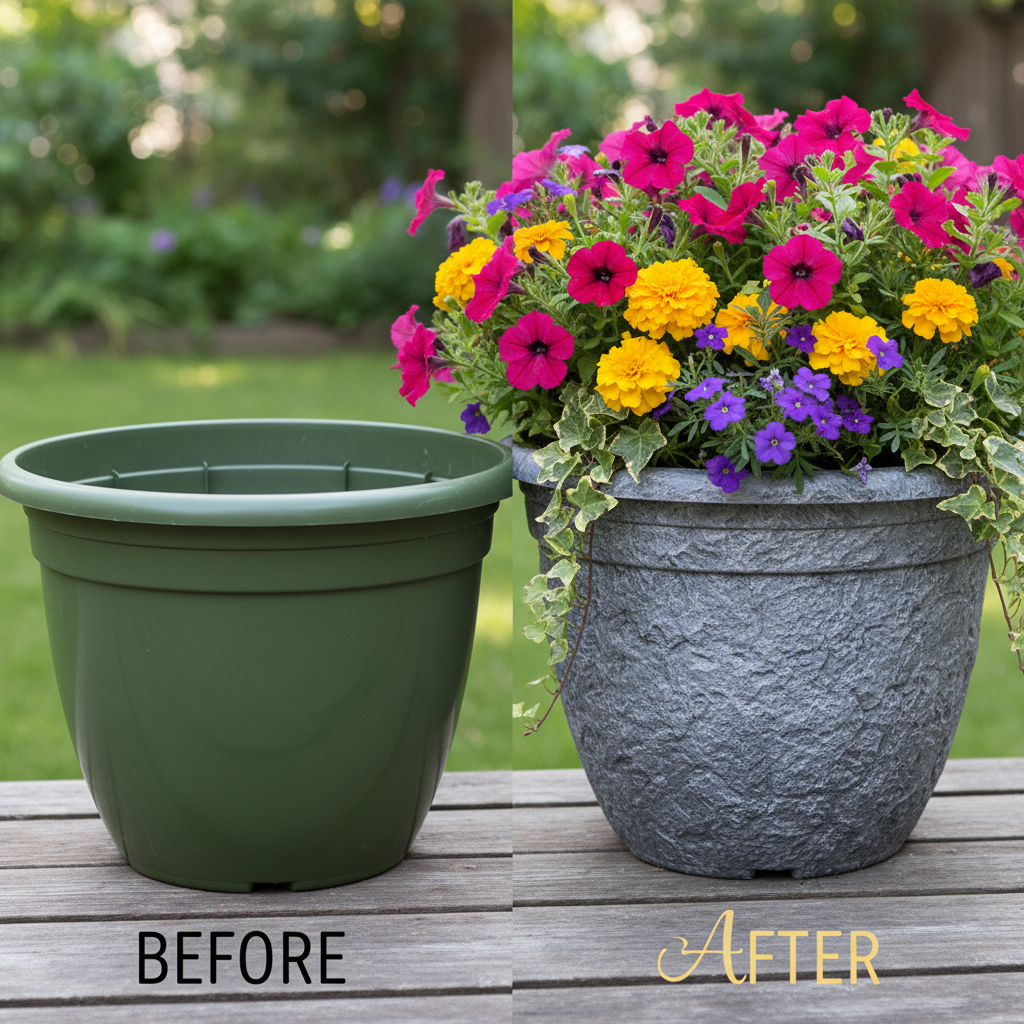
Plain plastic planters from the dollar store are your blank canvas. They might look cheap on the shelf, but with the right moves, they can mimic the look of aged terracotta, concrete, or even chic metal. This is the number one way to add instant sophistication to your porch.
The Materials You’ll Need:
- Plastic planters from the dollar store
- A can of spray paint primer (this is non-negotiable for plastic)
- Your choice of spray paint: matte black, metallic copper, or a textured stone-finish paint
- Optional: A small tub of joint compound or spackle
- Optional: A bit of dirt and a rag for an ‘aged’ look
The Step-by-Step Takedown:
- Prep is Everything: First, clean those plastic pots with soap and water to get rid of any dust or greasy film. Let them dry completely. If you want a textured, old-world look, now’s the time to get messy. Slap on a thin layer of joint compound with your hands or a putty knife. Don’t make it perfect; you want those lumps and bumps. Let it dry for 24 hours.
- Prime Time: Take your planters outside or to a well-ventilated area. Apply a light, even coat of spray primer. This step is critical—it gives the color paint something to grip onto, so it won’t just peel off in a week. Let it dry according to the can’s instructions.
- The Color Transformation: Now for the magic. Hit the planters with your color spray paint. For a modern look, go with matte black. For a rustic farmhouse vibe, try a metallic copper or bronze. For that heavy, expensive stone look, use a textured stone spray paint. Apply two light coats instead of one heavy one to avoid drips.
- The Aging Process (Optional): If you want them to look authentically aged, wait for the paint to dry, then rub a little bit of actual dirt into the crevices and wipe it off with a damp rag. It’ll leave behind a subtle patina that makes the planters look like they’ve been in your family for years.
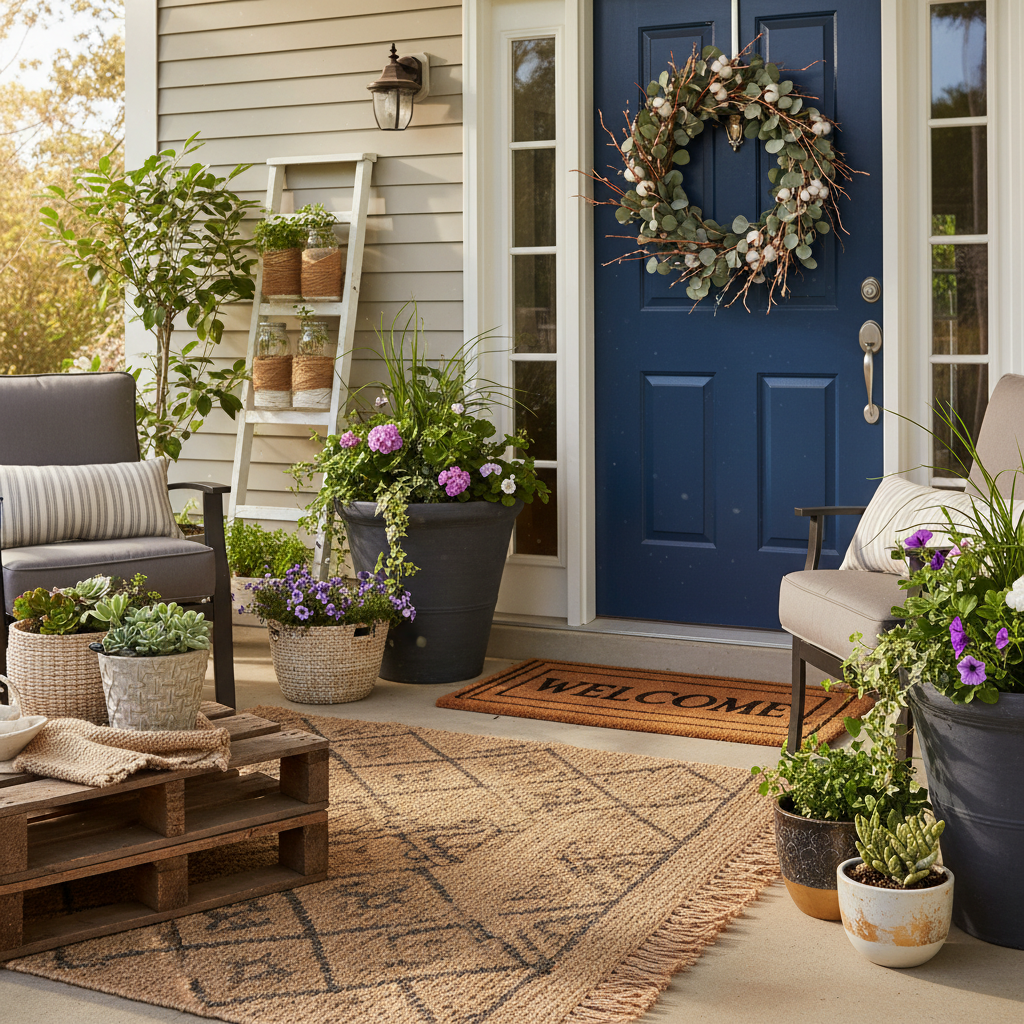
Hack #2: The Layered Welcome Mat That Screams ‘Style’

A single, sad welcome mat is a missed opportunity. The pros know that layering is the key to a welcoming and stylish entryway. This hack combines two dollar store finds to create a look that’s straight out of a home decor catalog.
What to Grab:
- A plain, natural coir welcome mat
- A slightly larger, flat-weave outdoor rug or placemat with a pattern (think stripes, buffalo check, or a geometric design)
- Optional: A stencil and black acrylic or outdoor craft paint
The Assembly Instructions:
- Build Your Base: The foundation of this look is the bottom rug. Place the larger, patterned rug where you want your mat to go. Make sure it’s centered and straight. The dollar store often has larger placemats or small kitchen rugs that work perfectly for this.
- Layer Up: Place the plain coir mat directly on top of the patterned one. The goal is to have the pattern of the bottom rug peeking out on all sides, creating a stylish border. This simple trick adds depth and visual interest instantly.
- Customize It (The Extra Mile): Want to really own the look? Create a custom message on the top mat. Grab a letter stencil and some black outdoor craft paint. Tape the stencil down firmly and use a dabbing motion with a foam brush to apply the paint. Go for a classic “Welcome,” a cheeky “Hello,” or your last name. Let it dry completely before putting it out.
Key Rule: Ensure both mats are rated for outdoor use to prevent them from getting moldy or falling apart after the first rainstorm.
Hack #3: Craft a Custom Wreath (Without the Craft Store Price Tag)

A beautiful wreath on the front door is like the perfect piece of jewelry—it completes the outfit. But boutique wreaths can cost upwards of $100. You can make one that looks just as good for under $10 using supplies from the dollar store’s craft aisle.
Your Supply List:
- A wire or grapevine wreath form
- 3-4 bunches of faux florals and greenery (look for varied textures and sizes)
- Floral wire or a hot glue gun with glue sticks
- A spool of wide ribbon for a bow
The Frugal Tutorial:
- Create a Green Base: Start with your greenery. Cut the stems off the main bunch, leaving a few inches to work with. Attach the greenery to the wreath form using floral wire, making sure all the stems point in the same direction, flowing around the circle. Cover the entire form to create a full, green base.
- Add Your ‘Thrillers’: Now, add your main, largest flowers. These are your statement pieces. Tuck them into the greenery and secure them with hot glue or wire. Distribute them evenly around the wreath, or create a focal point by clustering them on one side.
- Use ‘Fillers’ to Add Fullness: Next, use your smaller flowers and textured pieces (like faux berries or lavender) to fill in any gaps. This is what makes the wreath look lush and professional. Step back every few minutes to look at it from a distance to ensure it’s balanced.
- The Finishing Touch: Make a big, beautiful bow from your ribbon and attach it to the top or bottom of the wreath with floral wire. Leave long tails for a dramatic effect. Create a small loop of wire on the back for easy hanging.
Hack #4: Glow Up Your Walkway with Upgraded Solar Lighting
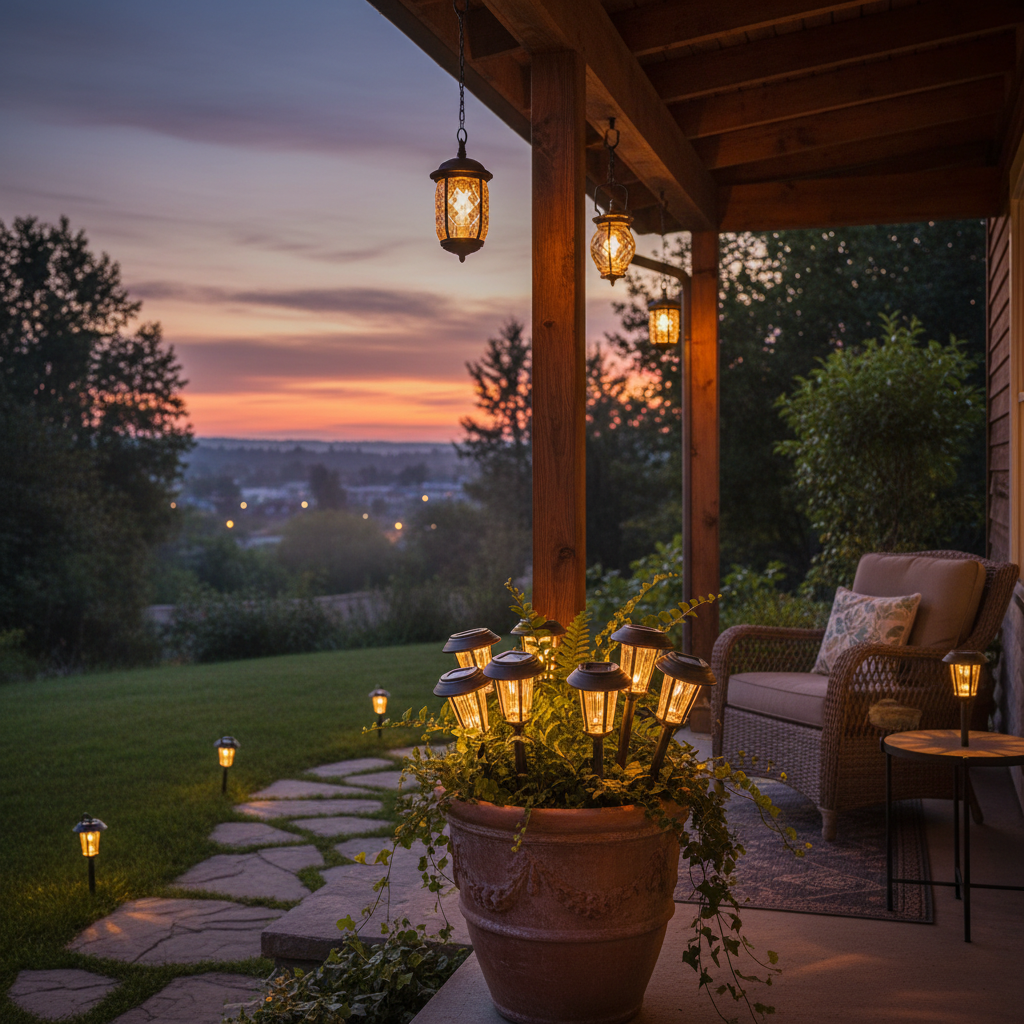
Those cheap plastic solar stake lights can look tacky when just stuck in the ground randomly. But with a little strategic thinking, they can provide a warm, ambient glow that makes your home look safe and inviting. The trick is to treat them as a design element, not just a light source.
The Game Plan:
- Group for Impact: Instead of a runway of single lights lining your path, buy 8-10 of them and cluster them together. Place a dense grouping inside a large planter on either side of your door. The concentrated light creates a dramatic, high-end effect.
- Get a Can of Spray Paint: The number one thing that makes solar lights look cheap is the black or grey plastic housing. A quick coat of metallic or oil-rubbed bronze spray paint can make them look like expensive metal fixtures. Just tape off the solar panel and the clear plastic light cover before you spray.
- Think Beyond the Ground: Who says solar lights have to go in the ground? Use zip ties or wire to attach them to porch railings. Hang them from shepherd’s hooks. Place the solar stake part inside a hanging basket to illuminate your flowers from within. This unexpected placement elevates the look immediately.
Hack #5: The High-End House Number Sign No One Will Believe is DIY
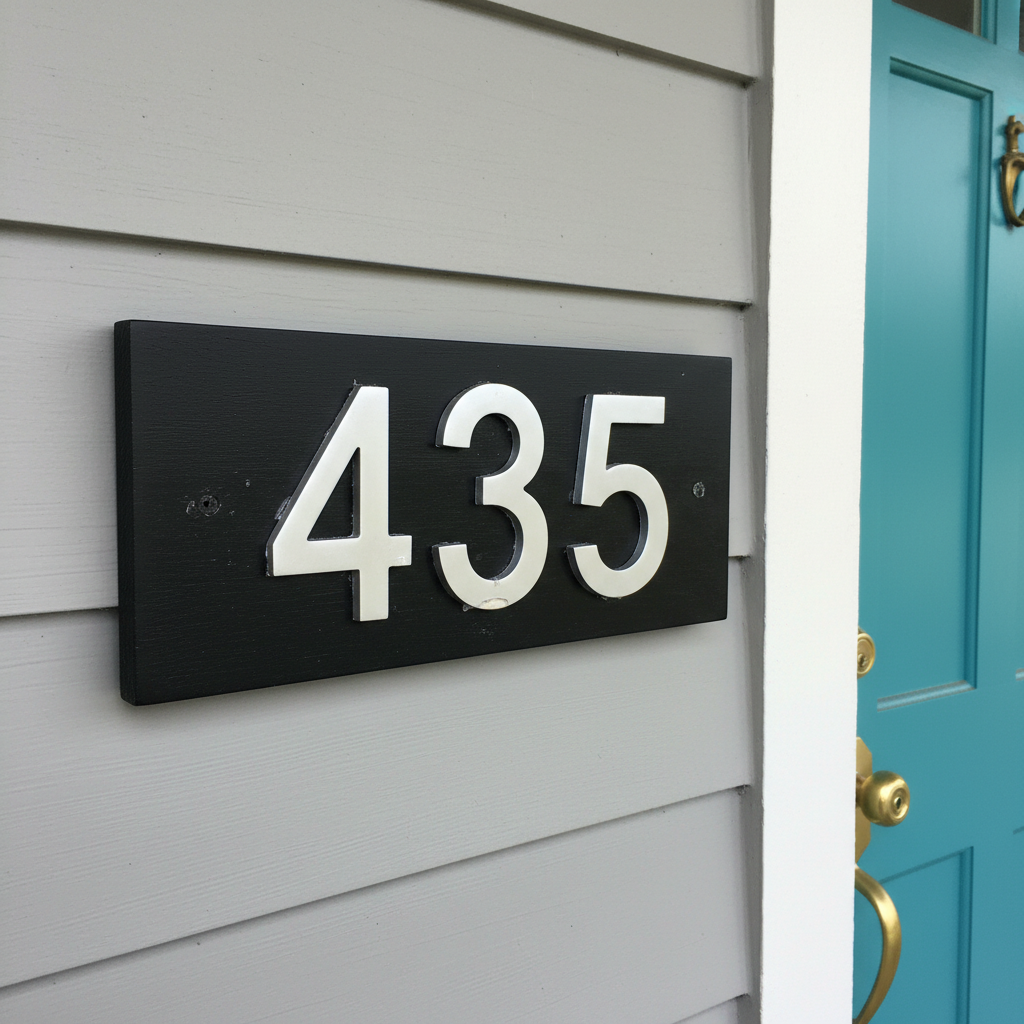
Is your house number just a set of peeling stickers on your mailbox? A custom house number sign is a small detail that makes a huge impact on your home’s perceived value and style. It’s an afternoon project that delivers a major upgrade.
The Materials:
- A wooden plaque, cutting board, or large, flat picture frame from the dollar store
- A set of house numbers (the dollar store sometimes has these, or you can find cheap ones at a hardware store)
- Outdoor craft paint or spray paint in your desired color (e.g., black, white, or navy blue)
- Strong, waterproof glue like E6000 or Gorilla Glue
- A can of clear, weatherproof sealant spray
The Build-Out:
- Prep Your Plaque: If you’re using a wooden plaque, give it a light sanding. Paint it with two coats of your chosen color, letting it dry completely between coats.
- Plan Your Layout: Arrange your numbers on the plaque. Use a ruler to make sure they are perfectly straight and evenly spaced. This is the most important step for a professional look. Use a pencil to make small, light marks where each number will go.
- Glue Them Down: Apply a generous amount of waterproof glue to the back of each number and press it firmly onto your marked spots. Wipe away any excess glue that seeps out. Let the glue cure for at least 24 hours.
- Seal the Deal: To protect your sign from sun, rain, and snow, apply two to three light coats of clear, weatherproof sealant spray. Let it dry completely. Add picture-hanging hardware to the back, and you’re ready to mount your custom, high-end-looking sign.
The Bottom Line: DIY vs. Retail Price Tags
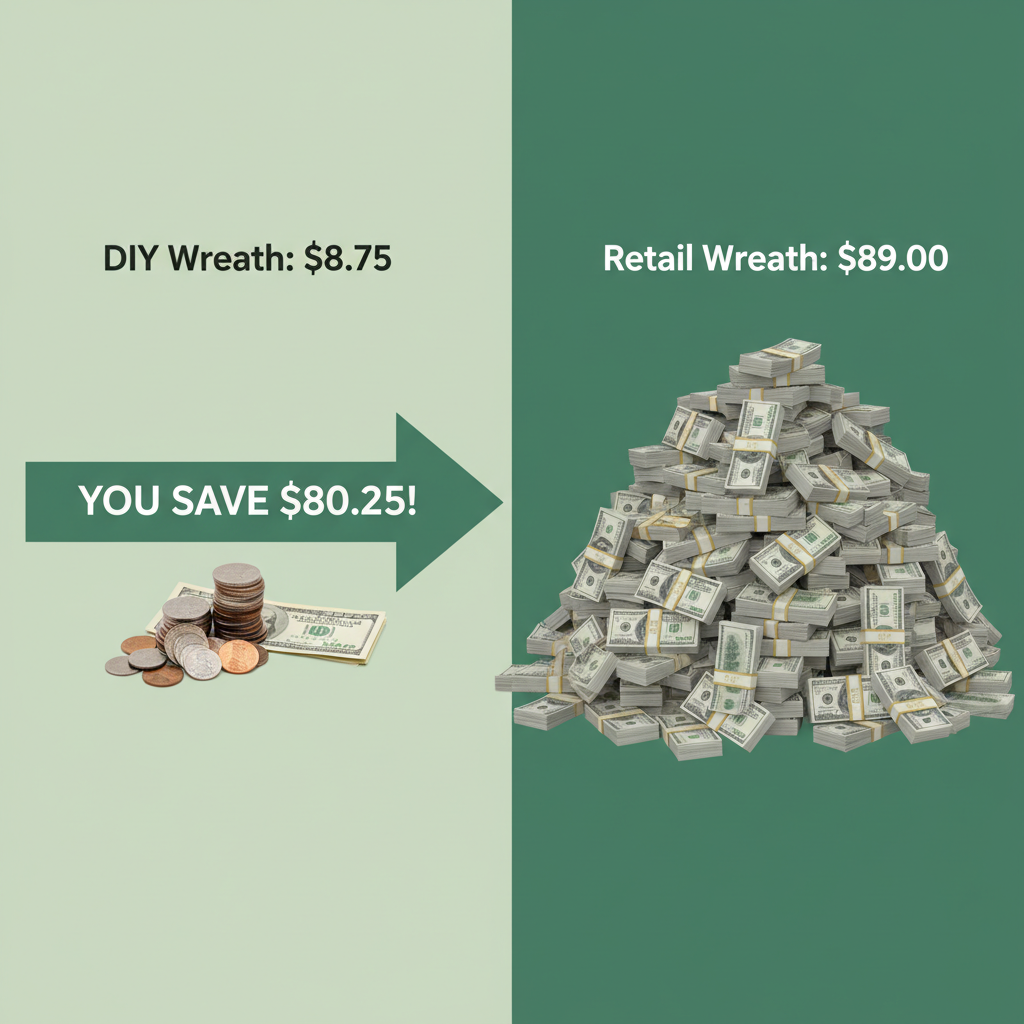
Still not convinced you can get a high-end look for less? Let’s break down the math on just one of these projects: the custom wreath. We’ll compare our dollar store DIY version to a similar-looking wreath from a popular home decor store. The numbers don’t lie.
| Item | DIY Dollar Store Cost | Retail Store Cost |
|---|---|---|
| Wreath Form | $1.25 | $89.00 (for a comparable, pre-made wreath) |
| Faux Greenery (2 bunches) | $2.50 | |
| Faux Flowers (2 bunches) | $2.50 | |
| Ribbon | $1.25 | |
| Floral Wire / Glue Sticks | $1.25 | |
| TOTAL COST | $8.75 | $89.00 |
| TOTAL SAVINGS | $80.25 | |
You’re saving over $80 on a single decor item! Imagine applying that same frugal-hacker mindset to your entire porch. The savings are massive, and the results are just as stunning. This is how you build a home you love without going into debt.
Hack #6: Build a Vertical Garden for Pennies
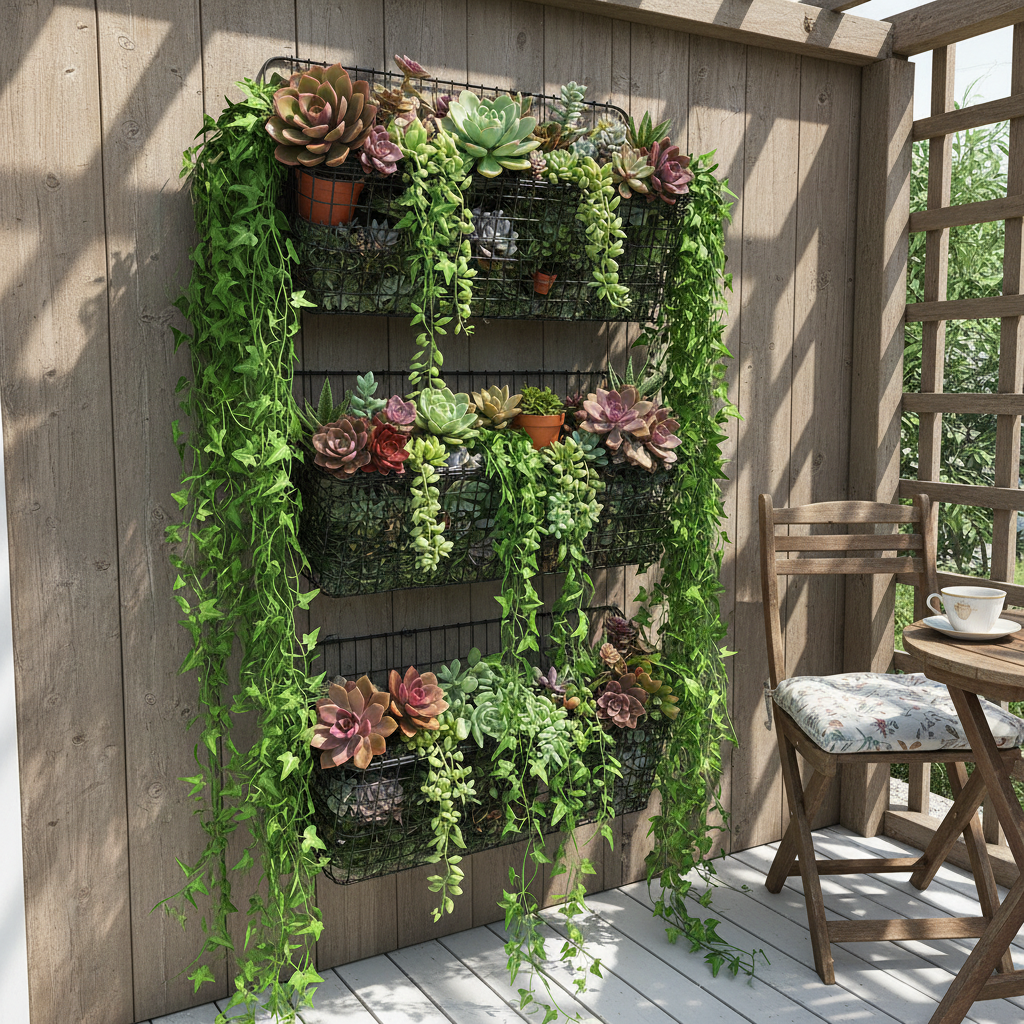
Don’t have a lot of floor space? Go vertical. A living wall adds texture, color, and life to a porch of any size. Using dollar store organizers, you can create a lush vertical garden for a tiny fraction of the cost of pre-made systems.
What You’ll Need:
- Wire baskets, plastic shower caddies, or fabric wall organizers
- Coco liners or landscape fabric
- Zip ties or screws for mounting
- Potting soil
- Small plants like succulents, herbs, or trailing ivy (check dollar store for faux options too!)
The Step-by-Step:
- Choose Your Location: Find a sunny spot on a wall or railing. Decide on your layout—will you hang three baskets in a row, or stagger them?
- Mount Your Containers: Securely attach your baskets or organizers to the wall. Use screws for a sturdy hold on wood or siding, or heavy-duty zip ties for railings.
- Line and Fill: Line each basket with a coco liner or a piece of landscape fabric to hold the soil in. Fill them about two-thirds full with good quality potting soil.
- Plant Your Garden: Gently remove your plants from their nursery pots and arrange them in the baskets. Fill in around them with more soil. Choose plants that ‘spill’ over the edge, like creeping Jenny or string of pearls, for a dramatic effect. If you have a black thumb, don’t be afraid to use high-quality faux plants—no watering required!
Hack #7: The Instant-Impact Seasonal Corner

You don’t need to redecorate your entire porch every season. The secret is creating one small, dedicated ‘vignette’ that you can easily swap out. This gives you that fresh, seasonal feel with minimal effort and cost.
The Formula for a Perfect Vignette:
- Find a Base: Start with a small stool, a wooden crate, or even a stack of two sturdy planters turned upside down. This creates a ‘stage’ for your decor.
- Add Height: Place your tallest item in the back. A tall lantern (with a battery-operated candle inside) or a vase with faux seasonal branches works perfectly.
- Layer in the Middle: Add your medium-sized, seasonal items. For fall, this could be a few faux pumpkins and gourds. For summer, maybe a small watering can and some faux lemons. For winter, a bundle of faux birch logs tied with twine.
- Finish with a ‘Spill’: Add something small in the very front that looks like it’s spilling out toward the viewer. A small sign, a bit of greenery, or a draped piece of burlap fabric can do the trick.
Street-Smart Tip: At the end of a season, when decor goes on clearance, hit the dollar store. You can get items for next year for pennies on the dollar. Smart shoppers plan ahead.
Conclusion
There you have it—seven knockout ideas that prove a beautiful porch is about hustle, not big bucks. Your neighbors will be stopping on the sidewalk, wondering which high-end design service you hired. Only you will know the secret is a handful of dollar bills and a shot of creativity. The power to create a home you’re proud of is already in your hands, not in your credit card balance. So pick a project, make a dollar store run, and get ready to transform your space. You’ve got this.